Embedded Files
ObjectiveNow that you have your blog design and look finished, you will now work on the layout and structure of the blog.Example: http://oakmeds.blogspot.comThe following is a the layout order for your Blogger:
Note: The gadget that says HTML/JavaScript is the LinkedIn Custom gadget that does not need a title.
Follow the directions below the image below to learn how to add the gadgets to your design layout page (most of the gadgets are correct in this example).
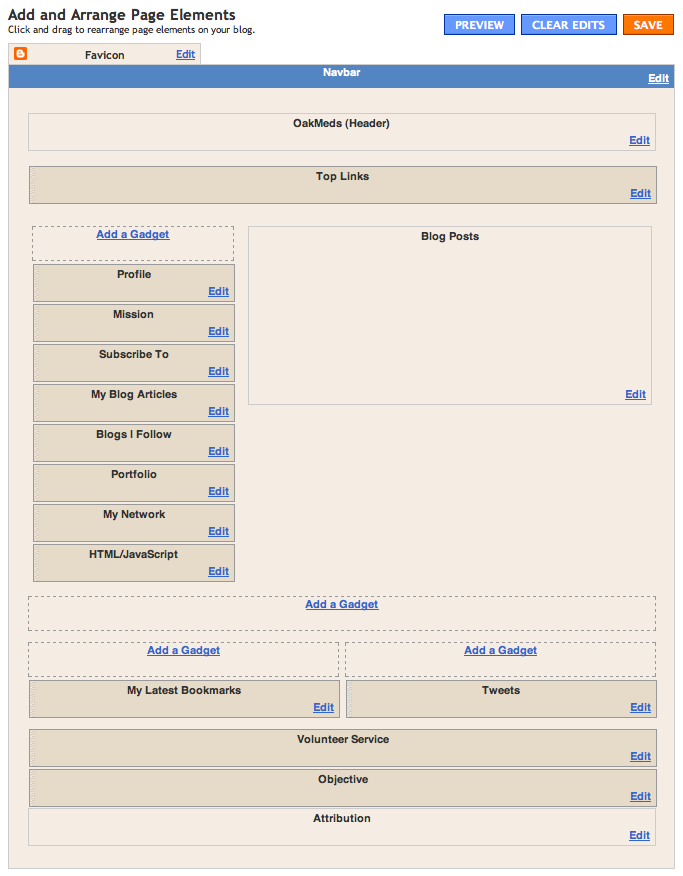
Insert the following Gadgets (bold headings below) into the layout of your blog. The names of the gadget boxes you see above are the titles that I have given each gadget.
Header
The header gadget is already in your layout, just edit it according to the following:
Create a header (text) using your unique name:
Blog Title: Your Me 2.0 name (e.g. DannyTunes)
Blog Description: Danny Lee's journey towards becoming a successful Music Manager (keep the same exact phrase but change the bold words)
Complete your Blog Profile Directions but do not fill out anything in the "About Me" text box in "Extended Info" that way no text will show up on your homepage like the image on the right.
Blog Posts
In the layout, click on "edit" for the large Blog Posts box in the center. Edit the Blog Post section with the following settings. Make sure you also arrange the items in the order as shown below.

Left Sidebar Column
Profile
Go to the "About Me" gadget that should already be on the left sidebar and click on the edit gadget button (icon of tools). Change the name to "Profile" and input the following settings like the screenshot. Your image of yourself should already be there if you followed the directions. If it is not, then click "View my complete profile" and then click on edit profile at the top right corner and add your photo.Text
Add the text gadget to the right or left side of the Blog Articles. Insert your mission statement (one sentence) as text with a title of "Mission." Choose your color and italicize it within quotation marks. Edit the HTML of the text to be 10pt font or use smaller appropriate font size.
Subscribe
Add the Subscription Links gadget and keep the default settings. Place it next to the Blog Post section. This way other people can follow your RSS feeds on sites like Netvibes.


Blog Articles
Click on the big orange "Post" button on the left side and post a Post a blank article (title it your Me 2.0 name and add the label or tag "articles." View your blog and you will see your article on the front page; click on the "articles" tag below your blank post. This will bring up all posts tagged as "articles" so in the future whenever you post an article to your Blogger, make sure you tag it as articles so they will all show up. Copy the URL after you clicked on the articles tag; it should look something like this:
www.yourme20name.blogspot.kr/search/label/articles
Then add the picture gadget. Type the title "My Blog Articles" and paste the URL link from the above article tag in the link box. Insert the image link for the photo:
http://3.bp.blogspot.com/_rsFNDCaENaU/S-ZtWmlM3AI/AAAAAAAAMXs/yCc3mGb_unI/S210/blogarticles.png
PortfolioAdd the title "Portfolio" for the gadget title. For the photo, use the photo link below
http://lh4.ggpht.com/_rsFNDCaENaU/S_S4HbW2G7I/AAAAAAAANDE/XtXakZlazbc/TechIcon.png
For the link add your Posterous www.ca3gary14.posterous.com). If you have not made the site already as part of the checkpoints, add the image icon but not the link.
NetVibes (Blogs I Follow)You should have already made a NetVibes account (you don't have to edit your NetVibes content page at this time). Add a picture gadget to the left side column and insert the following image link:
http://3.bp.blogspot.com/_rsFNDCaENaU/S-Ypd-uDalI/AAAAAAAAMXE/q2hAzoVaMSc/S150/netvibeslogo2.png
Then use the same picture to create a link to your Netvibes page "Blogs I Follow." Add the picture title "Blogs I Follow" for the gadget title. For the
Then go to your public Netvibes page; it should look like this with 2-3 blogs:
Copy your public Netvibes link and paste it in the same photo gadget under link.


Network
Having a group of students with similar career interests and passions is important to help motivate and give you new ideas. They also may be a good reference or of use in the future.
Choose three students in your class (can't be sitting in your row in the computer lab) or another computer class at the school that have the same or different career fields; these students will be in your network.
Choose the Link List gadget and type "My Network" for the gadget title. Add their Blogger link and type their name and Me 2.0 name (e.g. Joe Kim - FlyingPilot) as the title of their link. Click "Sort by alphabetical order" on the selection.

Bottom Gadgets
Left Bottom Column
Delicious (My Latest Bookmarks)
Add a custom HTML gadget and insert the following HTML.
<script type="text/javascript" src="http://feeds.delicious.com/v2/js/YourUserName?title=&icon=m&count=8&bullet=%C2%BB&sort=date&tags&name"></script>
In the code above, change the text YourUserName to your Delicious user name for Me 2.0.
Add the gadget title, My Latest Bookmarks.
Bottom Right Column
Add a gadget to the bottom right column. In gadgets, type Twitter Updates FeedWitter in the search box. Choose the latest version. For example, 2.2.1 is more recent than 2.2. View the gadget layout image at the top of this page to see where to place this Twitter gadget. Edit this gadget and enter your Twitter Me 2.0 name so it shows your Me 2.0 tweets. Your tweets should appear but retweets do not appear.
Bottom Center
Objective (Prezi)
Use a custom HTML gadget but do not use a title for this gadget. Paste the embed code (same Prezi embed code you emailed to your posterous when you finished it) and then change part of the embed code: width="830" height="450" (you will see and need to change this width and height twice in your code) or different values according to your blog size so that it fit nicely in the slot provided on your blogger.
Post the checkpoint
When you are finished, take a screenshot of your layout order and a screenshot of your homepage post to posterous with your Me 2.0 link to Posterous as well. Don't forget to always post the Posterous link to the spreadsheet.
Done!
YouTube Video (skip the YT video for now since you have not made it)
Use a custom HTML gadget but do not use a title for this gadget. Paste the embed code from YouTube and then change it to
ignore
ig

do not do:
Go get the HTML code for your LinkedIn badge (make sure you sign into your LinkedIn account first since you signed up in a previous checkpoint). Choose one of the following styles and copy the HTML code. Add an HTML gadget to the left or right sidebar and paste the code. Do not use a title.

Bottom Center
Picasa Photos (Volunteer Service)
Before you add the gadget to display photos, read the volunteer service directions and plan out which two volunteer activities you will use or plan to use (make a plan as to when you will take the photos because they will be due soon in a later checkpoint).
Eventually you will add and show your ten volunteer service photos to show the thumbnails at the bottom of the page above the attribution section. Although, you must still add the gadget now even without photos. Search for the gadget Picasa Photostream and choose to show ten thumbnail photos. If the entire photo does not appear on your Blogger and only part of it, that's okay.


be 350 x 300 or to fit nicely in the slot provided on your blogger.
Page updated
Google Sites
Report abuse