Embedded Files

Photography Tutorials
Many of these tutorials are simply reading or watching and then writing a short summary. Do not underestimate these tutorials! You will be using the concepts of these tutorials for the rest of the year and for the rest of the projects all year. So don't just read and watch...learn them because if you don't, it will show in your projects (low quality). Take good notes in your CA Book for the quizzes.
Composition Photo Process
When taking photos, first decide on your subject and how you want to lead the eye, then choose your composition setup (angle & shot), use the composition rules (e.g. rule of thirds), and finally, use other factors to achieve better composition.
Composition Overview
Tutorial 1A: Rule of Thirds

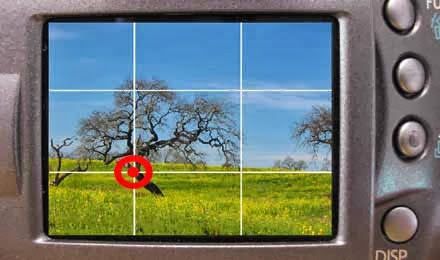
Complete the Rule of Thirds assignment and then take notes on Rule of Thirds, Symmetry, & Balance in class. Tutorial 1B: Angles & Shots
Review: Angles and Shots and make sure you have these notes when we learned them in quarter one. Then watch the video on angles and take additional notes. Take a screenshot from the video and explain in one sentence something specific you found interesting related to the photography content. Do not use the exact same screenshot or sentence that someone else previously wrote. These are very important as you will apply these throughout all of quarter two in your photography assignments and project.
Tutorial 1C:

Lighting You should have already taken notes on angles and shots in the previous tutorial. Take a page of notes for Principles of Lighting and Natural Lighting. You do not have to submit to Schoology but make sure you have good notes with illustrations for when they are checked after a future quiz.
Take Cornell notes (draw an example of each angle & shot like the notebook example below) on
Tutorial 2: Class Shoot Outside during class (if you are absent then take the photos outside of class) with the camera you brought you will take photos while applying the tutorials you learned above with various requirements which will be given in class and you will receive a task grade. Take the following photos.Tutorial 3A: Techniques Take at least one full page of Cornell notes for the combined technique principles while showing some diagrams. Do not post anything at this time. Tutorial 3B: Elements Take at least half to a full page of Cornell notes for each of the photography topics: on Leading the Eye & horizons. Do not post anything at this time.

Tutorial 4: Image TypesWatch the video about SD cards and the video on image format basics while taking notes.Tutorial 5: DSLR ExposureThis tutorial is really important in understanding the camera; without it you will be lost.
Watch the video tutorial on the Cannon 600D DSLR camera that we use in class. Also watch this short & take notes to review exposure in taking photos for this assignment where you will earn a quiz grade. DSLR stands for Digital Single Lens Reflex. If you are ever looking for a DSLR, I recommend this one or the new version (750D). Take notes in your CA book (example) as you watch the video. You must roughly draw these three diagrams in your CA book:
+The back of the camera showing all the buttons and what they are


.+The top right view of the camera labeling the buttons and mode wheel (e.g. P, M, TV) while explaining each mode +A diagram showing the main display screen when you press the Q button and the role of each of these settings Here are Images of a DSLR for your reference if you want to see what one looks like. You do not have to draw the body or lens of the camera.In class you will learn about exposure. You will need to watch the exposure video if you were absent from class or want to review more about exposure. This is a great visual summary that you should understand after watching the videos. Later on another day during class, you will be taking both a Classmarker quiz and a DSLR "hands on" QUIZ activity.Tutorial 6: Portrait Lighting
This tutorial will prepare you to take studio photos of your subject with the correct lighting for your magazine. Review the studio lighting slides & the strobe slides then watch the video while taking notes. Make sure to draw diagrams of the lighting placement so you can refer to it when you take photos.
Tutorial 7: Portraits
Take notes on the posing video and on the Portrait links (discussed in class).

----------------------
Do not do:
Post to postach.io. Now check your postach.io blog and check your twitter account as it should have autoposted to since you added the tag share. Post the specific twitter link of the post to the spreadsheet.
Classwork
Complete the quarter two classwork assignments
At the end of your notes,
explain shutter speed, ISO, & aperture in your own words
Take notes on Leading the Eye content (seven bullets: LTE Overview, Focal Point, Depth of Field, Negative Space, Framing, Patterns, & Lines)
Optional: Photographers
Tutorial (1): View the Principles of Light slides and post to posterous a couple new things you learned.
Tutorial (2): View slides and its videos about exposure. Explain shutter speed, ISO, and aperture in your own words (few sentences for each) and post to posterous.[videos all]
Optional: If you would like to learn about the various camera types, view the slides.
View the Landscape video explanations [one][two]. You can also review the slides (slideshow file) while you follow along the videos. Write a few sentences of which photography concepts you found most interesting and ready to try.
Follow the directions and find examples of the landscape principal concepts.
Watch Rick Sammon's Top Ten Digital Photography Tips video and Tracy Clark's Landscape Tips video. Type out which tip you thought was the most helpful in each video explain and how you are going to apply it in the future when you start taking your photos.
Watch Rules and Composition part I and part II videos and review the slideshow if needed. Type out specific locations you would want to go in Seoul and the type of photos you would take using the video information. Choose four tips and/or compositions and label the name of the rule or composition and a description of the shot and location. Be sure to include how you would use and control lighting.
Watch the and the Bratislava Shoot video. Write a short paragraph of something you learned from their photos and a city in the world that you would like to photograph and why.
Follow the directions for the YISS Photo Shoot
Complete the profile planning section.
Take photographs for your shadow collage
View the video on image format basics. Don't forget to always make a YT comment on mouseflip videos. You can also take notes if you want. In posterous, list some of the file types you learned about and explain in your own words what they are.
Complete your profile and portrait shooting section.
Complete your portrait & profile photo retouch. Watch the video starting at 2:22 and use similar tools to apply appropriate, realistic touch-ups to your profile photo. When you complete it, go ahead and work on all three parts of PS Tut.6. Reminder for Y students only, bring the camera that you will be using for this class with you to the next time you have CA class on . This could be a DSLR or a normal compact digital camera. If you do not have any of these or cannot bring it, email me the day before you come to class and let me know what you will be using (e.g. phone).
Optional extra videos to watch
Landscapes from around the world [video] National Geographic [videos] Pioneer Photographers [slideshows] (one summary for all, not one each)
Photo Journalism [link]
Adobe Bridge
Adobe Bridge
Football Photos [zip] Overview [video]
Apply
Apply
Video and slideshow summary directions Light Assignment directions Show Examples [directions] [slideshow file] Apply photo journalism to an event
Resources
Resources
Basic Photo Editing Tools
Basic Photo Editing Tools
- Pixlr Online PS [link]
- Picnik Online [link]
- Google Picasa Software [download]
- List of online photo editors [link]
- Pixinap Mosaic Maker [link]
- Photoshop Subsitutes [link]
Additional
Additional
Video & slideshow summary directions (summer students only)
Video & slideshow summary directions (summer students only)
Use your Macbook camera in PhotoBooth to take a picture of the notes (one photo for each page of the three sections, if you took more than one page on a certain section then only take the photo of the first page of notes) and post to your posterous and the link to the spreadsheet. If it takes the photo backwards, in PhotoBooth, go to Edit > Flip Photo. The posterous tag should be tutPhoto.
Optional: Try to to this since you will need to do it for the next tutorial
Upload a photo that you have taken within the year that does not have any faces in it to use for this tutorial adjustments. Make sure the photo is in color and has various colors in the photograph.
Page updated
Google Sites
Report abuse