Embedded Files

Using your notes on Rhythm & Contrast in your CA book, create your own unique pattern. Look at the past students' examples but do not copy their ideas.
Follow the directions below to create your own unique seamless pattern that you will later use as a background pattern for a section of your CD booklet so use the color scheme you have chosen for your CD project.
- Make sure your pattern shows rhythm and contrast according to the notes as you will have to write and justify in Schoology how you used these design techniques.
- Use your original Kuler scheme that you posted from Task Design 1 (not your monochromatic color scheme from the CD label assignment)
You need to create your own pattern. Grabbing patterns or pictures/vectors from the web and using them is considered cheating. You can Google search and look at patterns for ideas but you must create your own style and variation. Also, do not use the AI symbols or patterns that are preloaded and already made in Illustrator.
Follow the video tutorial to complete your pattern and make sure your document is 300 ppi like the example below:

When you are finished, export as a full quality RBG JPG (use the pattern and set it as your Macbook desktop background for one full week starting today) and upload to the Drive Folder and to Schoology by the end of class and continue the directions below to complete in class. If you cannot complete the instructions below, you will be allowed to submit it later that same day before 9:59pm.
In AI press cmd + k and make sure the checkbox is checked for Scale Strokes & Effects. By doing this, when you copy and paste a vector the strokes of the vector will look the same.
Take your pattern design and follow the video directions to finish the design for your "Produced by" CD. When you copy your pattern to the CD it will be a different dimension and it is okay if the pattern overlaps outside the CD boundary (below) as long as it is still a consistent pattern, just make sure to use art boards to crop it when exporting.

Upload the JPG full quality image to the Drive Folder & to Schoology as the same post reply as your pattern. If you did not upload only your portrait yet, do so to this Drive folder.

- Done!
do not do
Creating a Pattern Directions:
Seamless Pattern
Used from http://veerle-v2.duoh.com
Time
In years past CA Design students have finished this Pattern assignment in 30min. This assignment is due at the end of class.
Getting Started
Open a new RGB A4 landscape document in Illustrator. Select the Rectangle tool and draw a 4in x 4in square that is 300dpi. With the square still selected, hit command/control + 5 to make a guide from the square (View > Guides > Make Guides). Make sure guides are on so you see the square. Go to View > Guides > Show Guides (or hit command/control + semicolon). This square guide is the placeholder for our pattern swatch.


Draw your pattern
Using either Alternating Rhythm or Progressive Rhythm (Rhythm Overview), create a floral or shape pattern on your document (see the examples below and above). For your grade, is very important that you clearly show alternating or progressive rhythm in your design.
In making your designs, recommend using the pathfinder tool and warp tools if needed. Do not use any pre-made images or fancy brushes; make all the designs yourself.
Use your original CD color design from Kuler.


Reflect the corner ornament
If I have a quarter of a circle in each corner of the square, I'll get a perfect circle once the pattern is ready and applied. When you create yours, make sure you create your pattern so that it also has graphics in the corners.like the example.

First make sure Smart Guides are turned on. Go to View > Smart Guides and make sure you see the checkmark (use command/control + u to switch Smart Guide on or off). Select the ornament in in the corner and select the Reflect tool from the toolbox. Hold down the alt/option key and click precisely in the center of the square. With Smart Guides on you'll see the word 'center' if you are in the right spot. In the Reflect options window, make sure Preview is checked. Select Vertical as Axis and click Copy to duplicate the corner element. Double check if the corner is precisely positioned. Zoom in and correct if needed. With Smart Guides on this should go pretty easy. This double checking is important and needed if you want your pattern to be absolutely prefect. If the corner is not 100% perfectly placed on the guides, the pattern will show a tiny little gap or other imperfections in the circle. So this is absolutely crucial.
Reflect again and rotate the center ornament
Select both corner ornaments and alt/option click in the center of the square again. Select Horizontal Axis and hit Copy to duplicate and reflect both corners vertically so that the top two corner designs mirror the bottom corner designs.

Now select the central ornament and select the Rotate tool from the toolbox. Alt/option click in the center of the square. Enter 180 degrees in the Angle field and check preview. Hit the copy button to rotate and duplicate the ornament. Again, double check the corners so they are absolutely perfectly placed in each corner.
Create a pattern swatches

Select all corners and central ornaments by dragging a selection around the square. Now drag the selection into the Swatches palette. Now you have created a pattern swatch.
Pattern applied
Draw a big rectangle anywhere on the right side and give it the pattern fill you've just created as practice (this is what you will later be doing to fill part of your CD booklet background).

Above you'll see the end result of the 2nd pattern.
Scaling a pattern

You can scale a pattern within an object, or you can scale the object without scaling the pattern if needed.
Rotating a pattern

The same goes for rotating. You can rotate a pattern without rotating the object or you can rotate the object without rotating the pattern. Of course you can scale or rotate both pattern and object together as well.
In Illustrator, go to the top toolbar and click View > Outlines and take a screenshot of your pattern design in outline mode which you will upload to Schoology later. Then go back to normal view by going to View > Preview.
Delete the practice big rectangle and when you are done creating your main pattern inside the guides, press shift + o and use the artboards to place around your pattern. Resize the artboard so it borders tightly around the blue guides.

Then go to Export > JPG and click Use Artboards (ALL).

Save as maximum RGB quality.

The following pattern is not done correctly because it does not connect to each other seamlessly:
The following is correct and the pattern is seamless:
- CD Design
- Follow the video directions to create the design for your CD.
- Post
- Upload the three files below to Schoology:
- 1. Outline Preview (In AI, View > Preview > Outline)
- Upload the three files below to Schoology:

- 2. JPG Version of Your Pattern Square

- 3. JPG of final pattern with self portrait and signature

- 4. Your official color scheme you are using for your CD project

- Done!
Do not do:
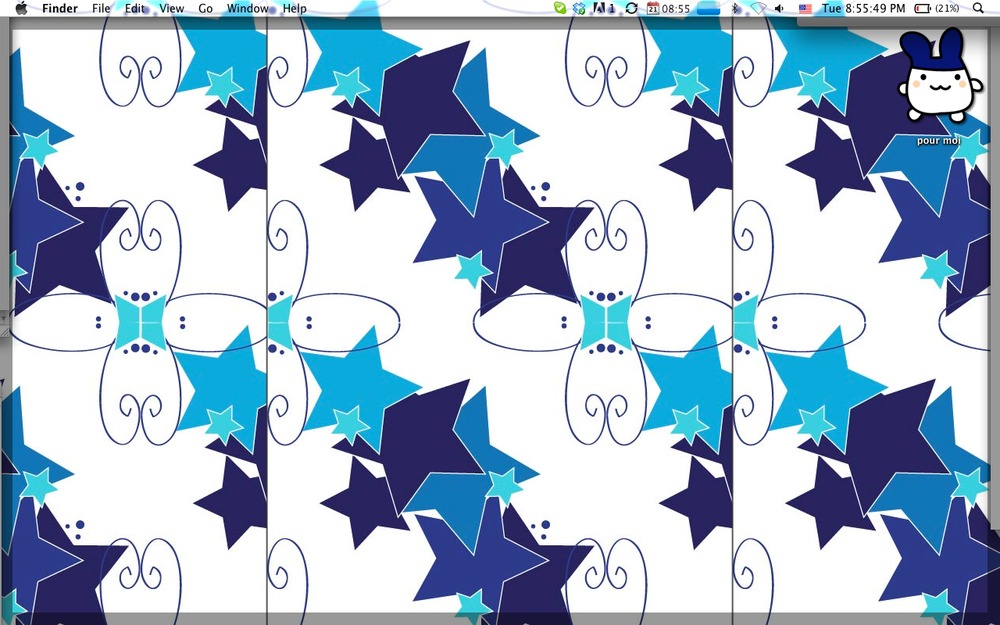
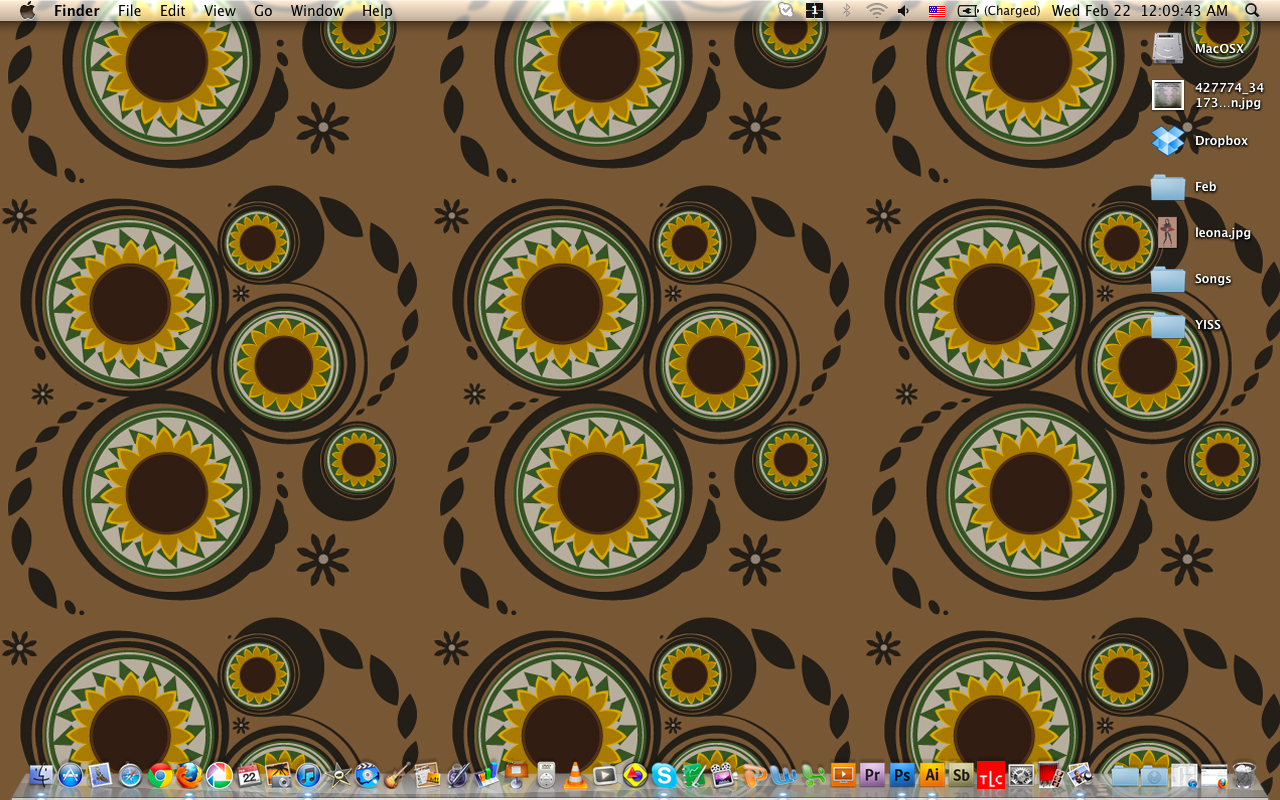
Now right click on the image file you just made and select use as desktop and go to your Macbook settings and choose the Tile option. Remember, you can go back to your AI file of the pattern and scale it down or make it larger, export it, and set it as your desktop to change the pattern size and intensity.

Now organize your desktop files into folders and take a screenshot of the entire screen cmd + shift + 3. In next class, I may check your desktops for your pattern and to see if they are organized. Remember to keep your pattern as your Macbook desktop for the rest of the month. Do not have more than a combination of eight total files/folders on your desktop. Organize it.
Make sure you do not see white lines like the image below:

Upload the screenshots to your WordPress. In the WordPressarticle comment, write and explain how your pattern is either alternating or progressive rhythm (this is important) and how you used contrast.
Then upload the screenshot of your desktop to the MF Picasa album Pattern Background and upload it.
Email to WordPress the four screenshots (color scheme, outlines, JPG, & desktop) and write what type of design principals you used from the Rhythm notes you learned about (e.g. Alternating Rhythm with the colors of the circles)
Examples of the four screenshots required:
Upload either the color calculator color or kuler color scheme

Screenshot of your desktop with your pattern

- CD Design
- Follow the video directions to create the design for your CD.

- Post
- Now hide the signature layer and save it as a JPG full quality image and upload to Schoology.
Page updated
Google Sites
Report abuse