Embedded Files
This page documents two Thacher models I built between 6/18/12 and 8/14/12. Both were commissioned for sale.
I think this is a pretty tough build. It requires quite a few major tools (drill press, table saw or radial arm saw, planer) and quite a lot of time (allow 75-100 hrs of work time over a month or two of calendar time). You're quite likely to make mistakes along the way. The tolerances are very small; even 1/64" can make a difference to a radius measure, so be careful and measure size/fit wherever possible as you go. There's a lot of painstaking work, but if you have the patience the results can be startlingly pretty and functional.
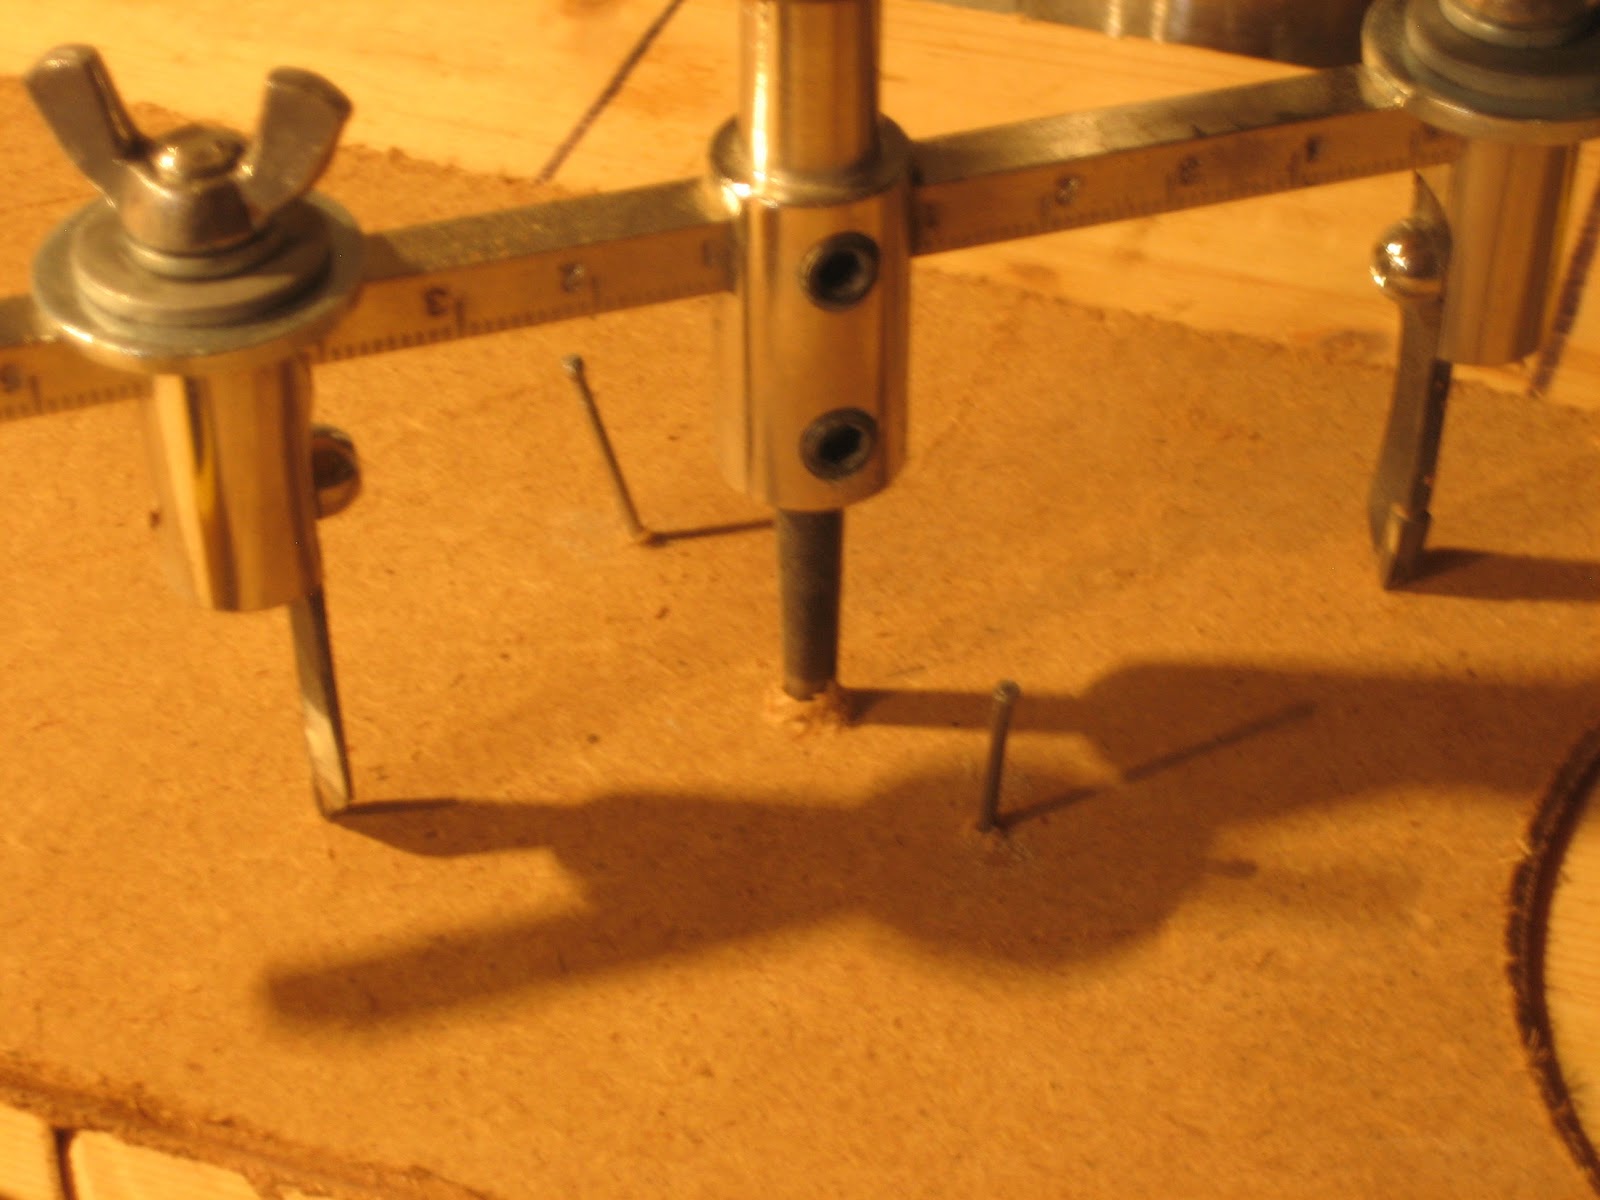
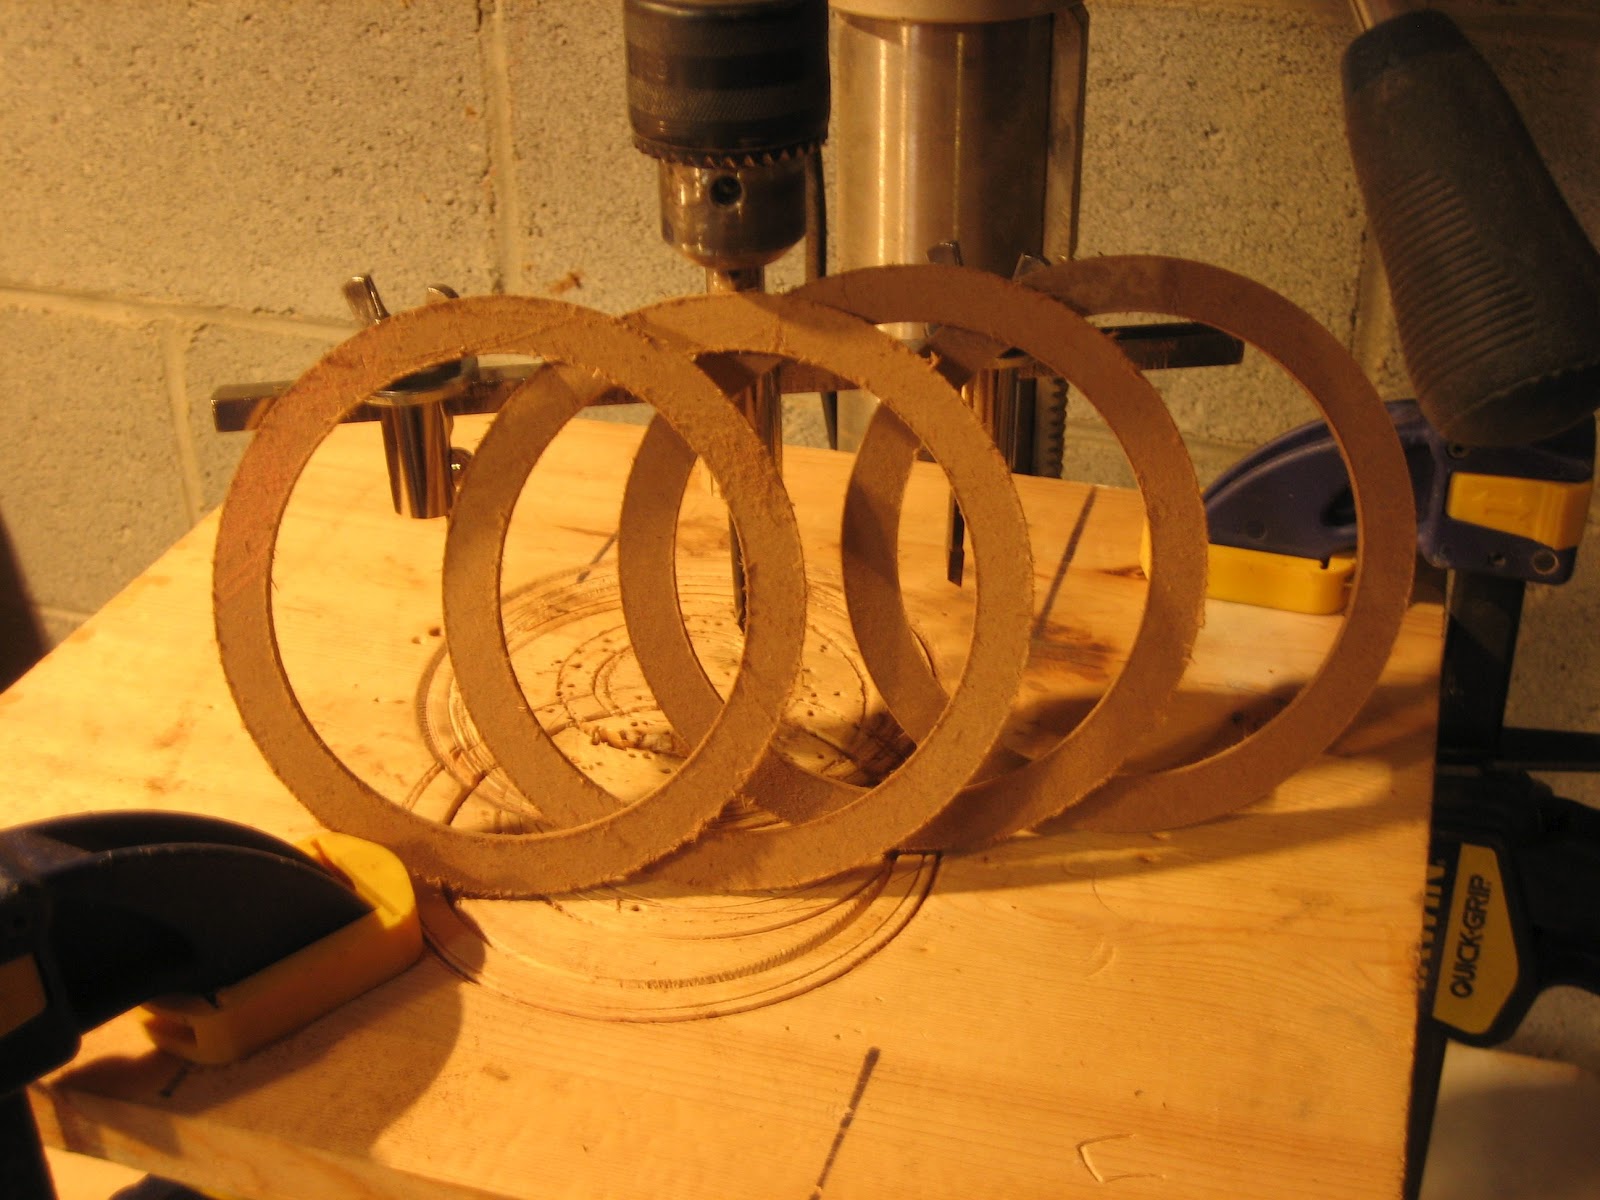
Begin by cutting 4 rings from 1/8" Masonite, IR = 2 1/32", OR = 2 1/2". I use a "wing cutter" on a drill press.
Cut partway into one side, then flip to cut from the other. When you cut into the 2nd side, pin down the inner and outer parts of the board so they don't rotate if one edge of the ring cuts through before the other.
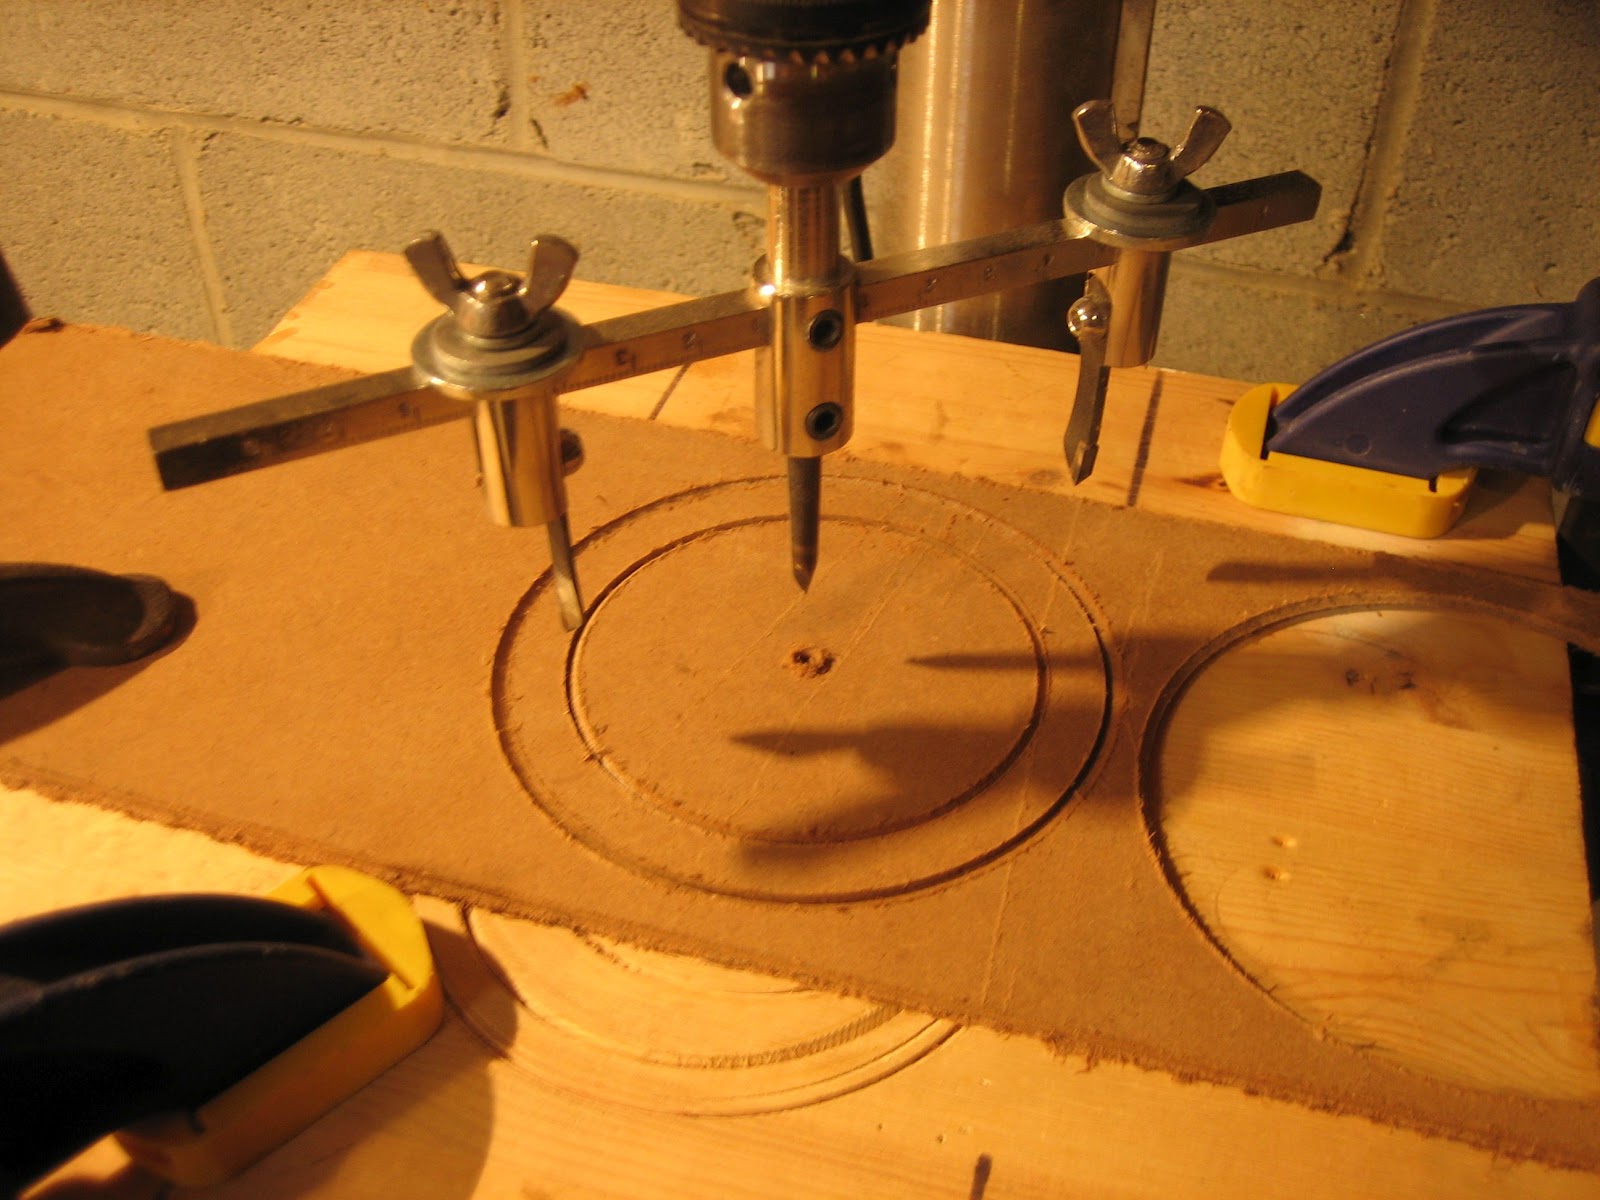

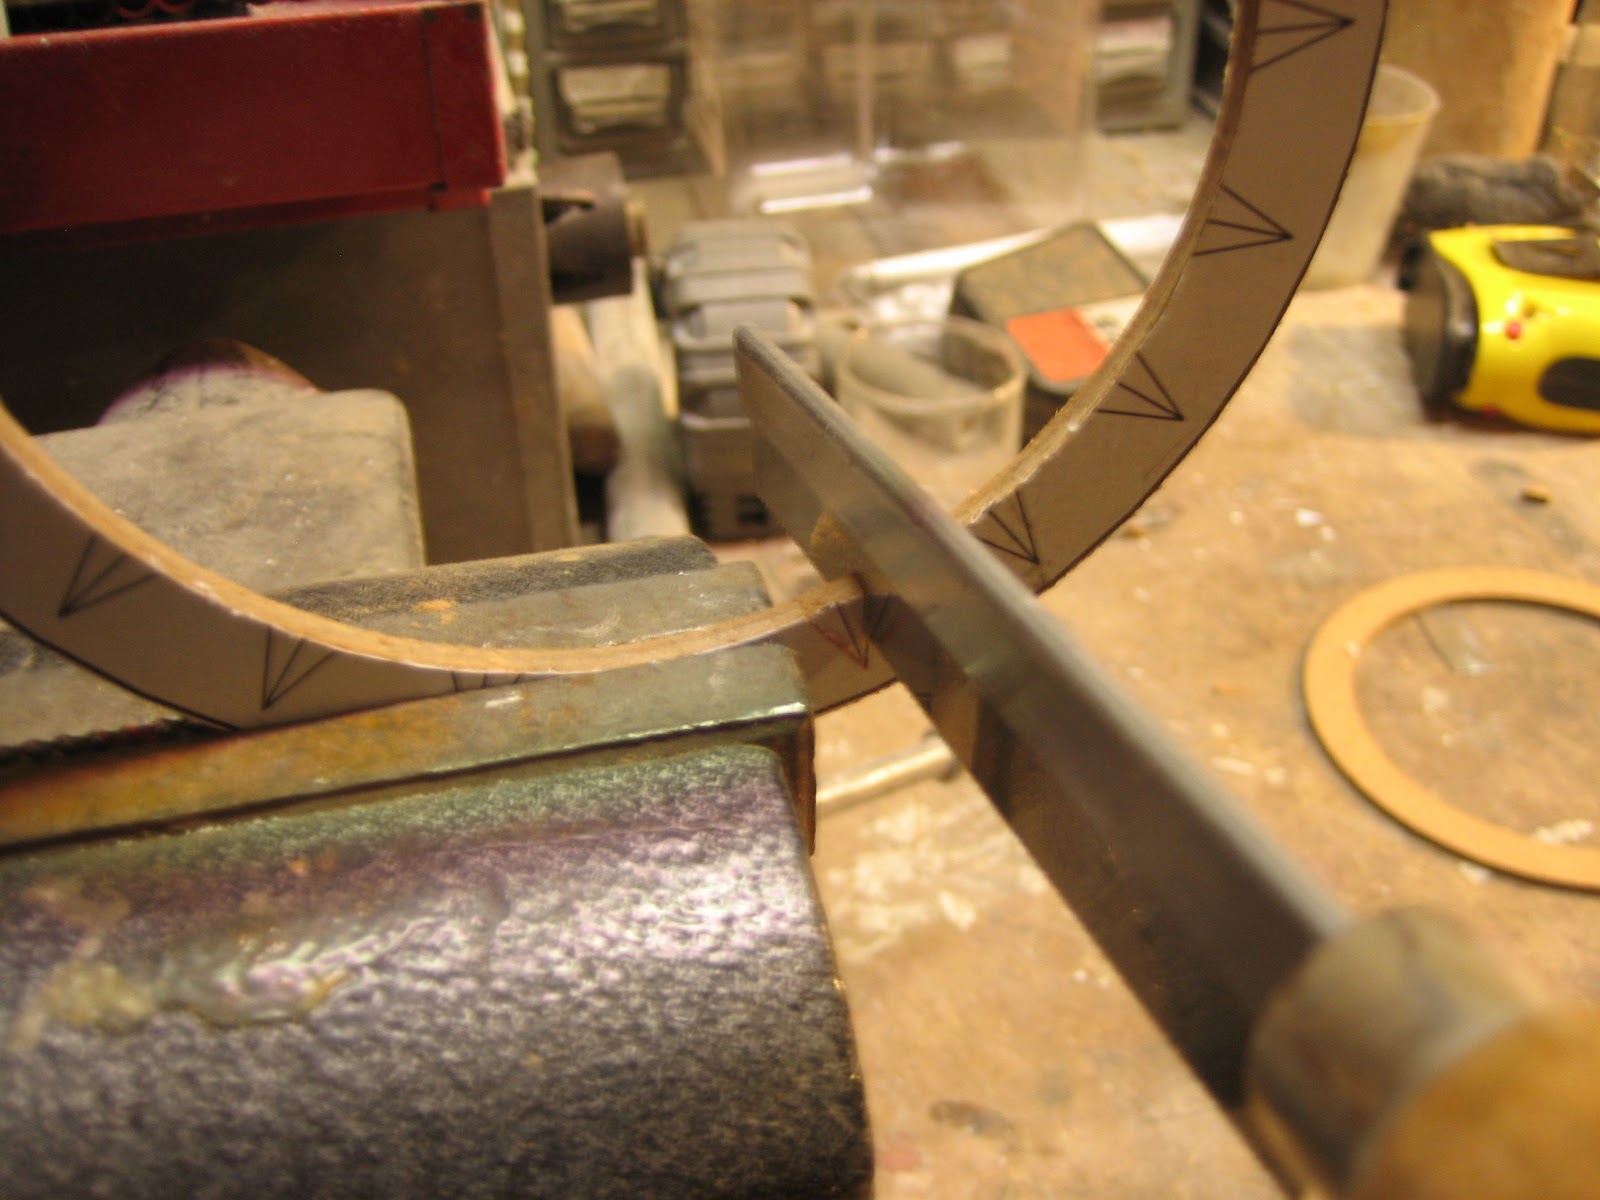
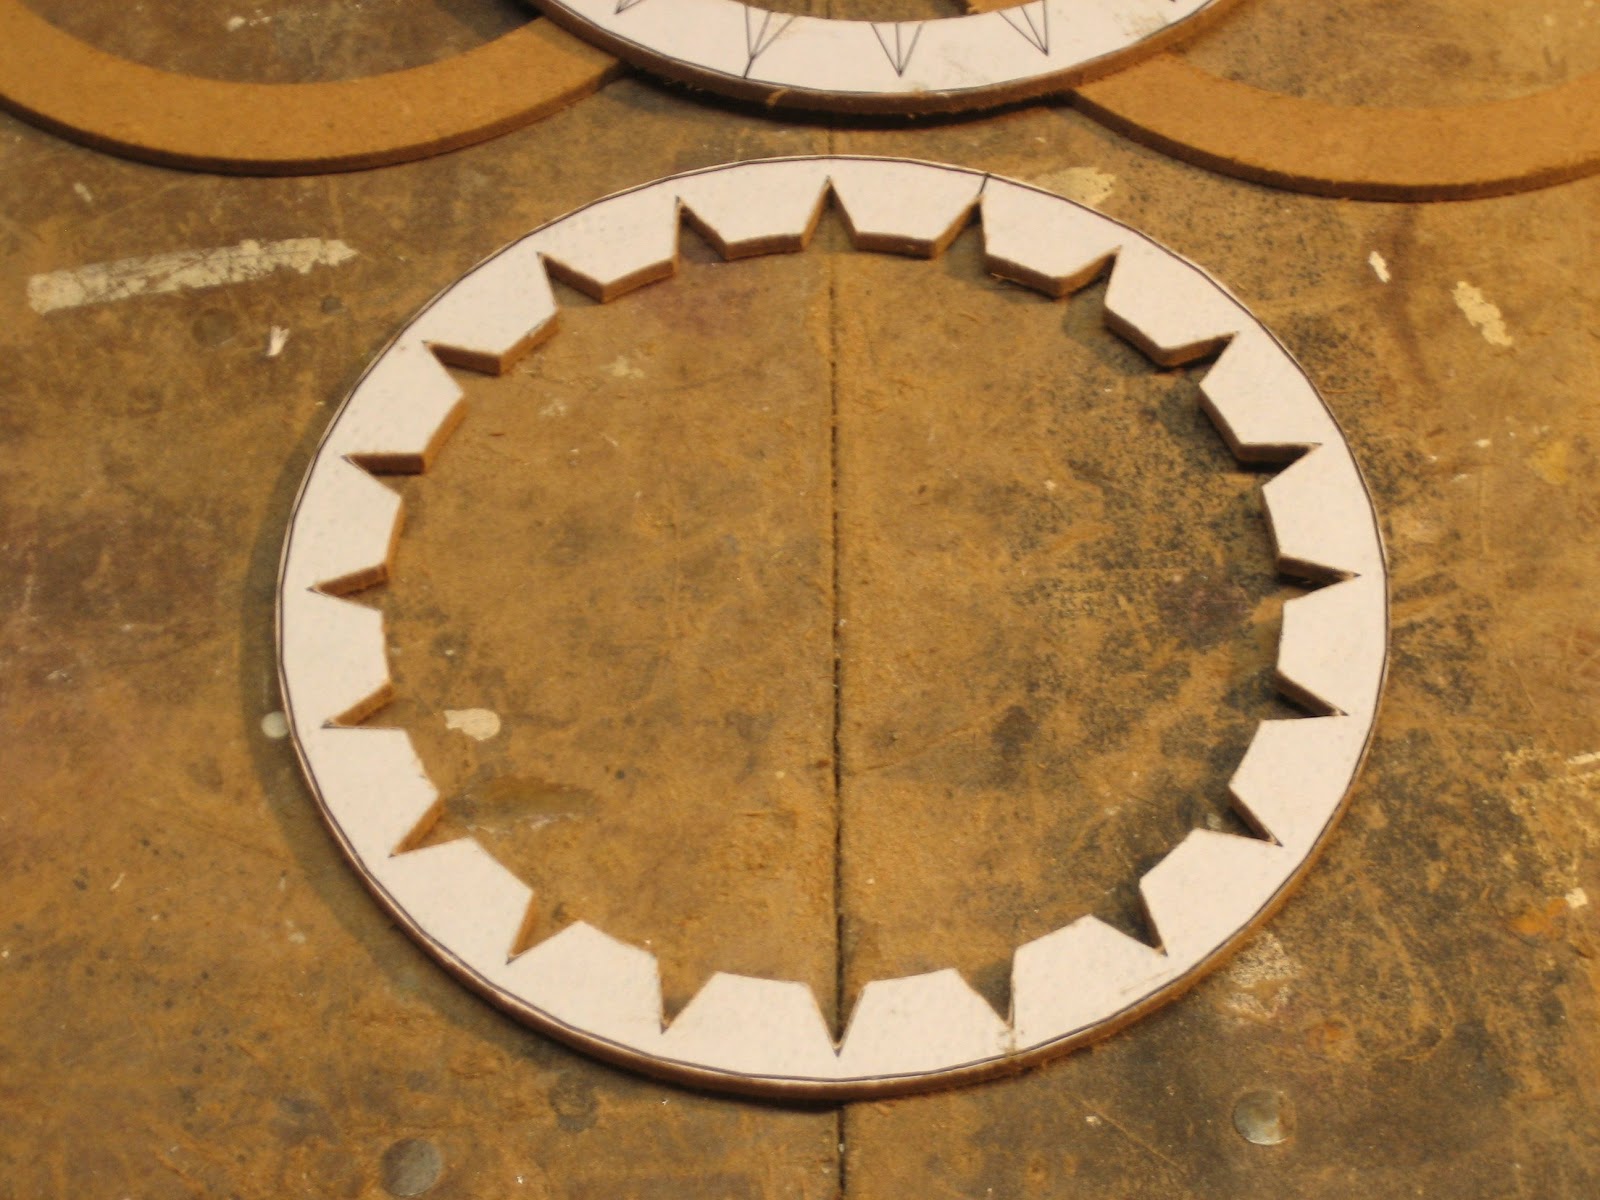
Using the CAD package of your choice (I use Google SketchUp) design yourself a paper template. You need a ring of the above dimensions, and around the inner circumference you need to evenly space 20 isosceles triangles of size 3/8" x 1/4" by 3/8". Print the template, cut it out, and glue it to 2 of the rings (I use a glue stick).

Now use a razor saw to cut out each of the triangles on both rings. Be as precise as you can. Don't break the ring. (Cut extras as above, just in case.)

Apply glue to each of the 2 cut rings, and glue them to the 2 uncut rings. Lay the rings on a flat surface, put a board over them, and then put some weights on the board to apply pressure while the glue dries.

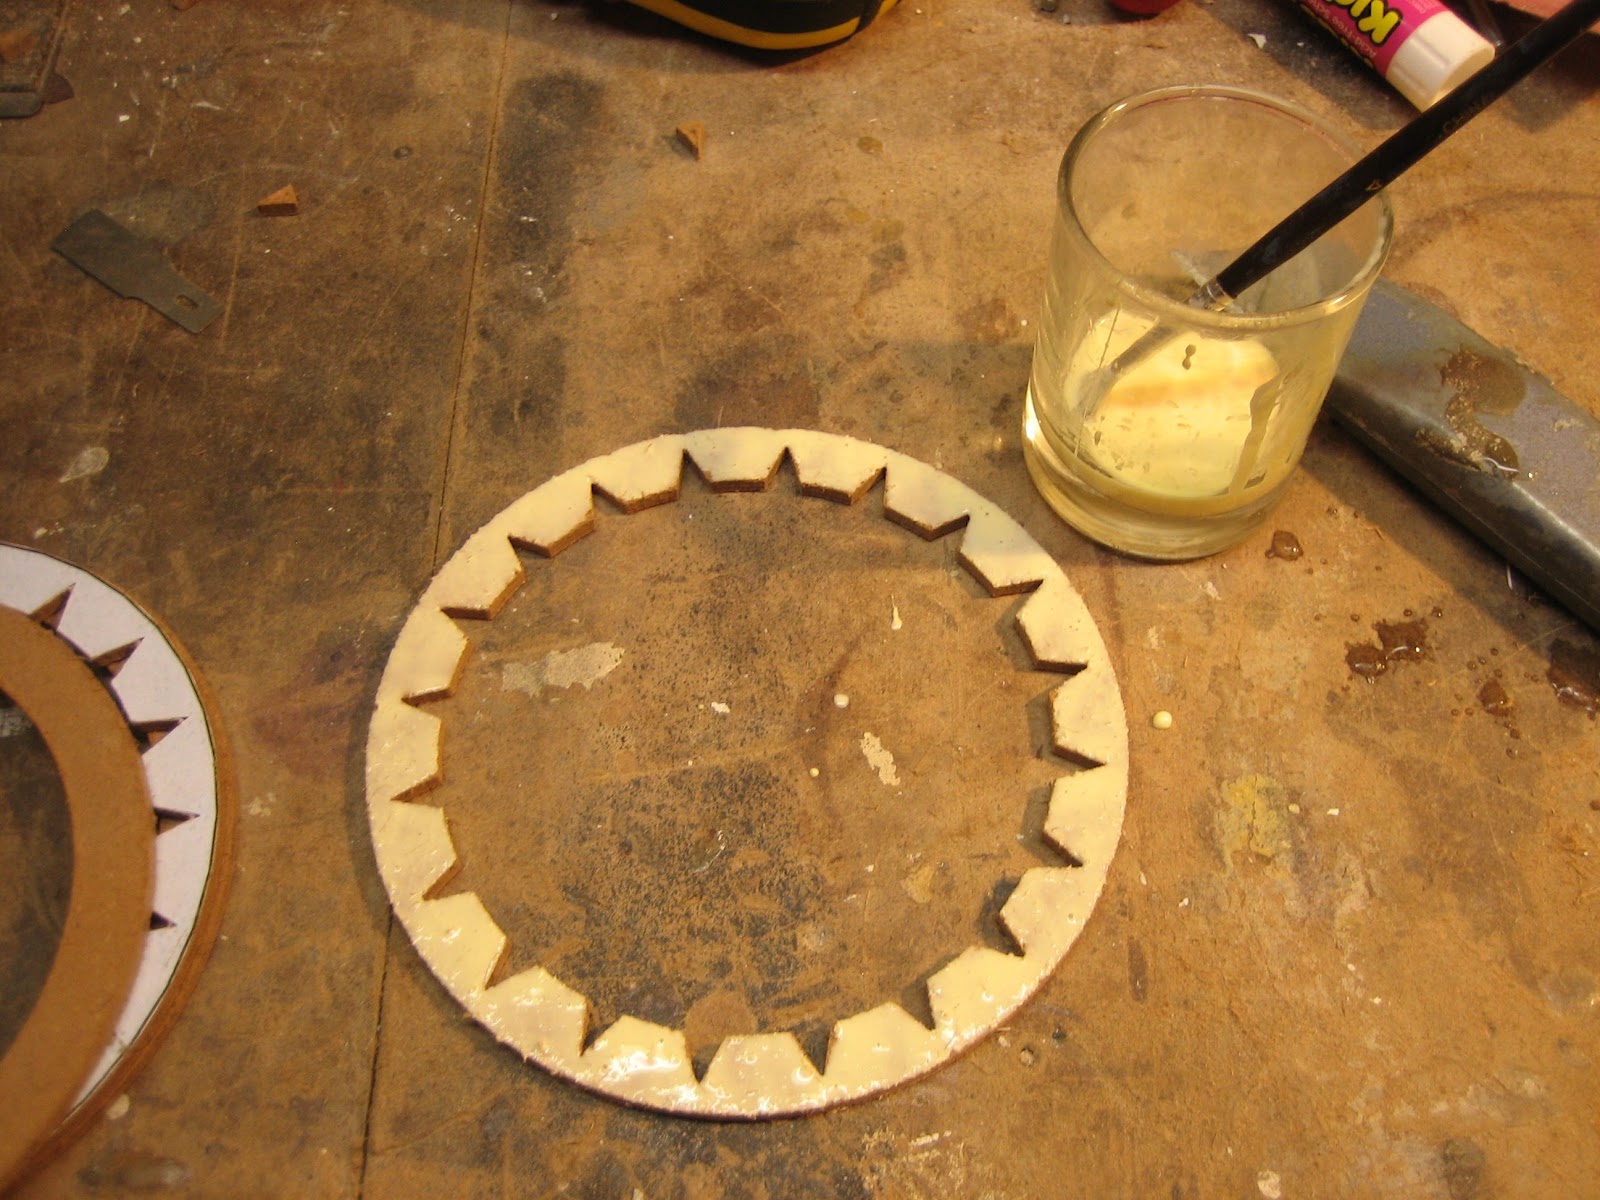
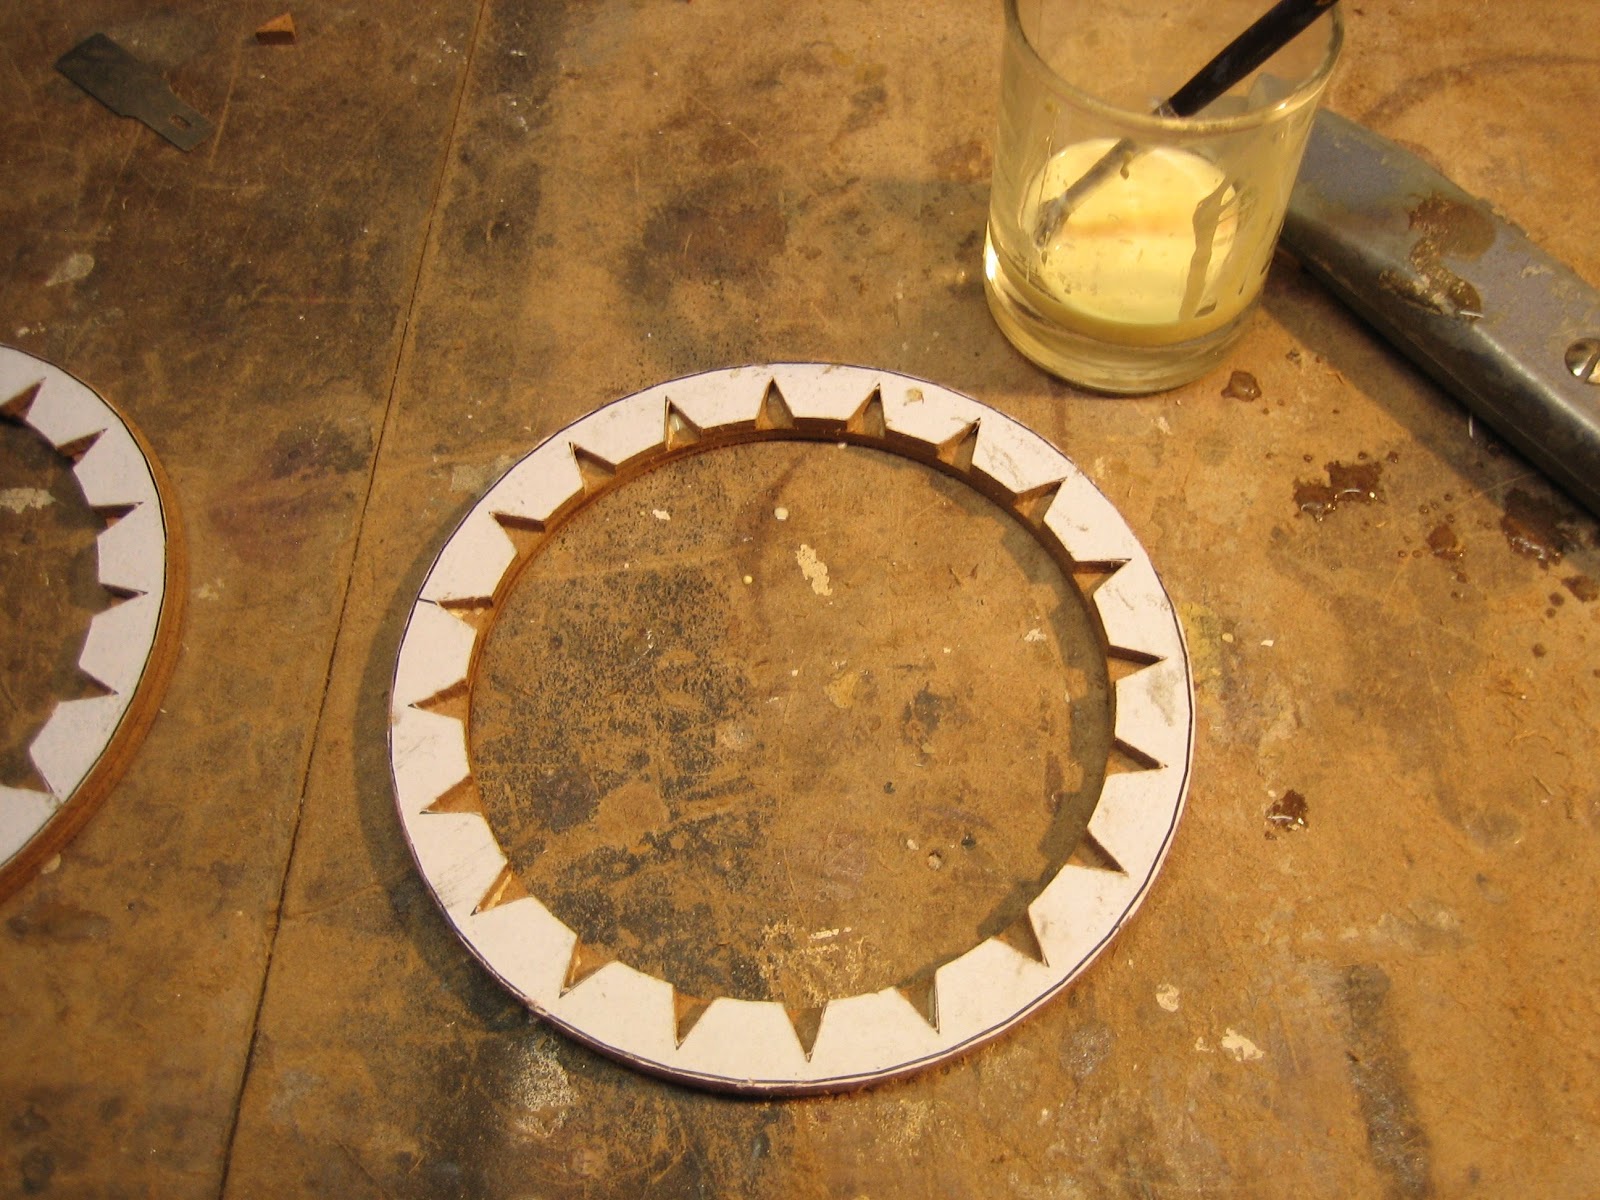
Once the glue has dried, peel or sand the paper templates off.

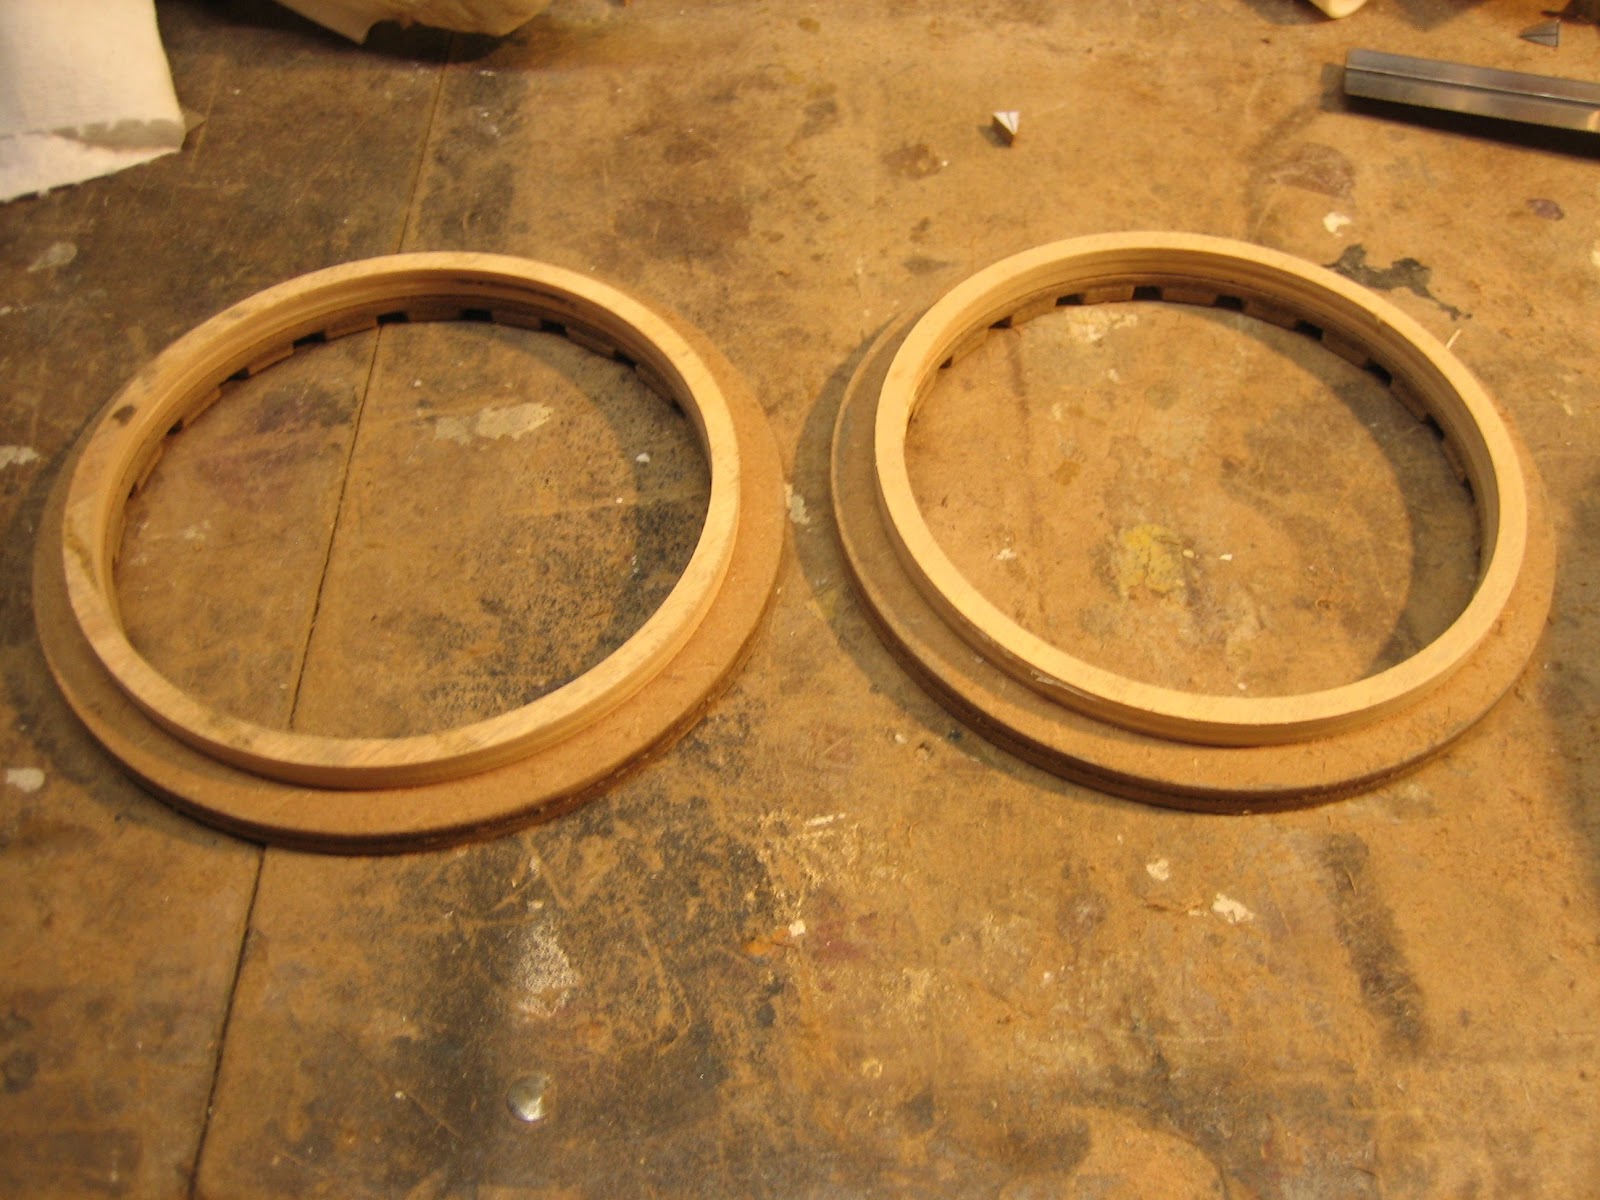
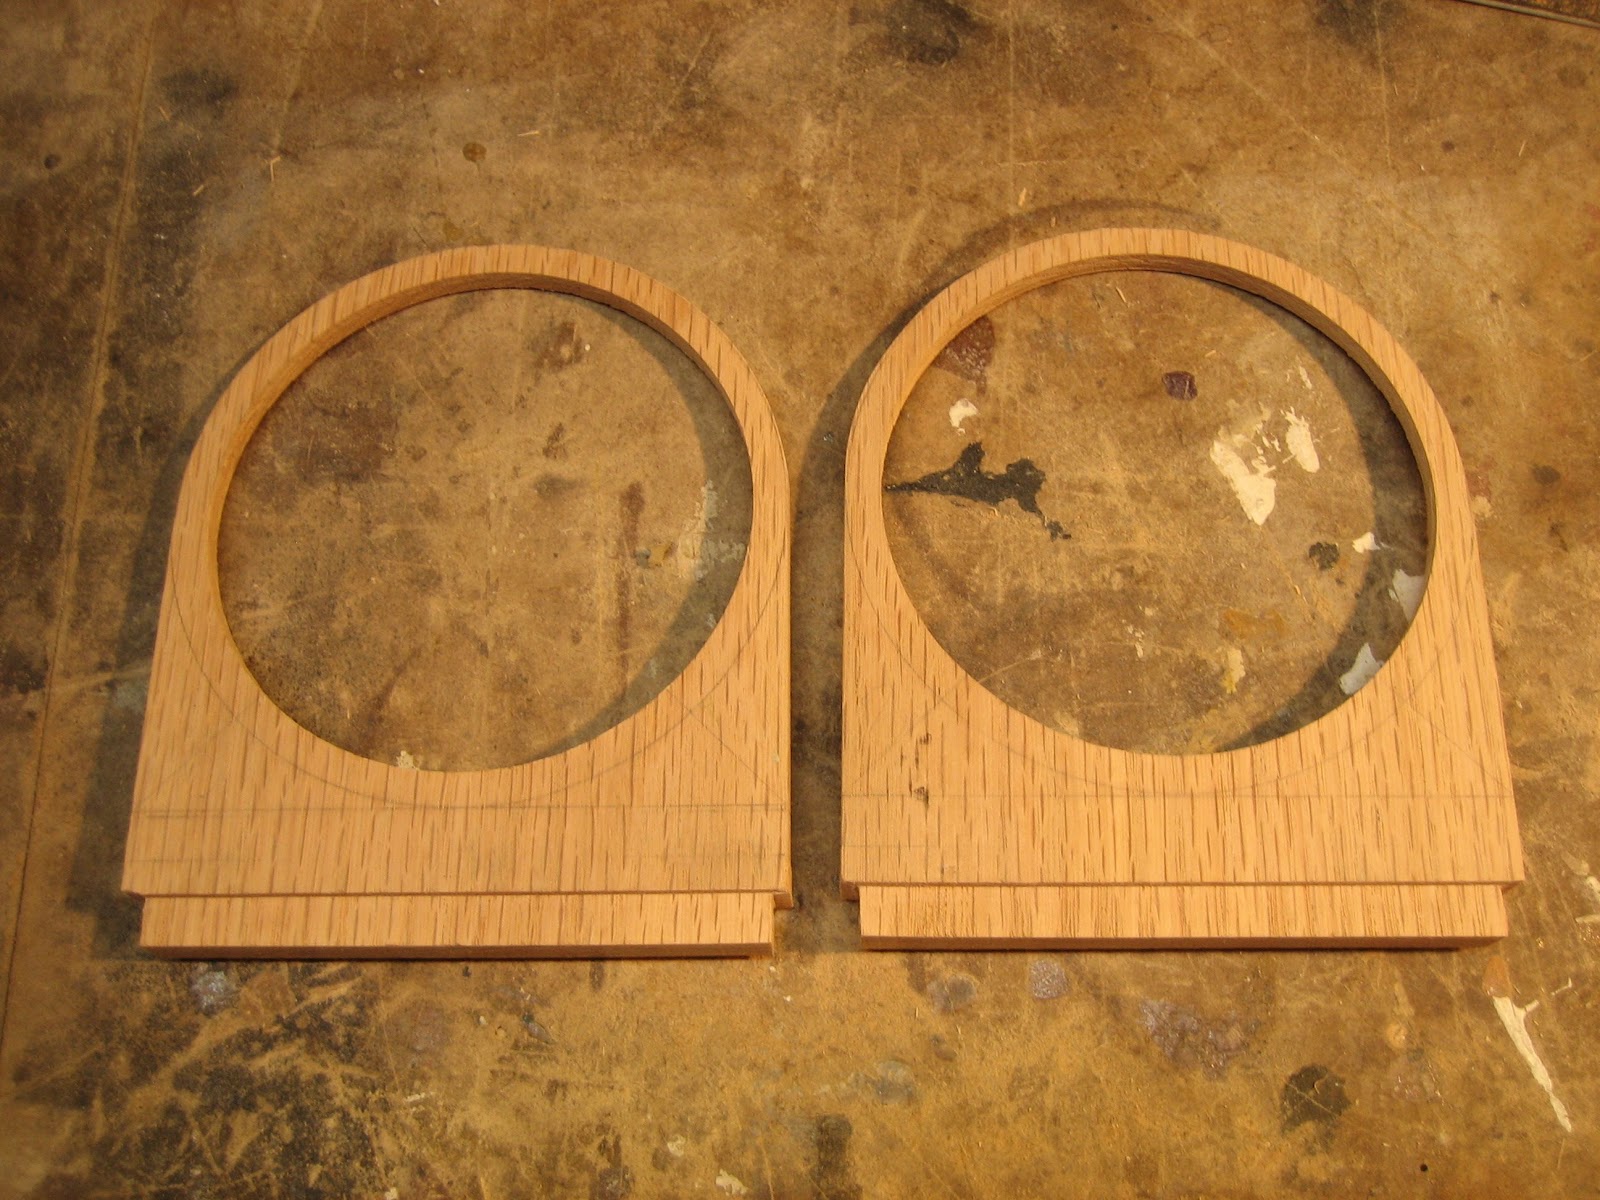
Next, cut two rings from 1/4" plywood. IR = 2 1/32 just like the rings above. OR = 2 7/32". (If you can find 5-ply use it. It cuts better and is stronger. The more-common 3-ply will work, but is more subject to chipping out during wing-cutter cutting.)

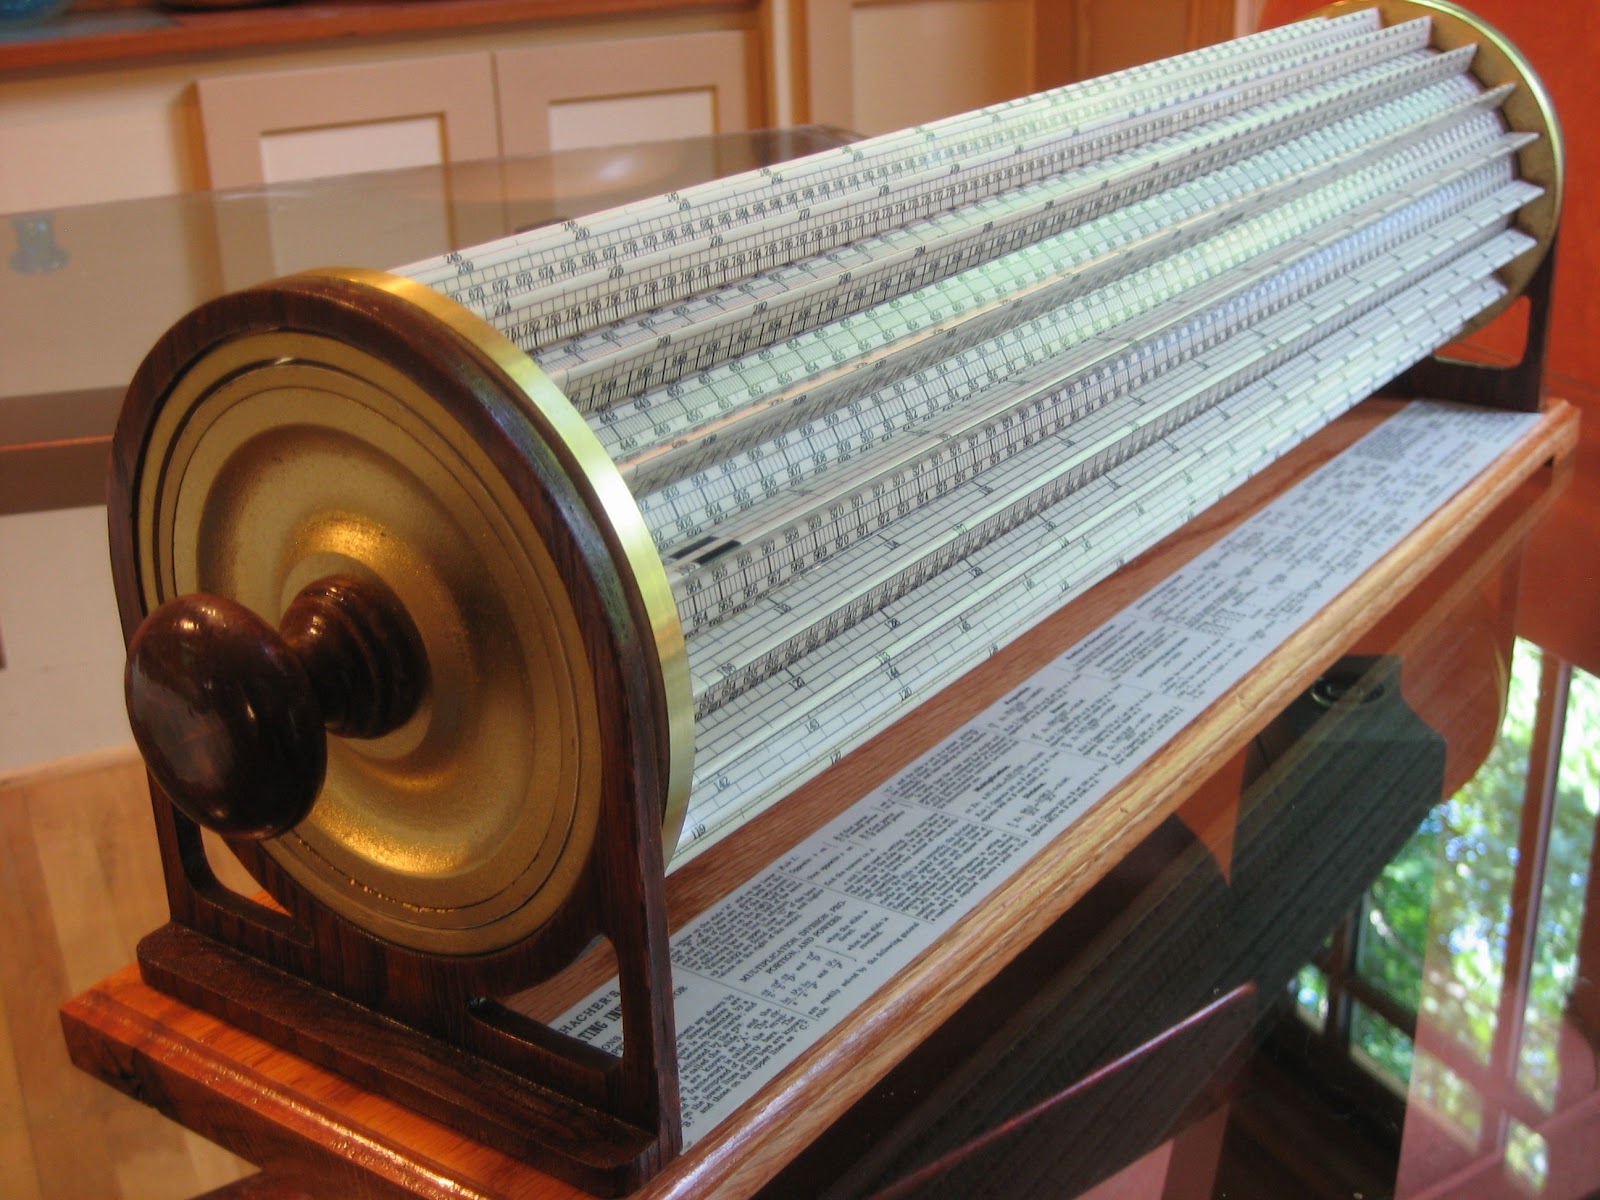
Glue them to the un-notched sides of the above assemblies. Press them together while the glue dries. These are going to form the left and right ends of the "envelope": a cage of 20 triangular bars which will comprise the stator part of the rule, but that comes a bit later.
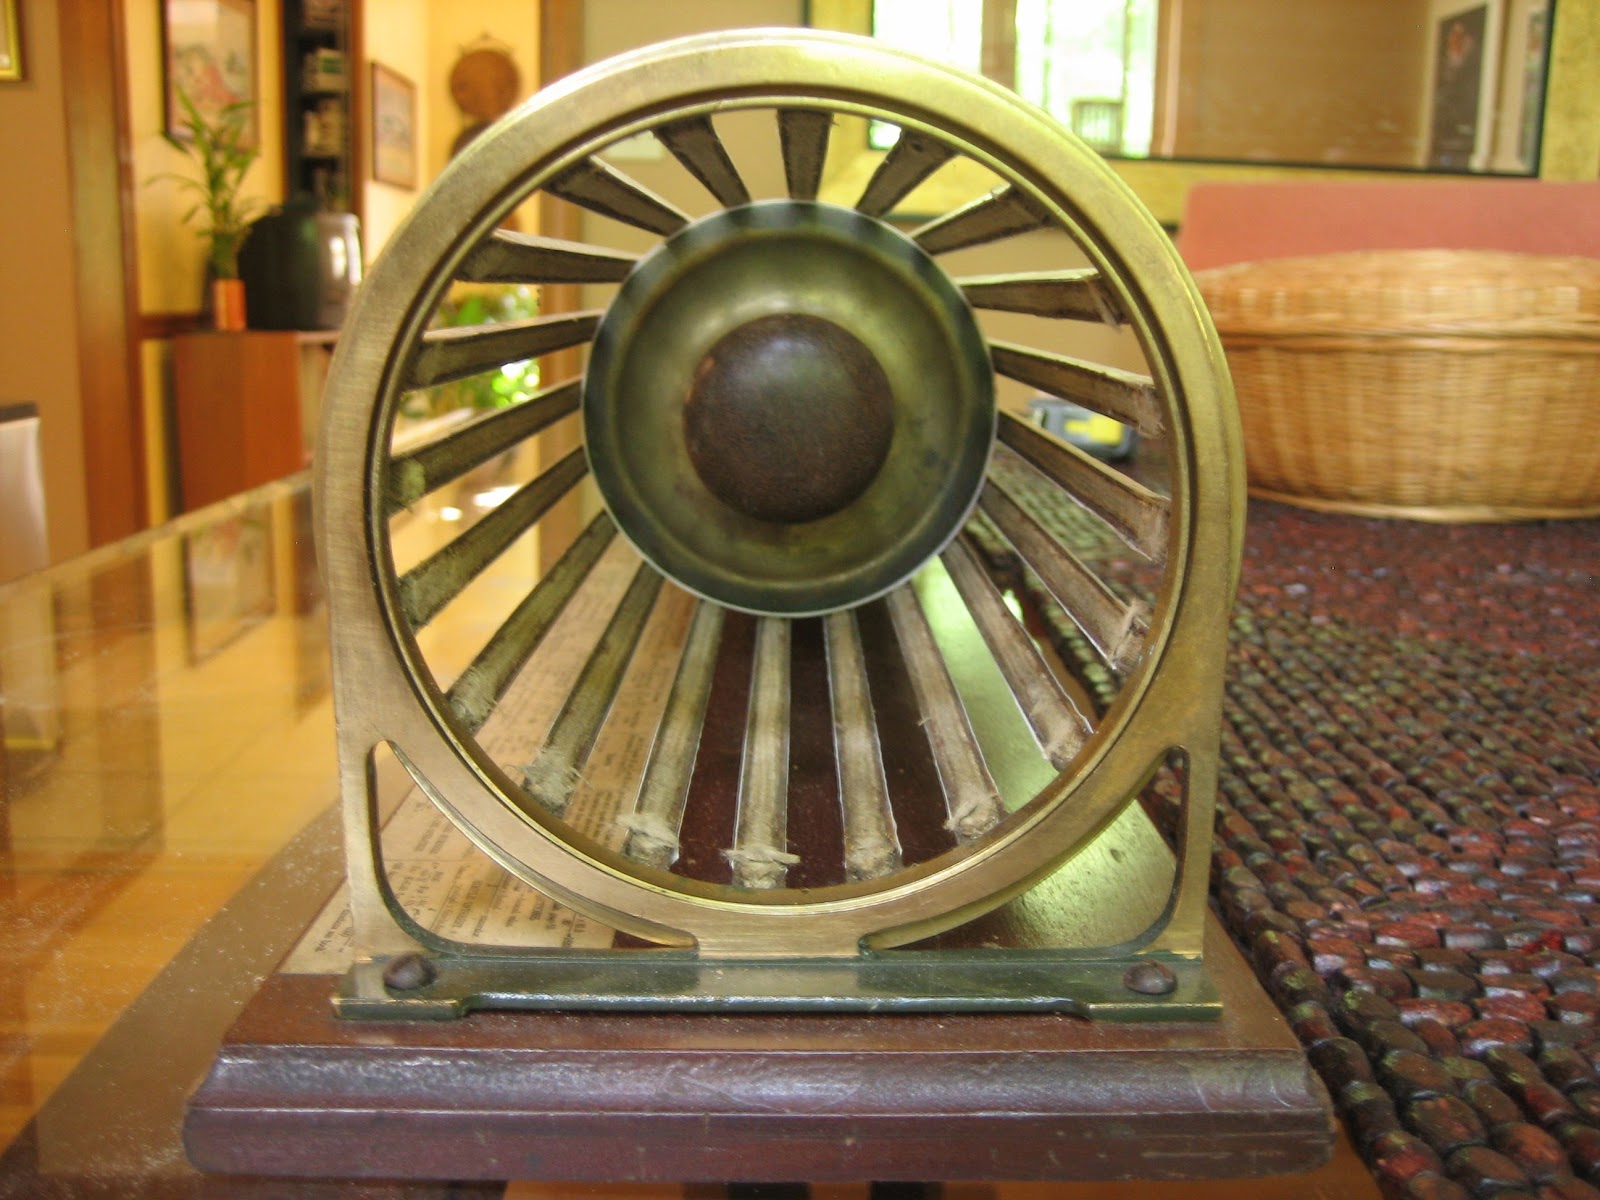
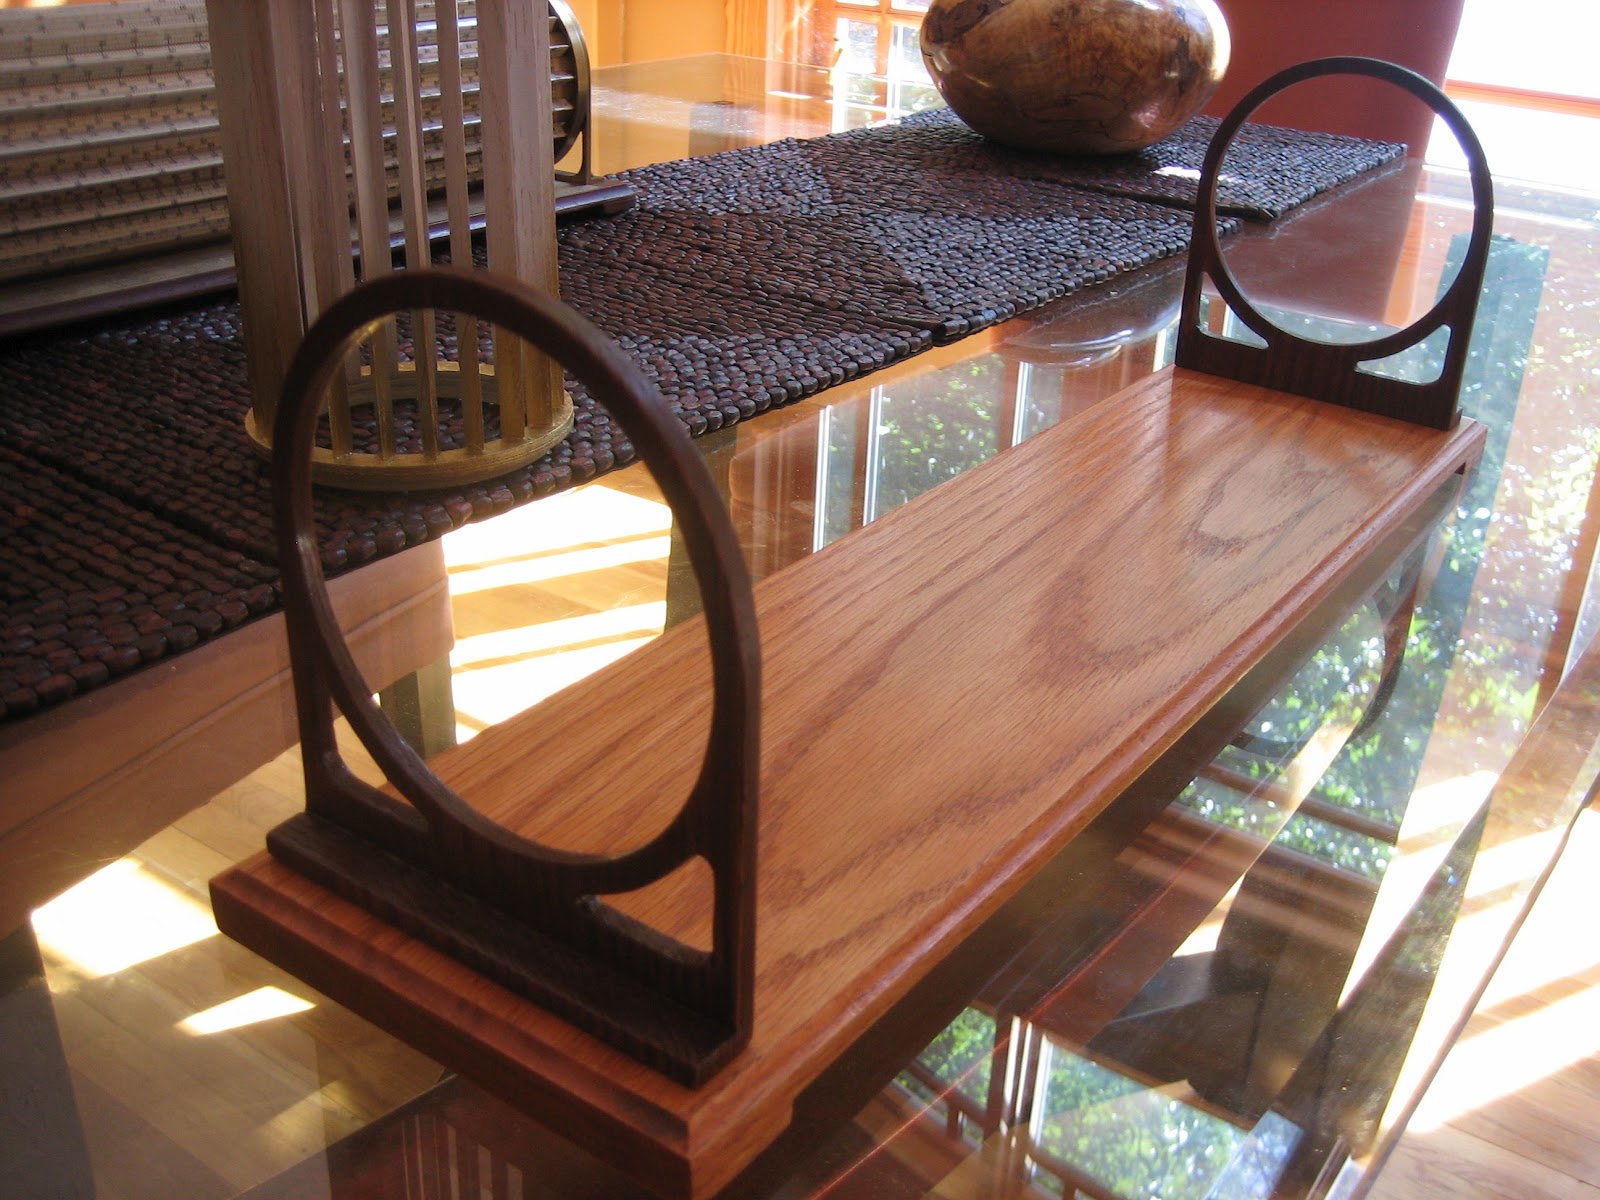
The envelope has to be supported at the sides by vertical stanchions. On a real Thacher, these are cast brass L brackets about 1/8" thick, about 4 1/2 inches tall and wide, sporting a 1/2" lip through which screws are driven to attach them to the wooden base.
Mill the replica's simulations together from 3/4" hardwood stock. These will be a showy part, so use a nice piece. To begin, face-plane a plank and mark up both sides as shown below. Mark an edge for the material to be removed.
Each stanchion has a 3/8" high tenon (T) that will anchor it into the Thacher base. It then has a 1/4" high lip (L). In a real Thacher, the envelope is suspended right above the lip, but in so doing it shadows the instruction label terribly. Therefore, I add 3/8" inches of rise (R) below the replica envelope and above the lip. The picture below shows the layout on a fresh board, and a partly milled version behind so you can see what material is to be removed. (In the partly milled piece, the riser areas have yet to be milled to leave just the 1/4" lip.)


You need to mill away material to leave the lips and tenons, as well as all but 1/4" from one face between the lips. I use a radial arm saw that has a router-bit arbor opposite the blade arbor, but you could as easily remove the material with a table saw and a dado blade. When done removing material, cut the two stanchions apart at the middle of the milled piece.


Here are two pairs of stanchions (because I was building two replicas at the same time) showing the tenon and lip, all ready to be holed-through to accept the ends of the envelope.

After more careful wing-cutter work, the small rings on the envelope-end assemblies fit into the stanchions with just enough gap to allow their rotation. Take note here of the direction of the grain! It runs vertically because if it were to run horizontally there would be two very weak points at the 3- and 9-o'clock positions and the piece would easily crack in half. With the vertical grain, there's a weak spot at 12-o'clock, but it is not too likely to split because there's the fairly thick lip and tenon opposite at 6-o'clock.

Finish up the stanchions by rounding off the top corners flush to the envelope ring, and cutting away the ends of the tenons. Here's what the result should look like.
If you've got a scroll saw and want to heighten the replica's resemblance to a real Thacher, you can further refine the stanchions by cutting rounded triangles out of the riser area:

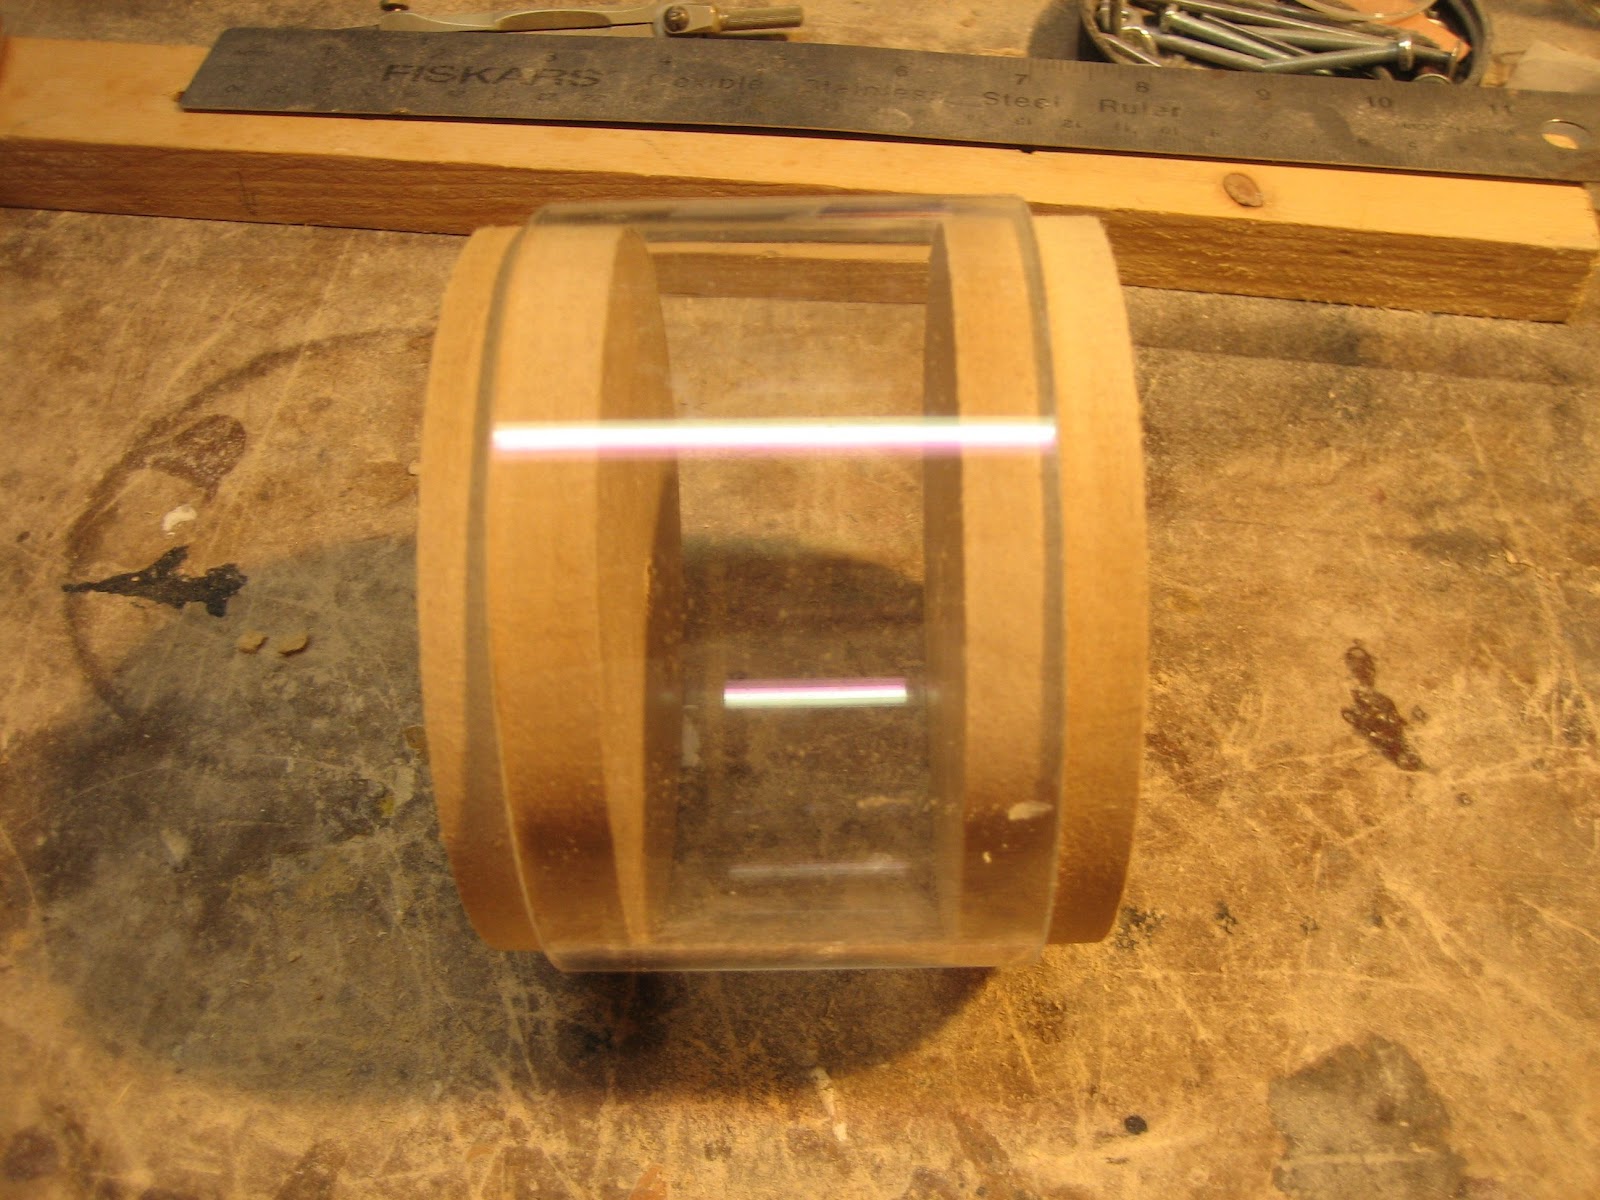
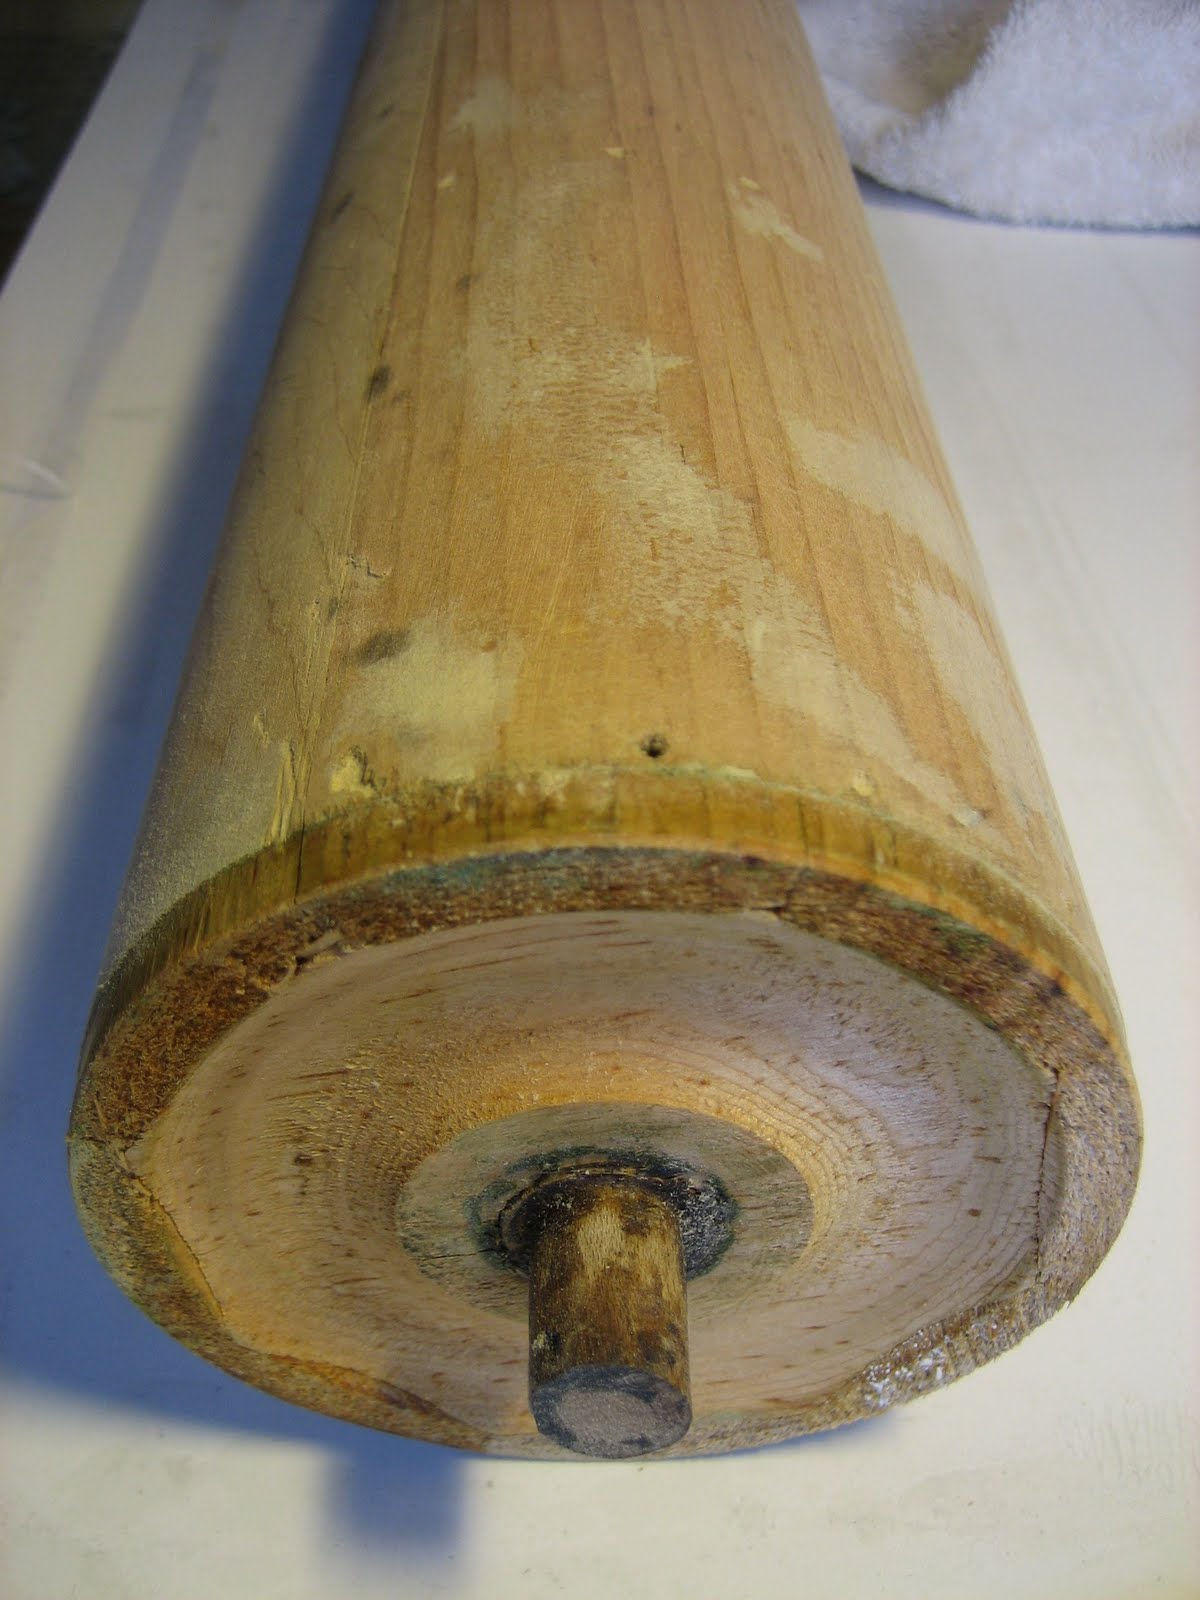
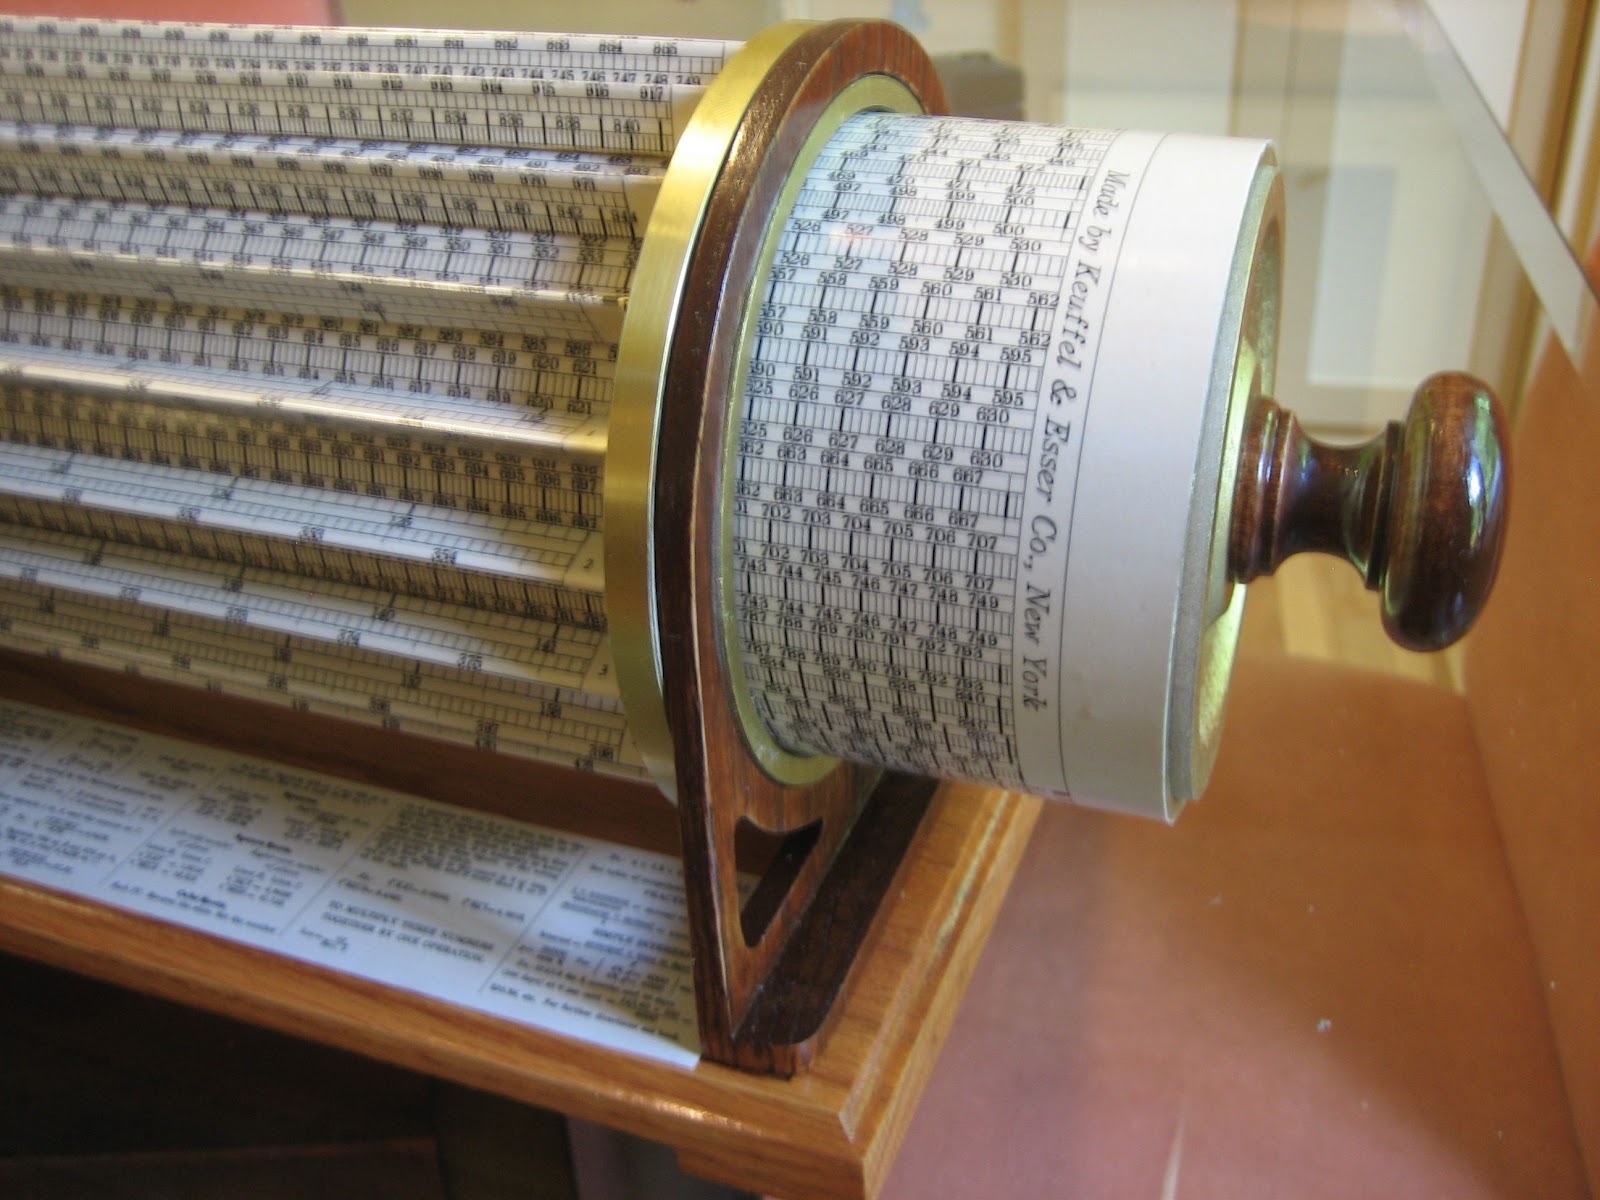
Since the wing cutter is still mounted on the drill press, it might as well be used to cut the endcaps for the rule's slide, a cylinder that moves both laterally and rotationally within the envelope. The cylinder itself will be a piece of clear acrylic tube, OD = 4", ID = 3 7/8". It can be ordered on-line from Outwater plastics, part number 10727, but you have to buy a 6' length.
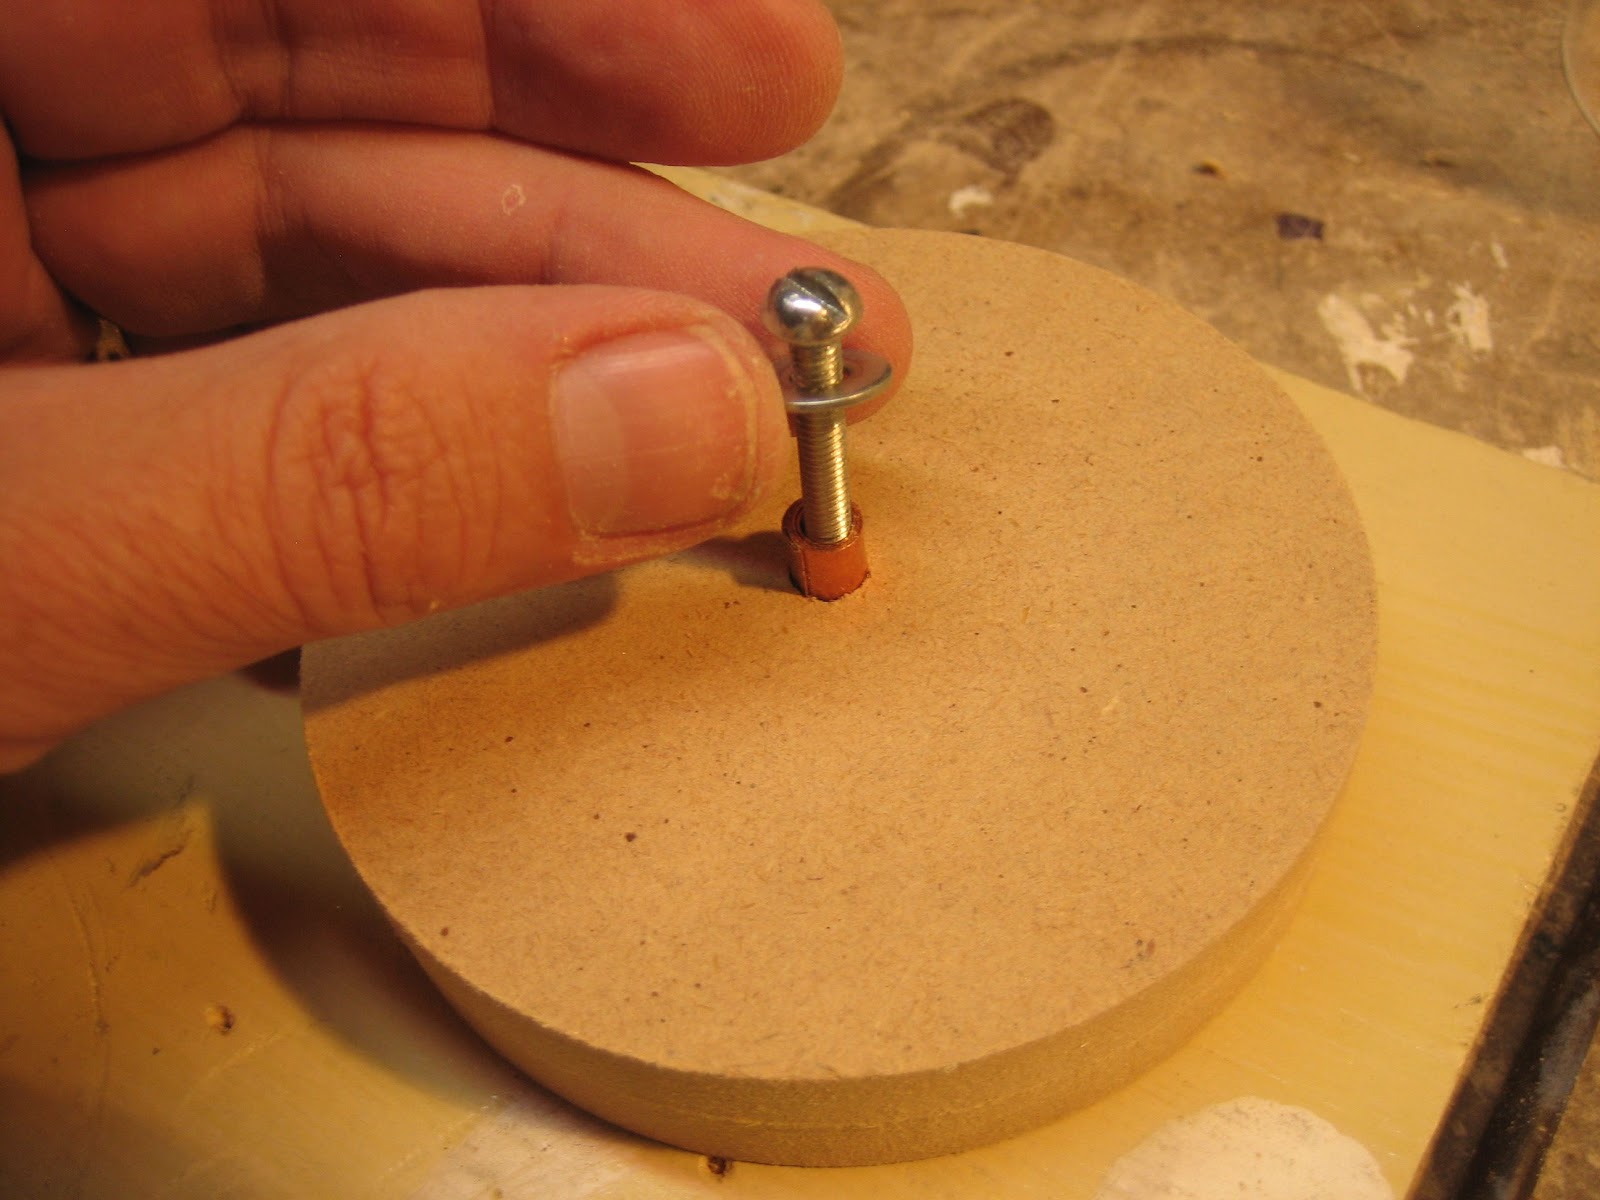
The ends of the tube will be plugged with caps to which wood knobs can be attached. Cut the caps from 3/4" MDF. It's best to set the cutter to cut a circle a shade larger than you need and cut 1/2 way into one side of your stock as shown here:
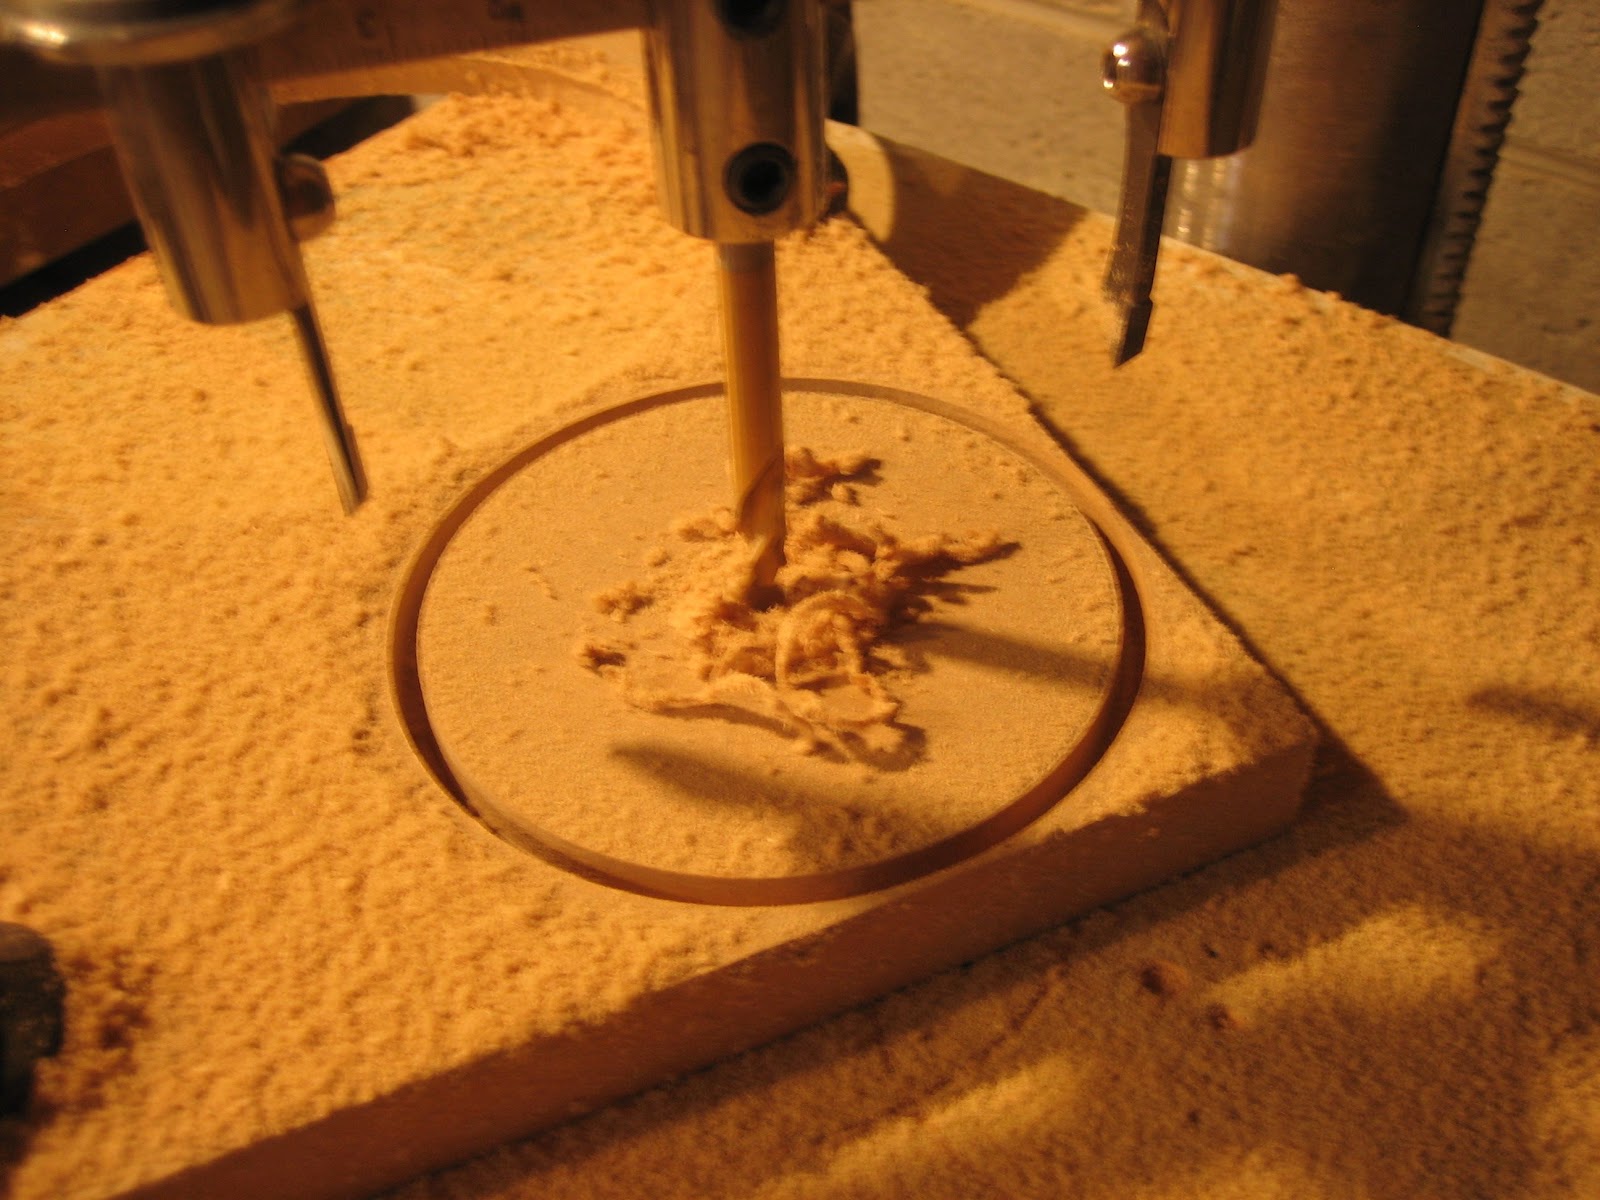
Now raise the cutter and rotate the table of the press to the side. See if a test piece of the tube will fit into the groove you've made. (Make sure the two cutterheads are set to cut a groove at least 1/8" wide.) You're looking to have the tube fit tightly against the side of the disk. Keep narrowing the cutter by hairs and eating away at the disk until the pipe can just barely be forced over the disk. When you finally get the right fit, flip the stock and cut the cap away from the other side. Then repeat for the second cap.
It's worth noting that an actual Thacher's slide is wood! It's made of 8 octagonally arranged beveled slats nailed to 4 evenly-spaced octagons. Pegs are glued to the centers of the end-octagons, a brass cap is fitted over the end of the cylinder, and then the knobs are attached to the pegs. Some day I'll have to emulate this construction, but for now a capped plastic tube will do.

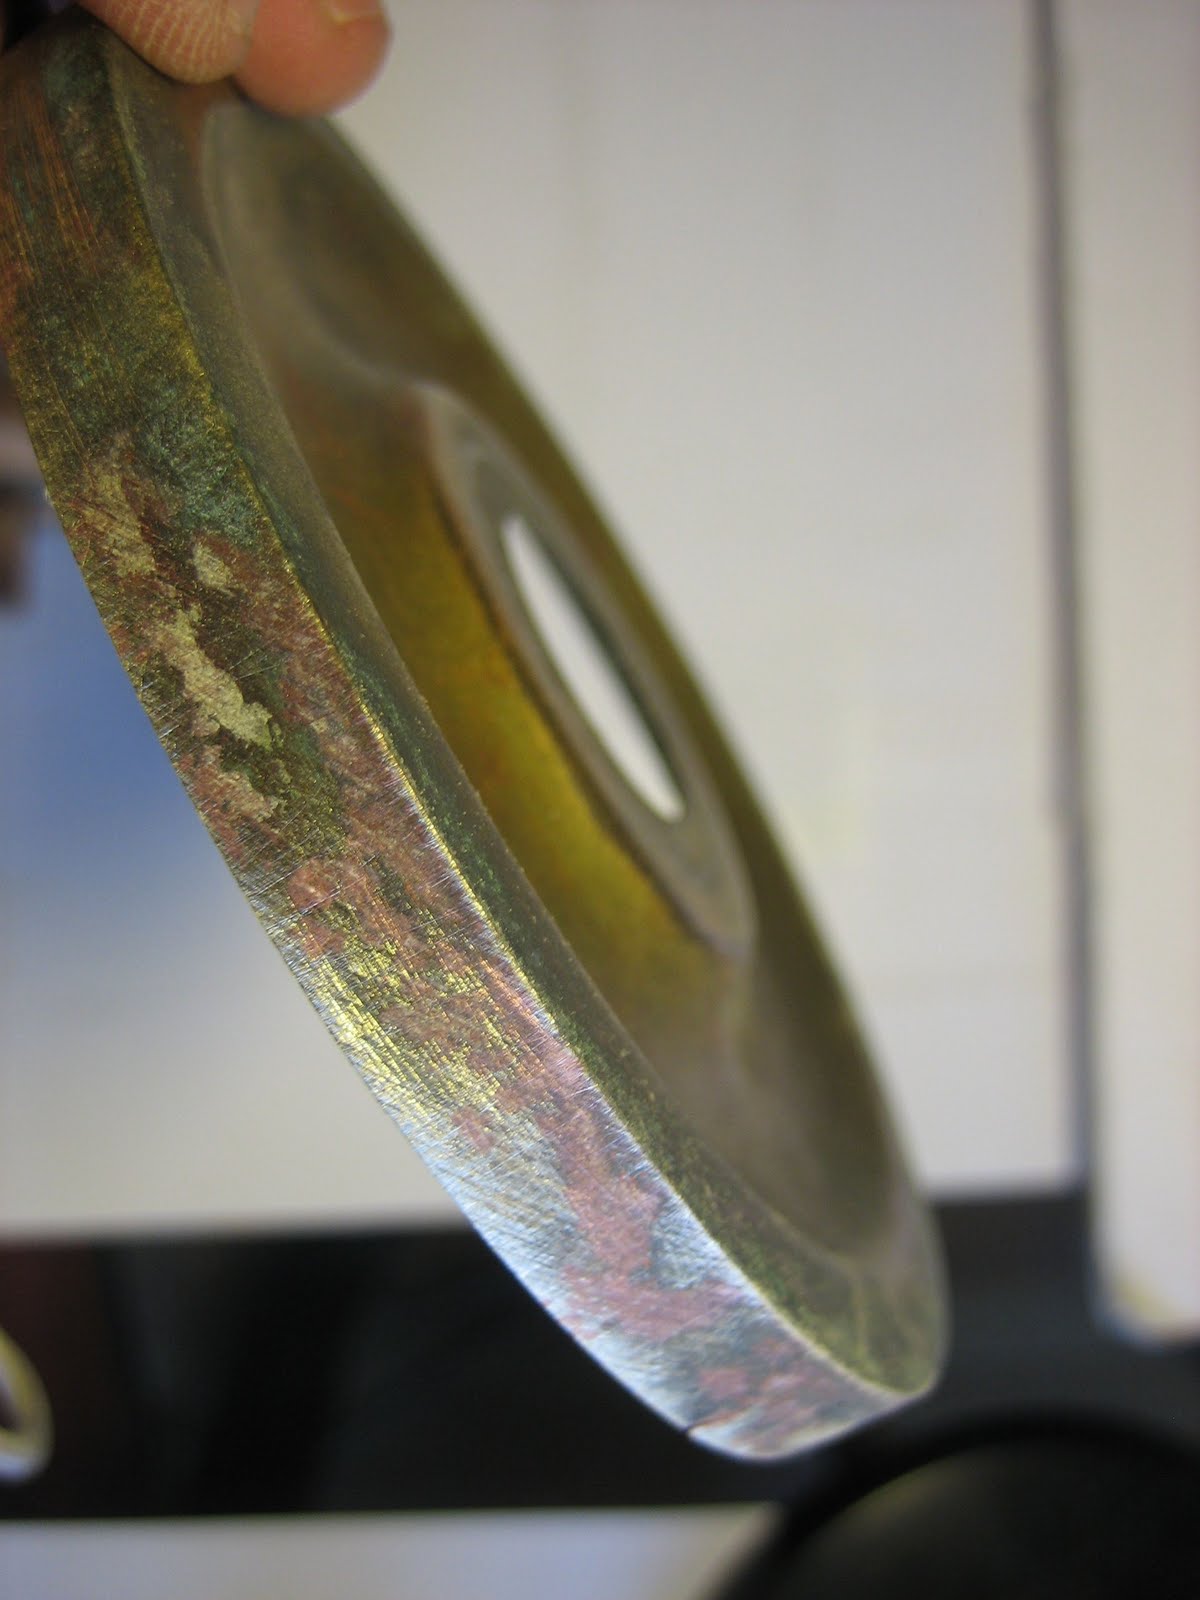
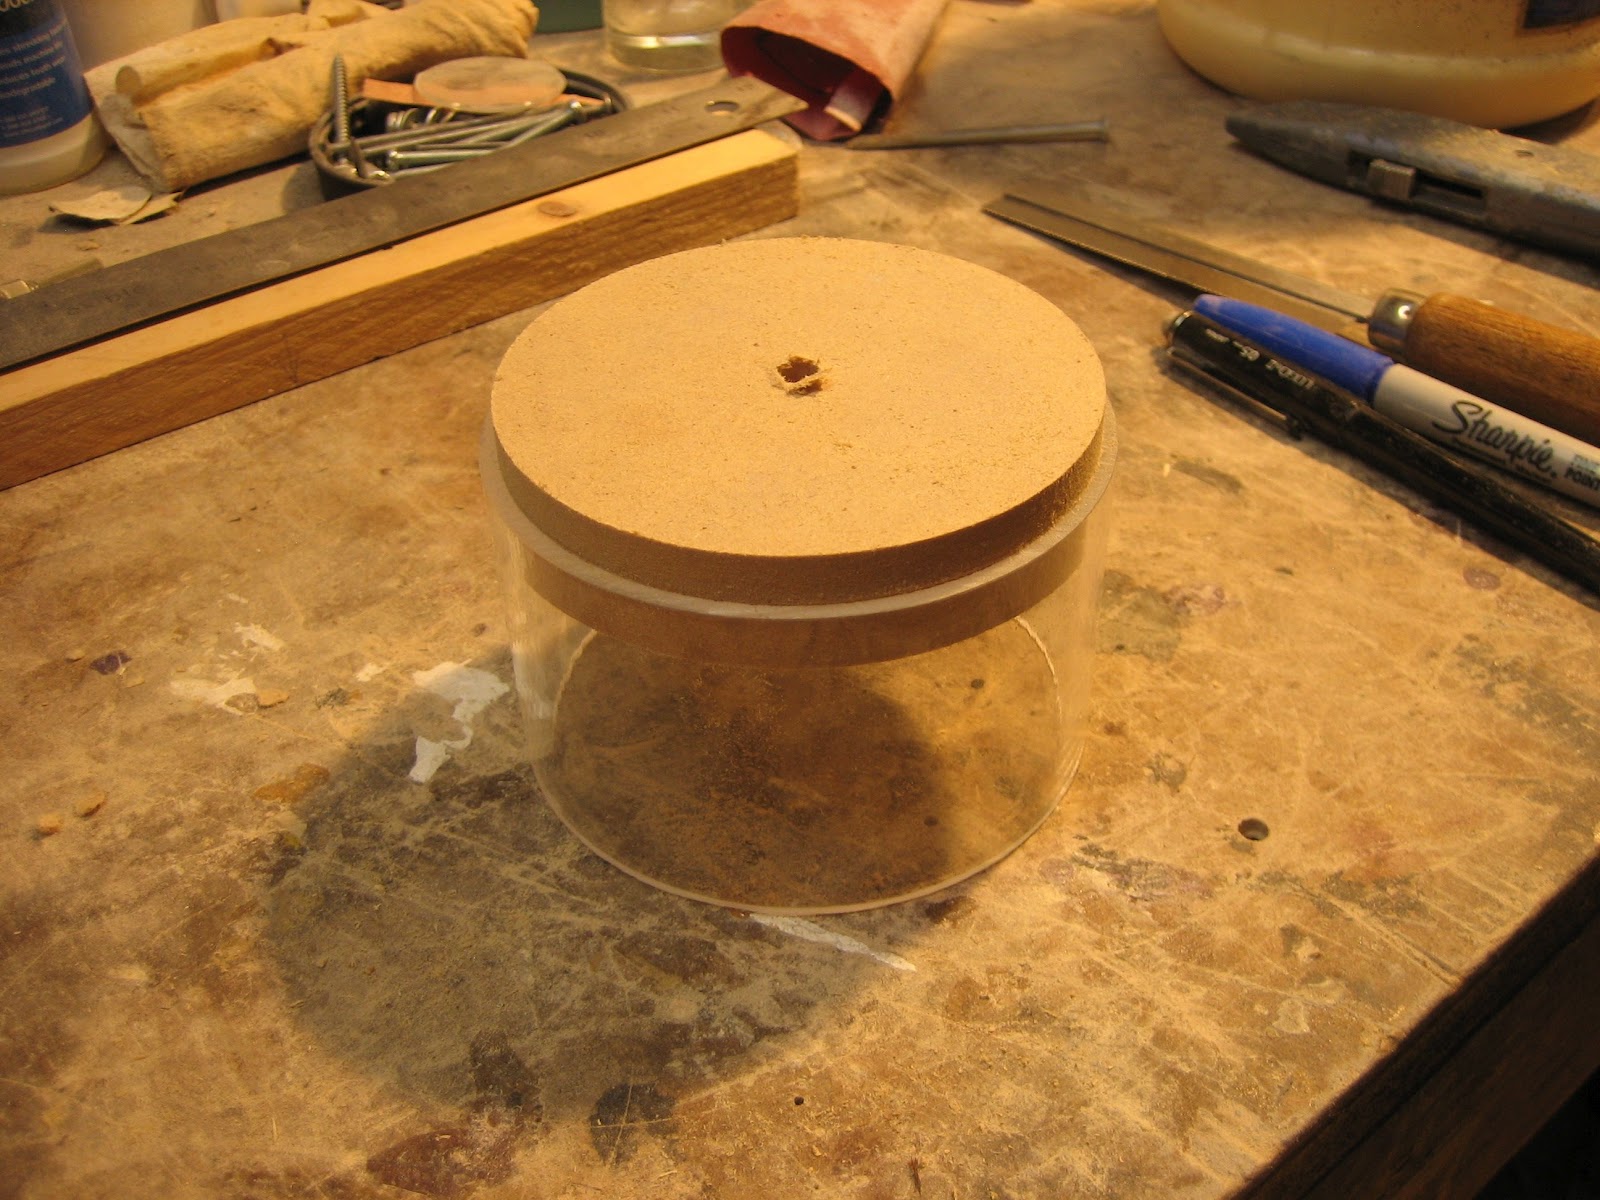
Note above that the ends of a real Thacher slide are concaved. To replicate that we have to rout some material from one side of each of the two caps just made. Call me crazy, but I use the drill press for this, too.
Using the hole already in the middle of a cap, a collet that adapts a screw to the exact size of the hole, and a couple washers and a locknut, I attach the cap to a scrap board. I then clamp the board to the baseplate of my drill press and mount a round router bit in the chuck. I lower the bit into the cap, and turn the the cap on the screw - which is tight but not too tight - to carve a round-bottom groove. I deepen the groove in stages to 1/8", and then nudge the baseplate left & right to widen the groove. I make the IR = 3/4" and the OR = 1 5/8".


These caps will get sanded and spray-painted gold. Knobs will be screw-mounted at the holes.
Next, cut the triangular bars for the envelope. Each is a long prism whose cross section is an isosceles triangle with sides 3/8" x 1/4" x 3/8". Their finished length needs to be 18 7/8", but in as much as ripping them from a board often leaves imperfect ends, I think it's best to initially cut them a little long and then trim them back.
The critical angle is 19.47 degrees - that's 1/2 of the angle at the apex of the triangle. Set that tilt in your saw blade. In this build I'm using a radial arm saw to rip them, but in the past I've used a table saw. In either case these have not been easy to produce perfectly.
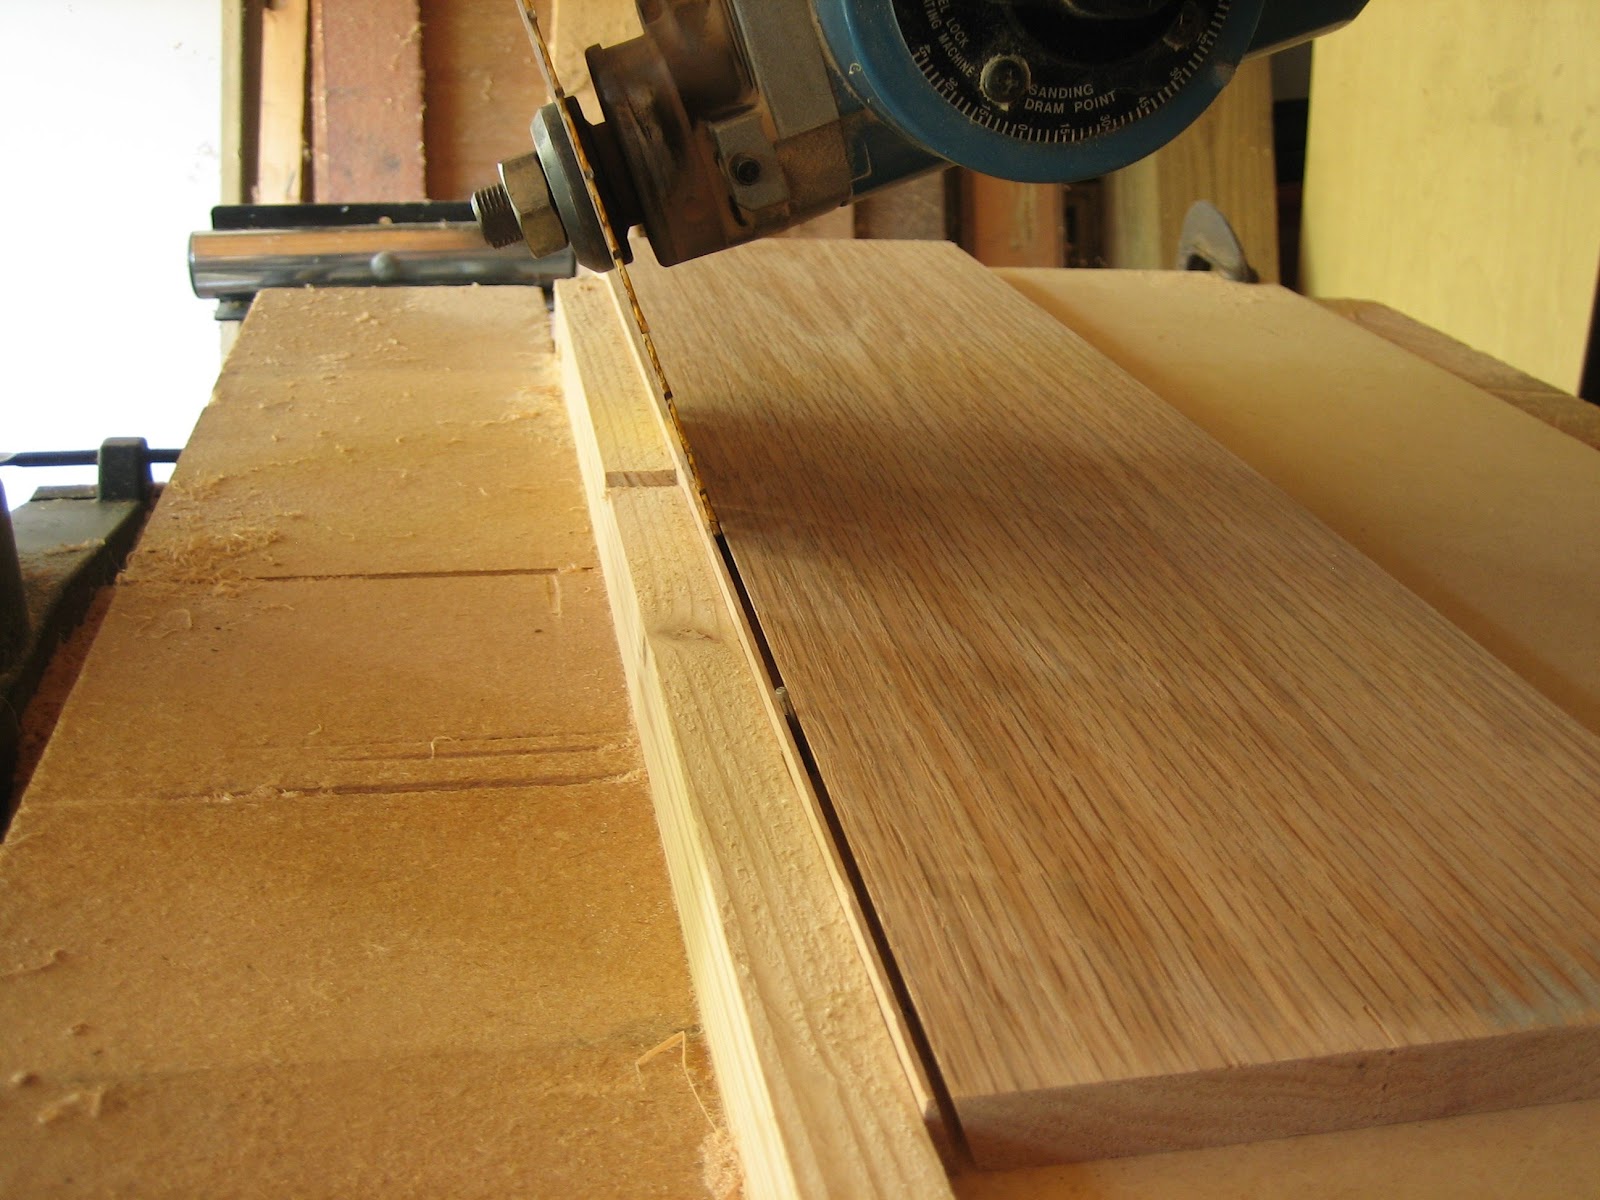
Here's my setup. I'm ripping exactly 1/4" (at the table) away from a short backstop. It's not an ideal cut and tends to promote pinching.
Note that I've placed an angled nail in the cut-path on the outfeed side of the blade (toward the camera) to prevent pinching. Its friction on the bar also prevents the blade from shooting the bar out the feed side as soon as it's finally cut free of from the stock.
This shows the 1st rip to take the square edge off the stock.
I've tried making these from several different hardwoods (maple, cherry, walnut, ipe) and manufactured woods, and so far red oak is the best I've found. Its long grain promotes rough cuts, but increases stiffness, and that helps make the envelope stronger.
Face-plane your stock to about 1/2" thickness and make your first pass to leave the edge of the stock beveled.. Now flip it and rip again to produce the first bar. Keep flipping and ripping and keep checking the quality of your result. Make tiny adjustments as needed until you get good cuts and pretty even results.
Don't be too surprised if you find that your bars taper from one end to the other. It's a difficult cut. Err on the large side if you must; there's a relatively easy way to reduce an overly large bar down to correct size.
To do it, you first need to build yourself a jig. Take two of your bars and glue them side by side down the face of a base about 18" x 3" wide x 3/4". This gives you a nice V-groove along which you can nestle and slide a bar. Now mount a sanding drum on your drill press and clamp your jig sideways right up next to the drum so you can sand down the base of a bar as you slide it along the groove. This will help trim overly large bars down to exactly the right size along their entire length.

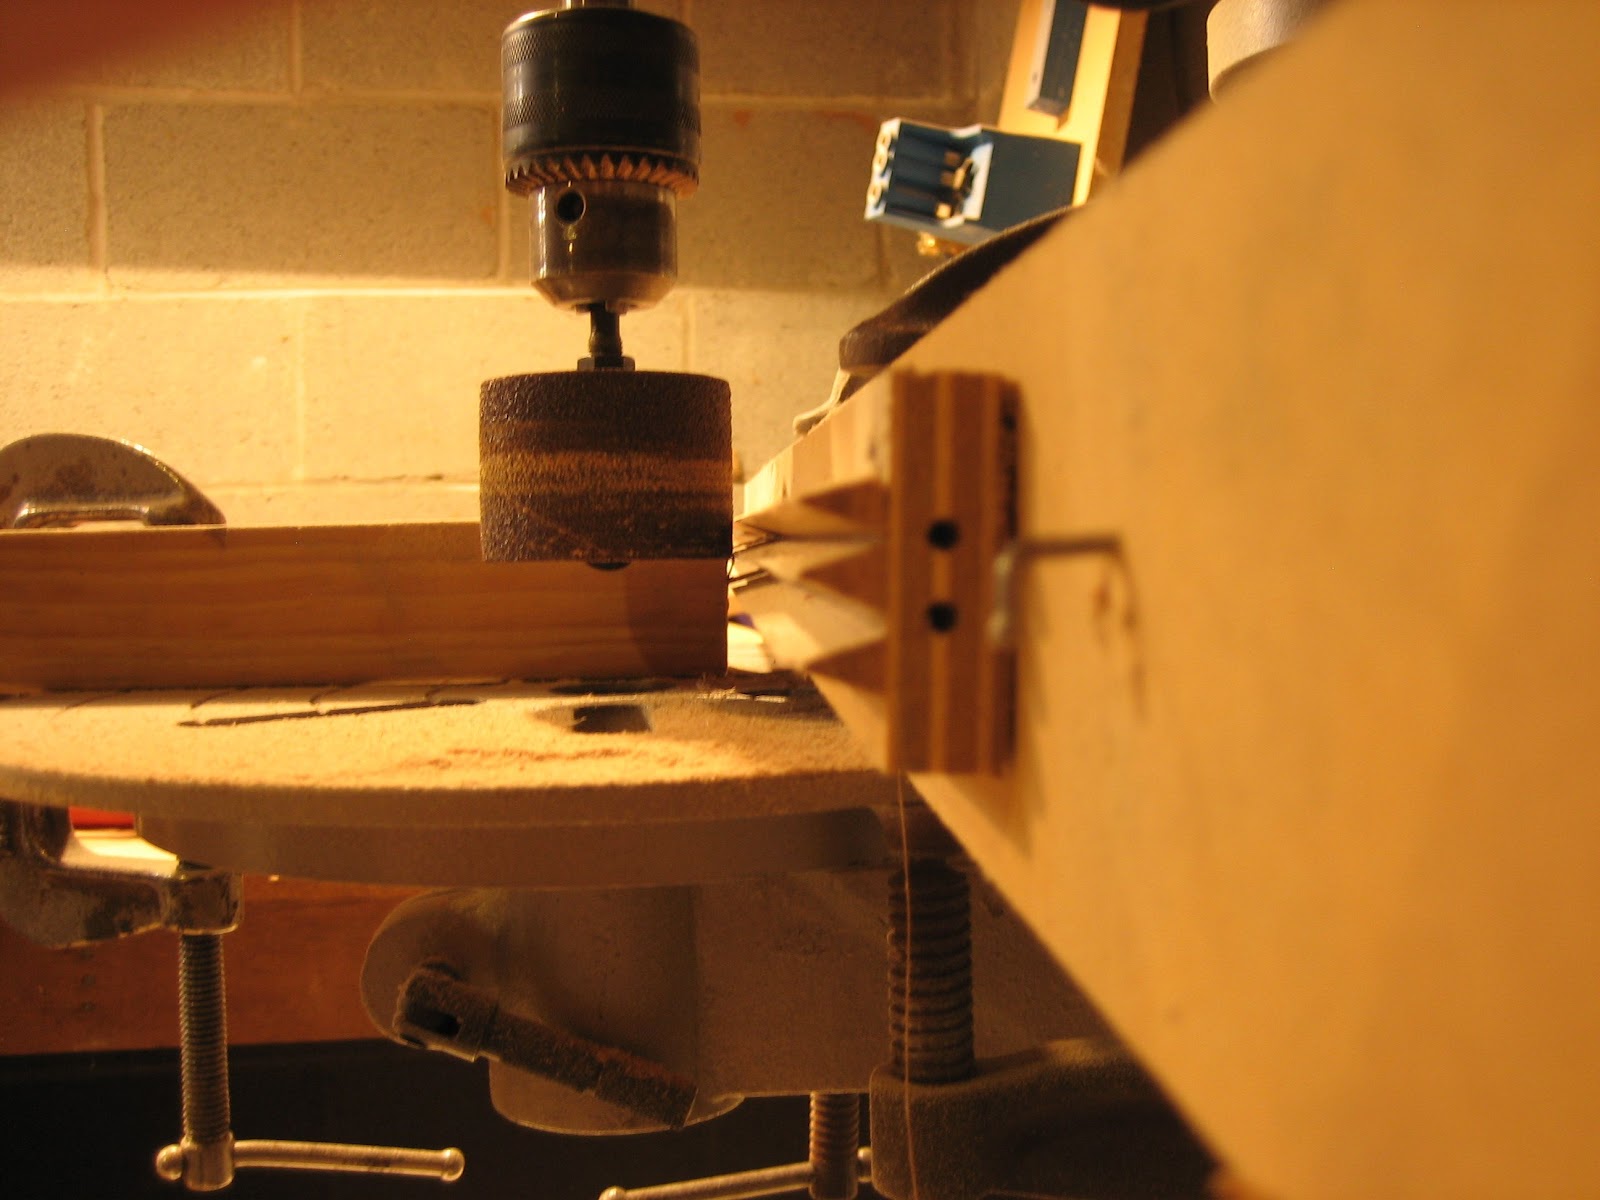
I'd already made the jig for my Thacher rescale project. It has 3 bars and two grooves, one slightly narrower than the other. (Note that the center bar bears a Thacher scale. It was a trial piece in another build.)
When a slightly oversized bar is inserted into the groove and pushed past the drum, its base gets sanded down everywhere an even distance from its apex. So you want the "hole" formed by the drum and the groove to be 3/8" x 1/4" x 3/8" or just a hair larger.
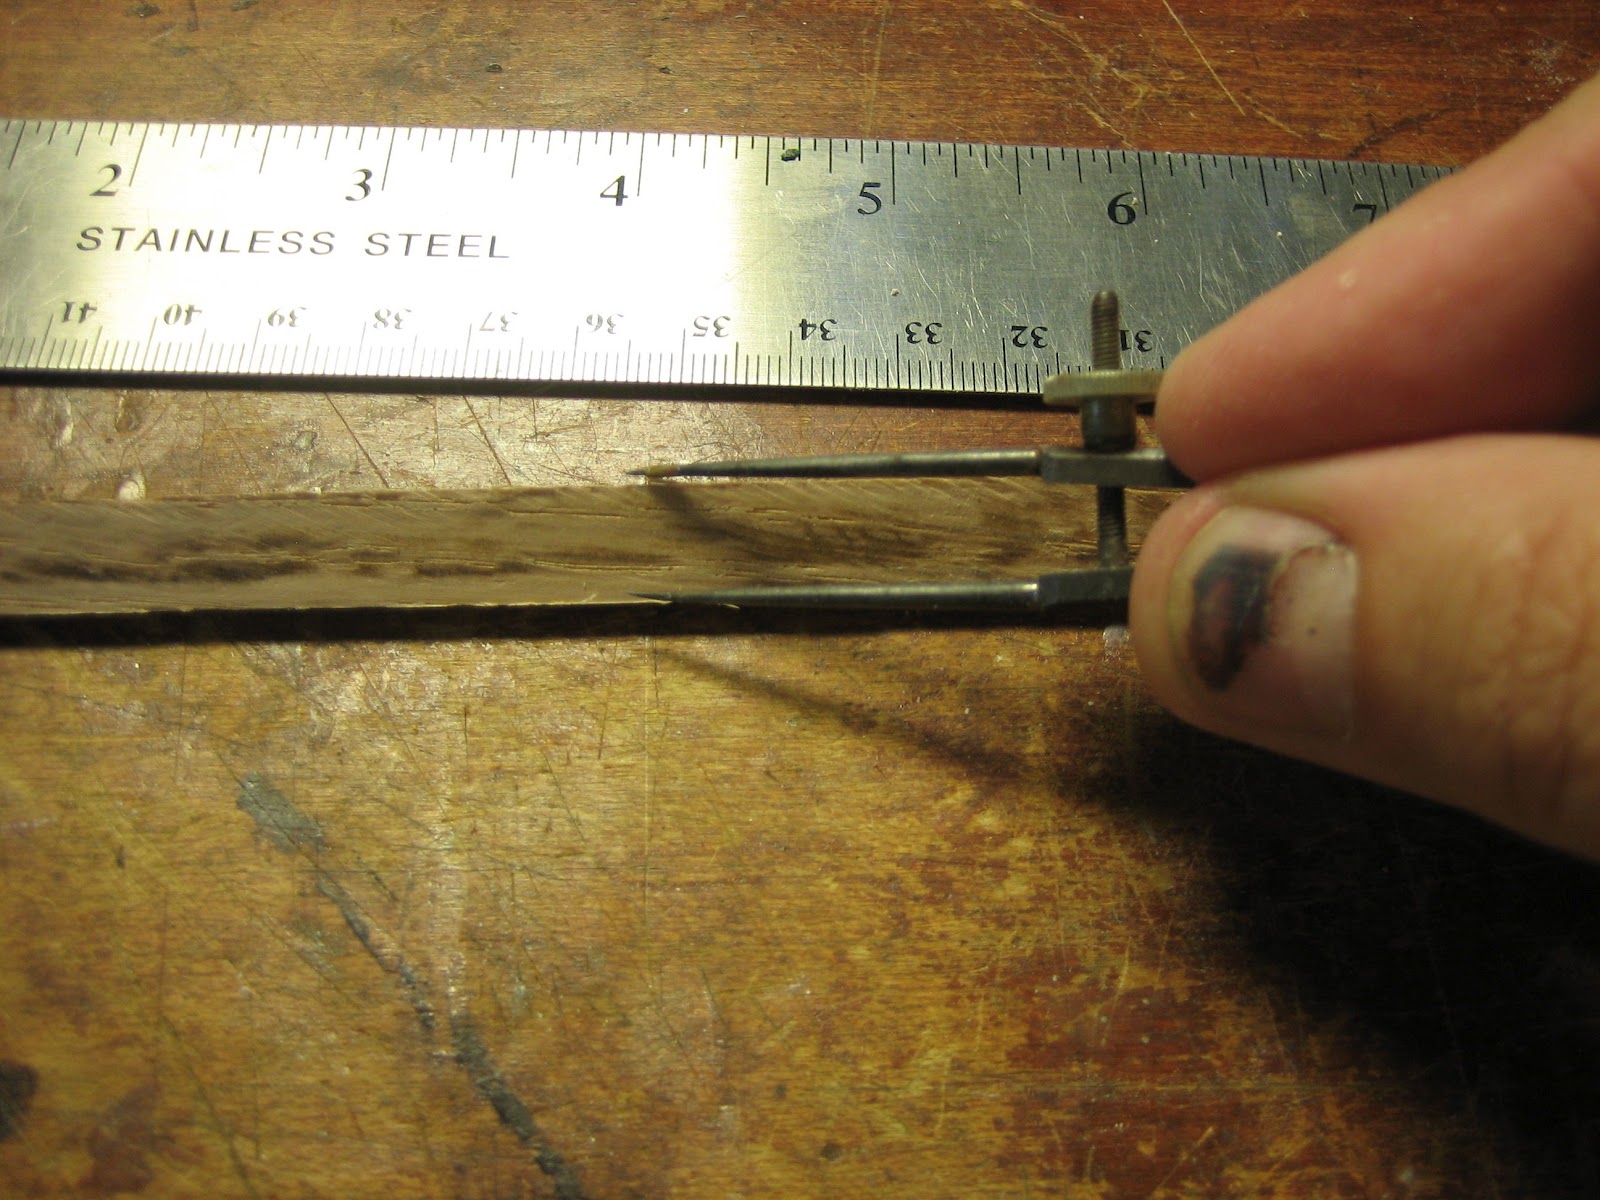
Check your bars by setting a caliper for 3/8" and running it along your bars. Toss any that are too narrow. Sand the bars gently by hand to smooth away any splinters and then check their size again.
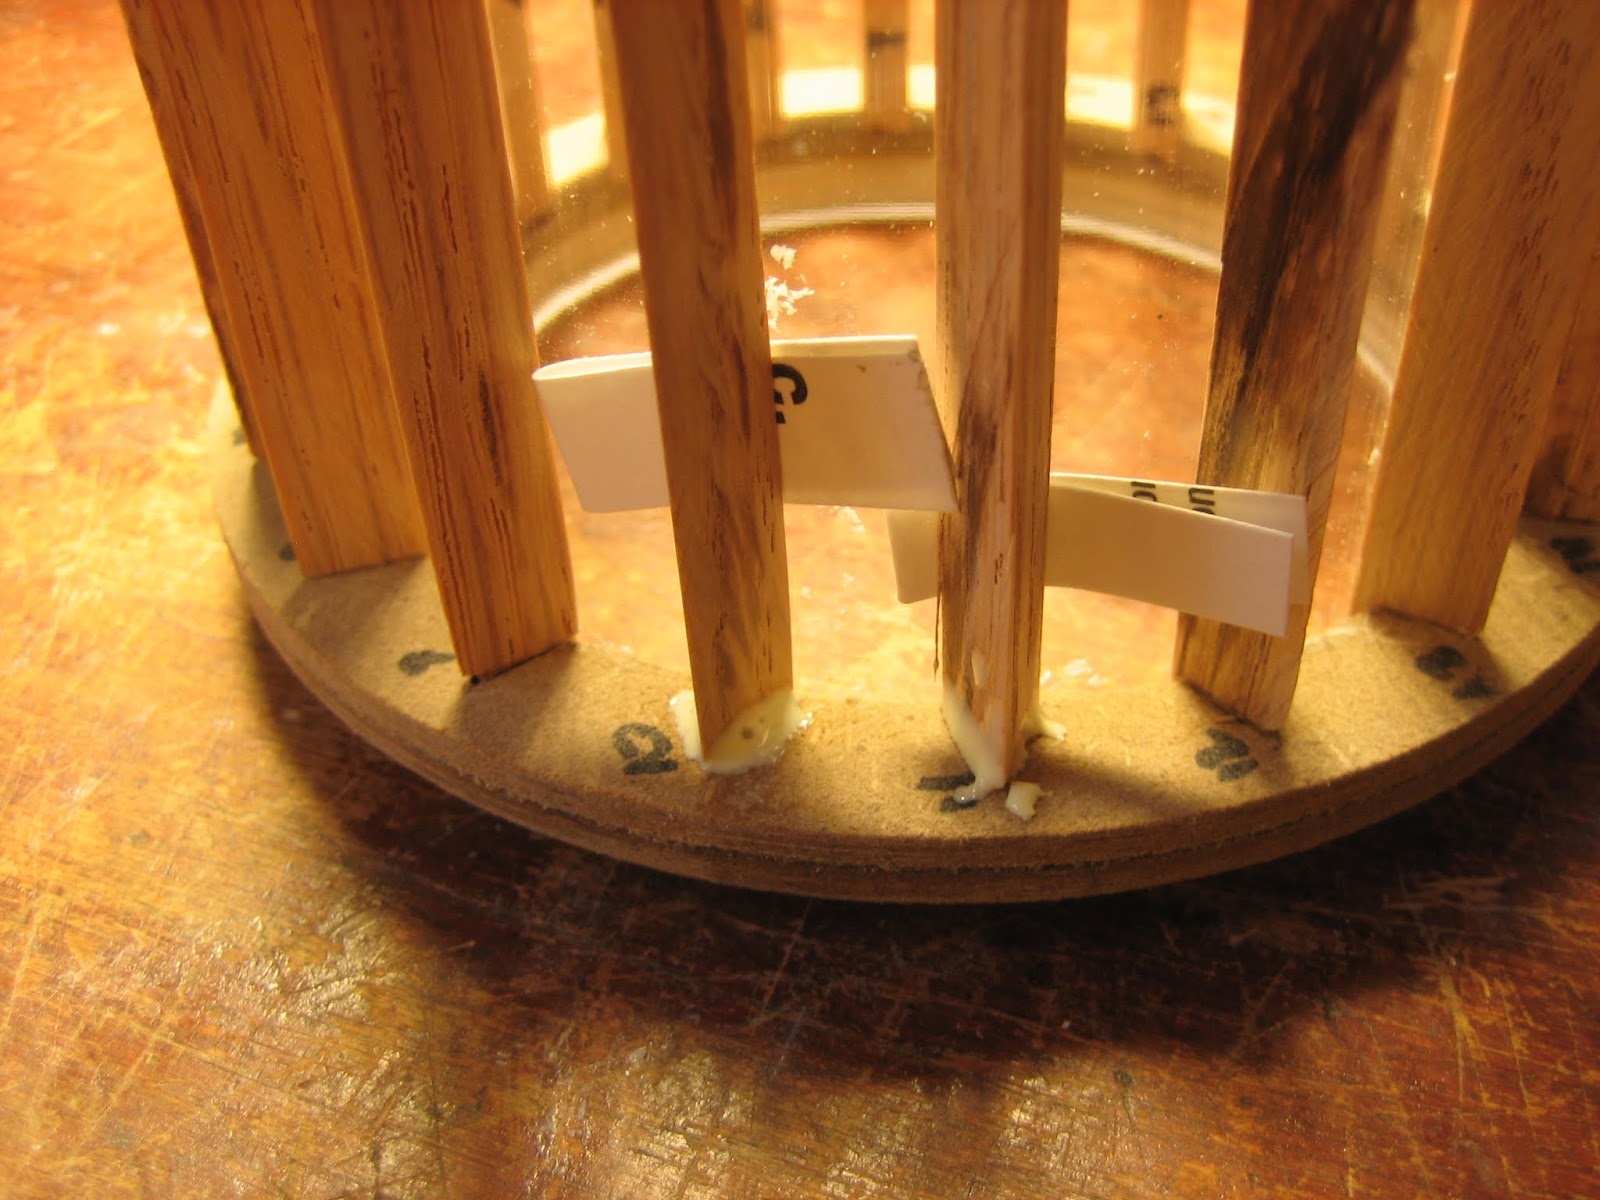
You now want to fit the bars into the notches of the envelope end rings such that their bases are flush with the inside circumference. If they're too small, toss them out. If they're a little large that's OK - the next step is to trim them for an exact fit.
Start by numbering the slots on one ring clockwise, in red. Then number the slots in the other ring counterclockwise in black. Now choose your best 20 bars, designate one end red and the other black, and number them, too. Now carefully test fit each bar end into the notch of the matching number and color. Use something like a Dremel tool to shave down the last 1/8" of the end so that it exactly fits. Make sure all 40 ends fit snugly into their notches. It's tedious but important to get the bases of the bars flush with the inside of the ring.


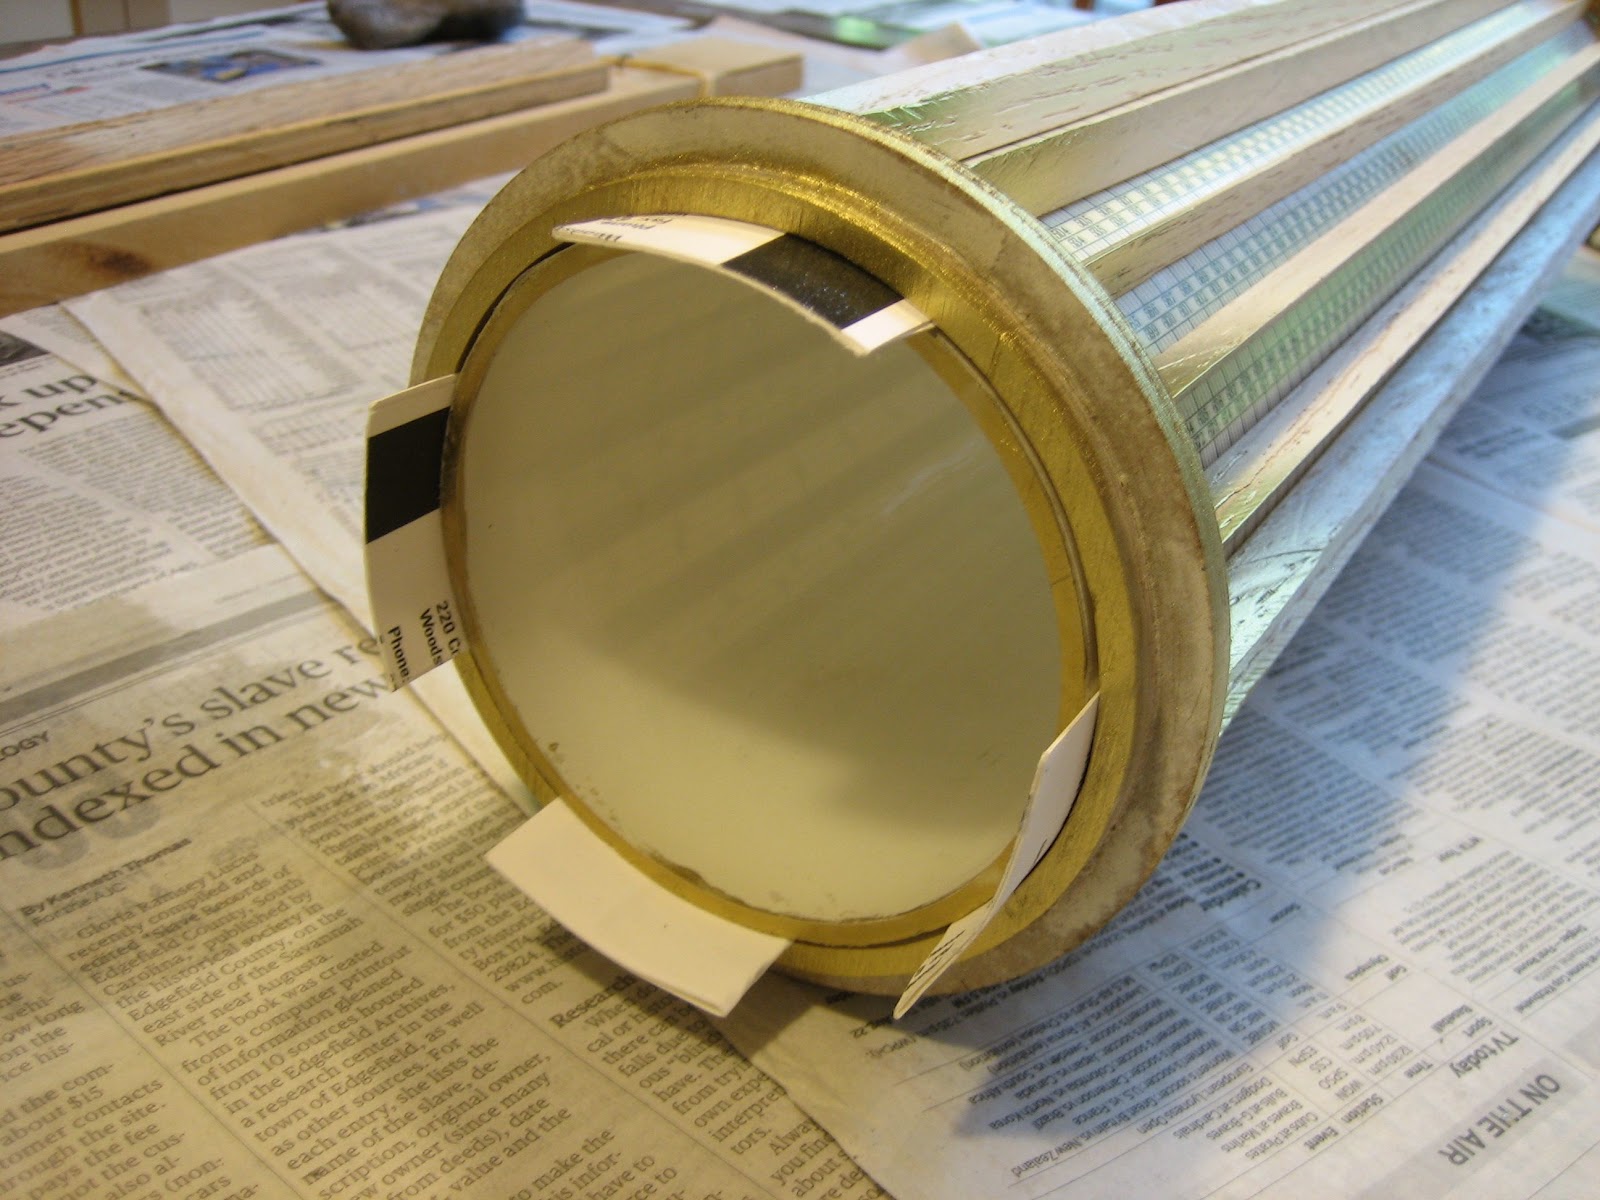
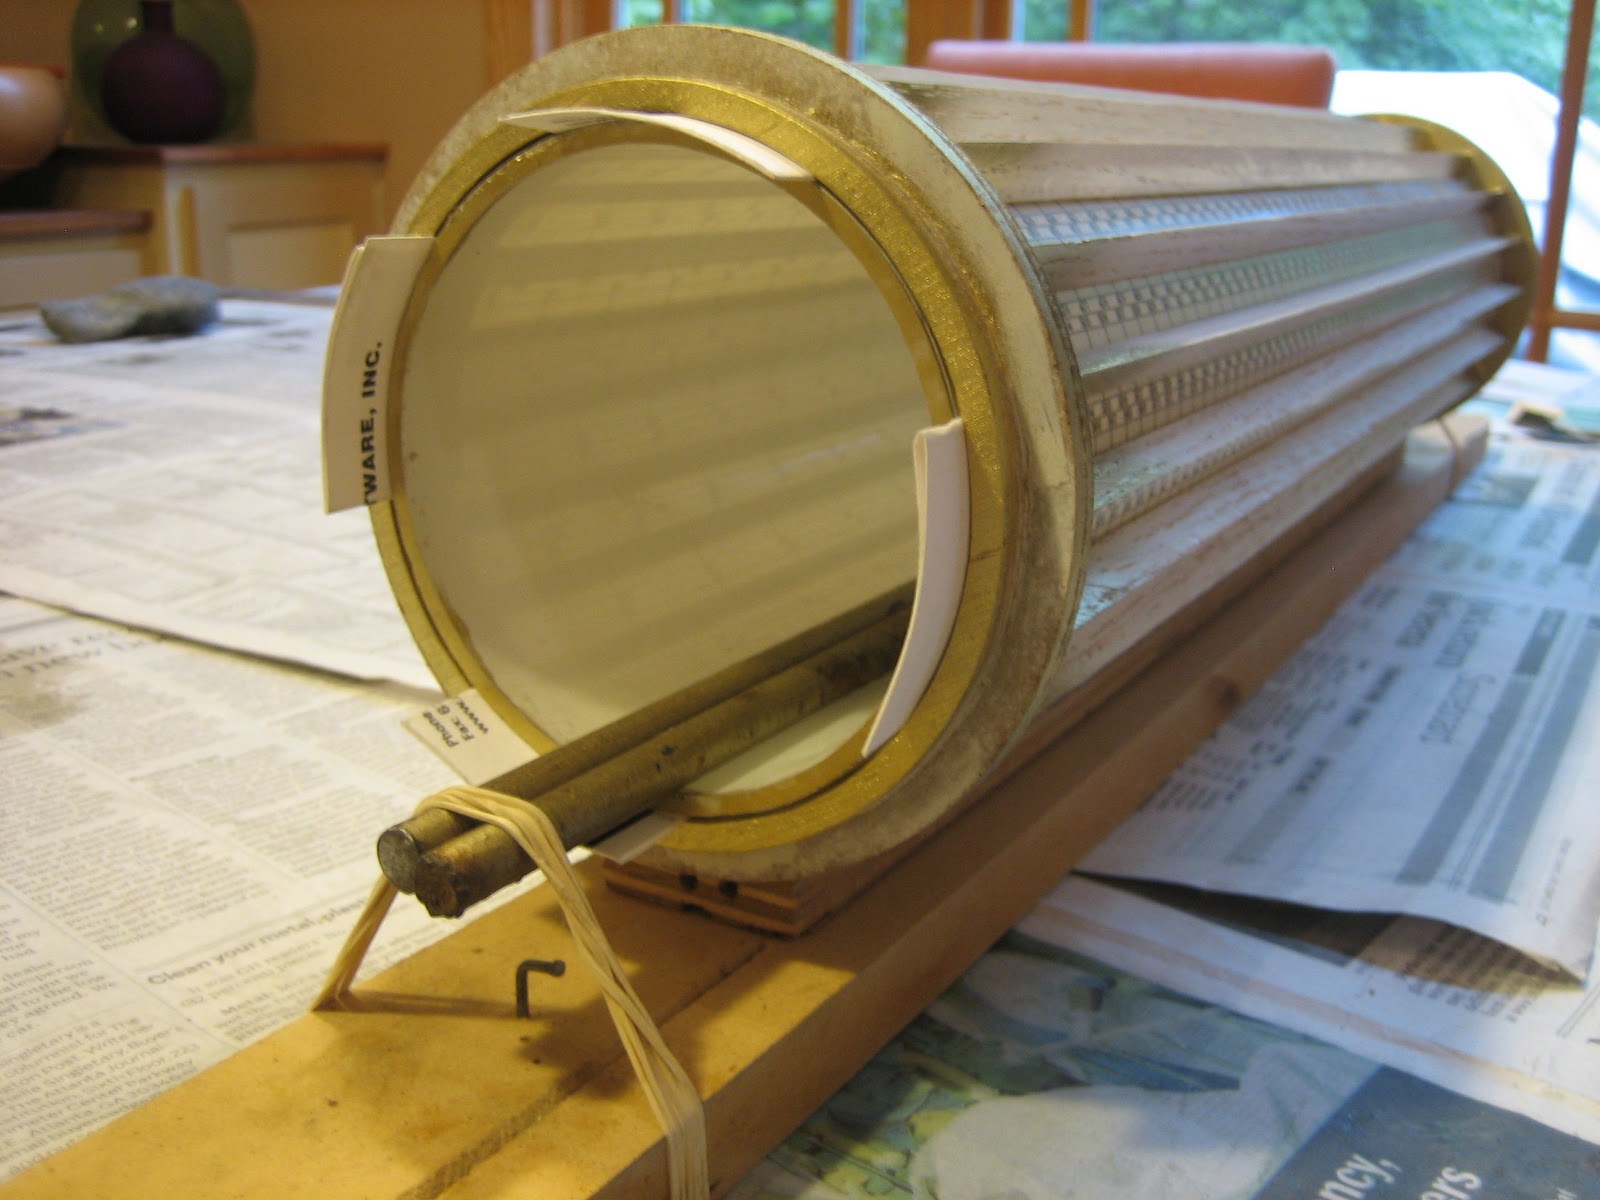
Next, cut a segment of 4" OD acrylic pipe (order from Outwater plastics, part number 10727 in 6' lengths) 19 5/8" long. Try to make sure the ends are square. Place one of the end ring assemblies on a level surface with the notches up, and sit the pipe inside it. Seat the correct end of the bars into the ring, holding them all in place with a rubber band around the top. Fit the other end ring over the top of the pipe and nudge the upper ends of the bars into its notches, just to align everything and be sure it fits. You can then remove that ring
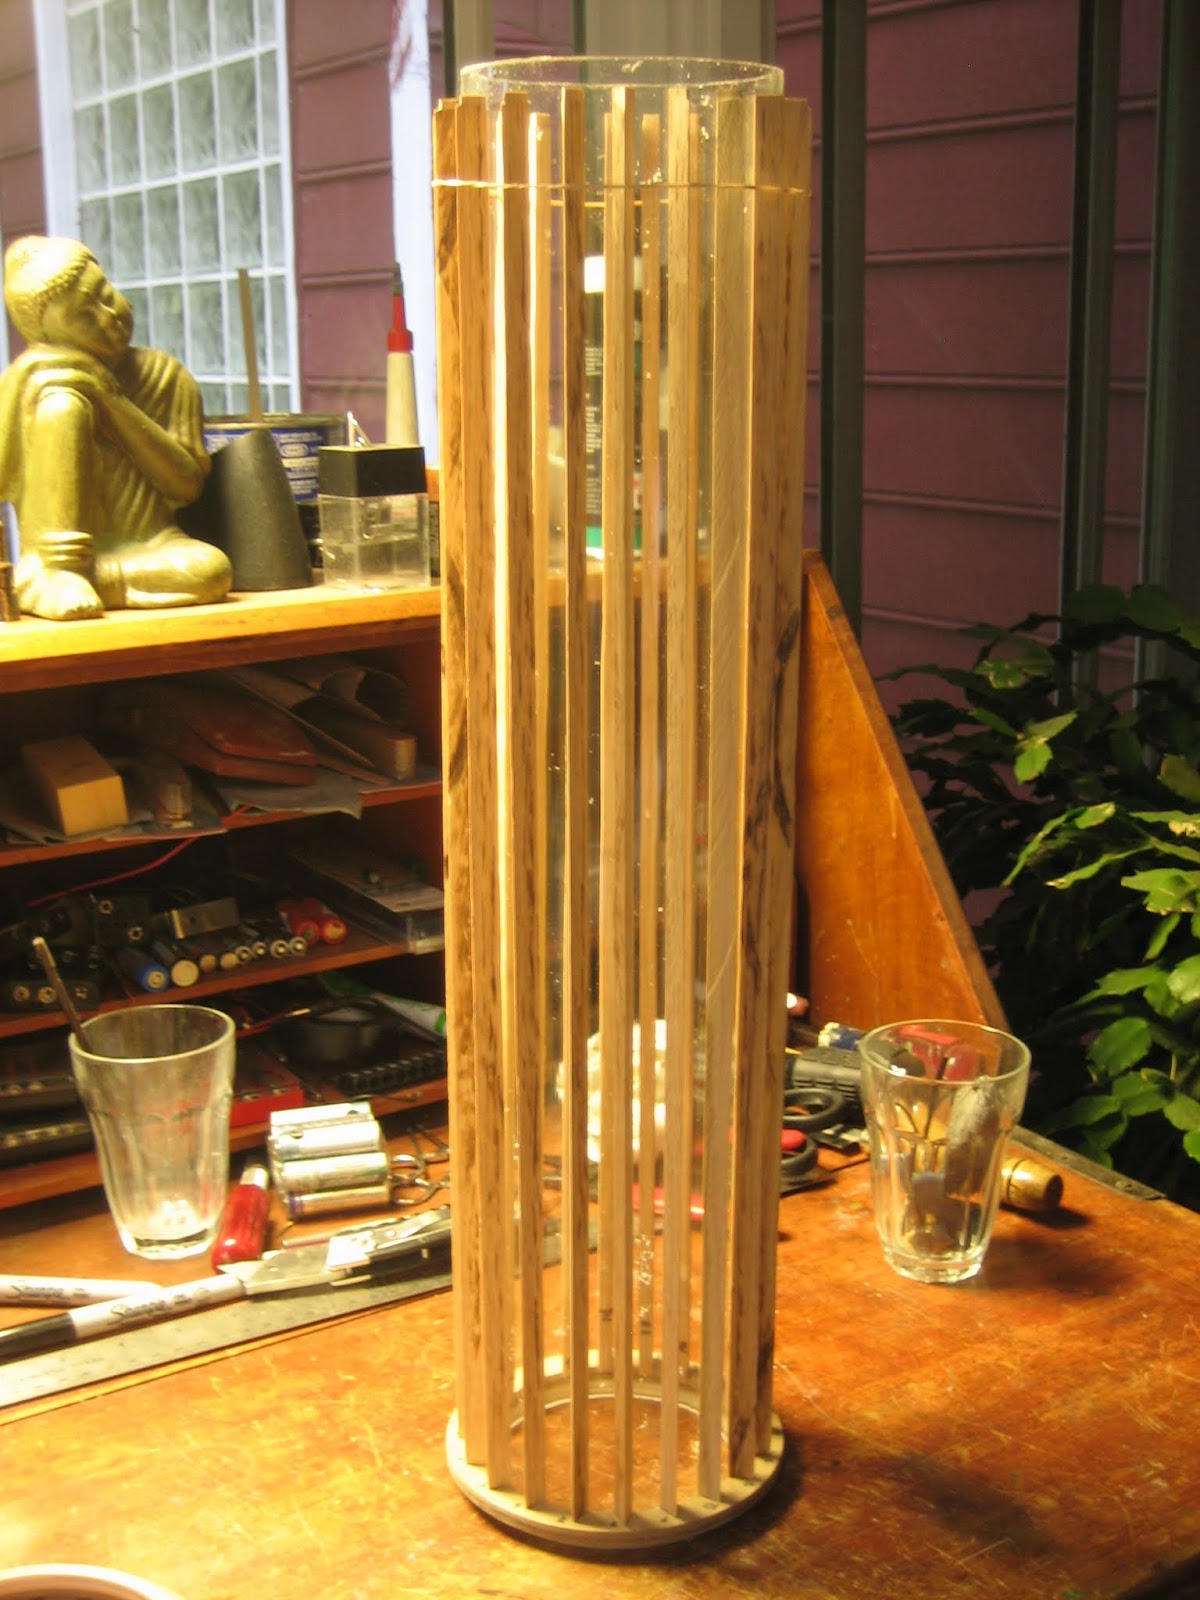
Lift each bar a bit, dab wood glue into the notch and onto the sides of the bar, and then drop the bar back into its notch. Cut two business cards vertically into 10 strips each, fold each strip over to double its thickness and slide it between each glued bar and the pipe. (It's easiest if you slide them in near the middles of the bars and then push them down to the glued ends.) This will provide pressure to push the bars outward firmly into the notches with their 1/4" bases flush with the inside of the ring. Try not to get glue between the bars and the pipe! Wipe up any excess glue with a damp Qtip and let sit overnight to dry.

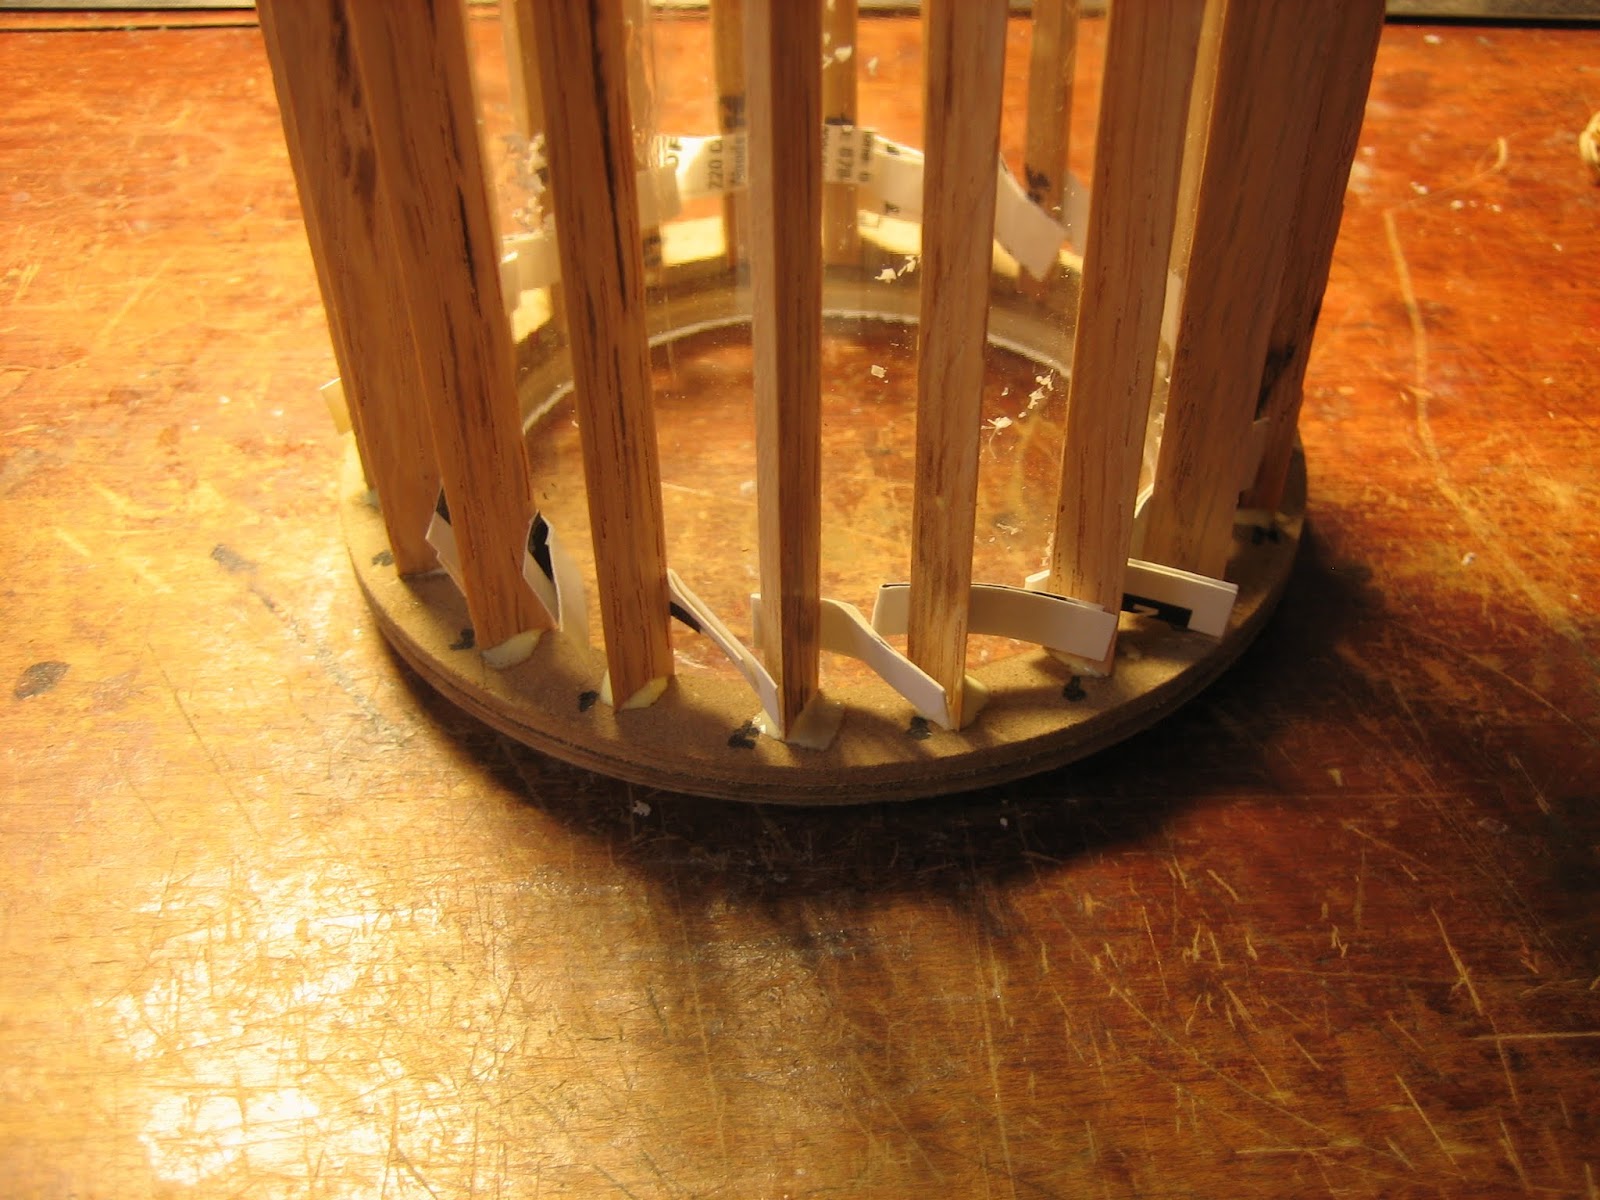
When dry, remove the strips and, if you got any glue between the bars and the pipe, gently break the pipe free.
Next dab a little glue into the notches of the other ring and on the sides of upper ends of the bars, drop the ring over the top of the pipe, and fit the bar ends into the notches. Again insert the folded strips and let dry. When ready, remove the pipe and sand the inside of each ring to be sure everything is flush and smooth.

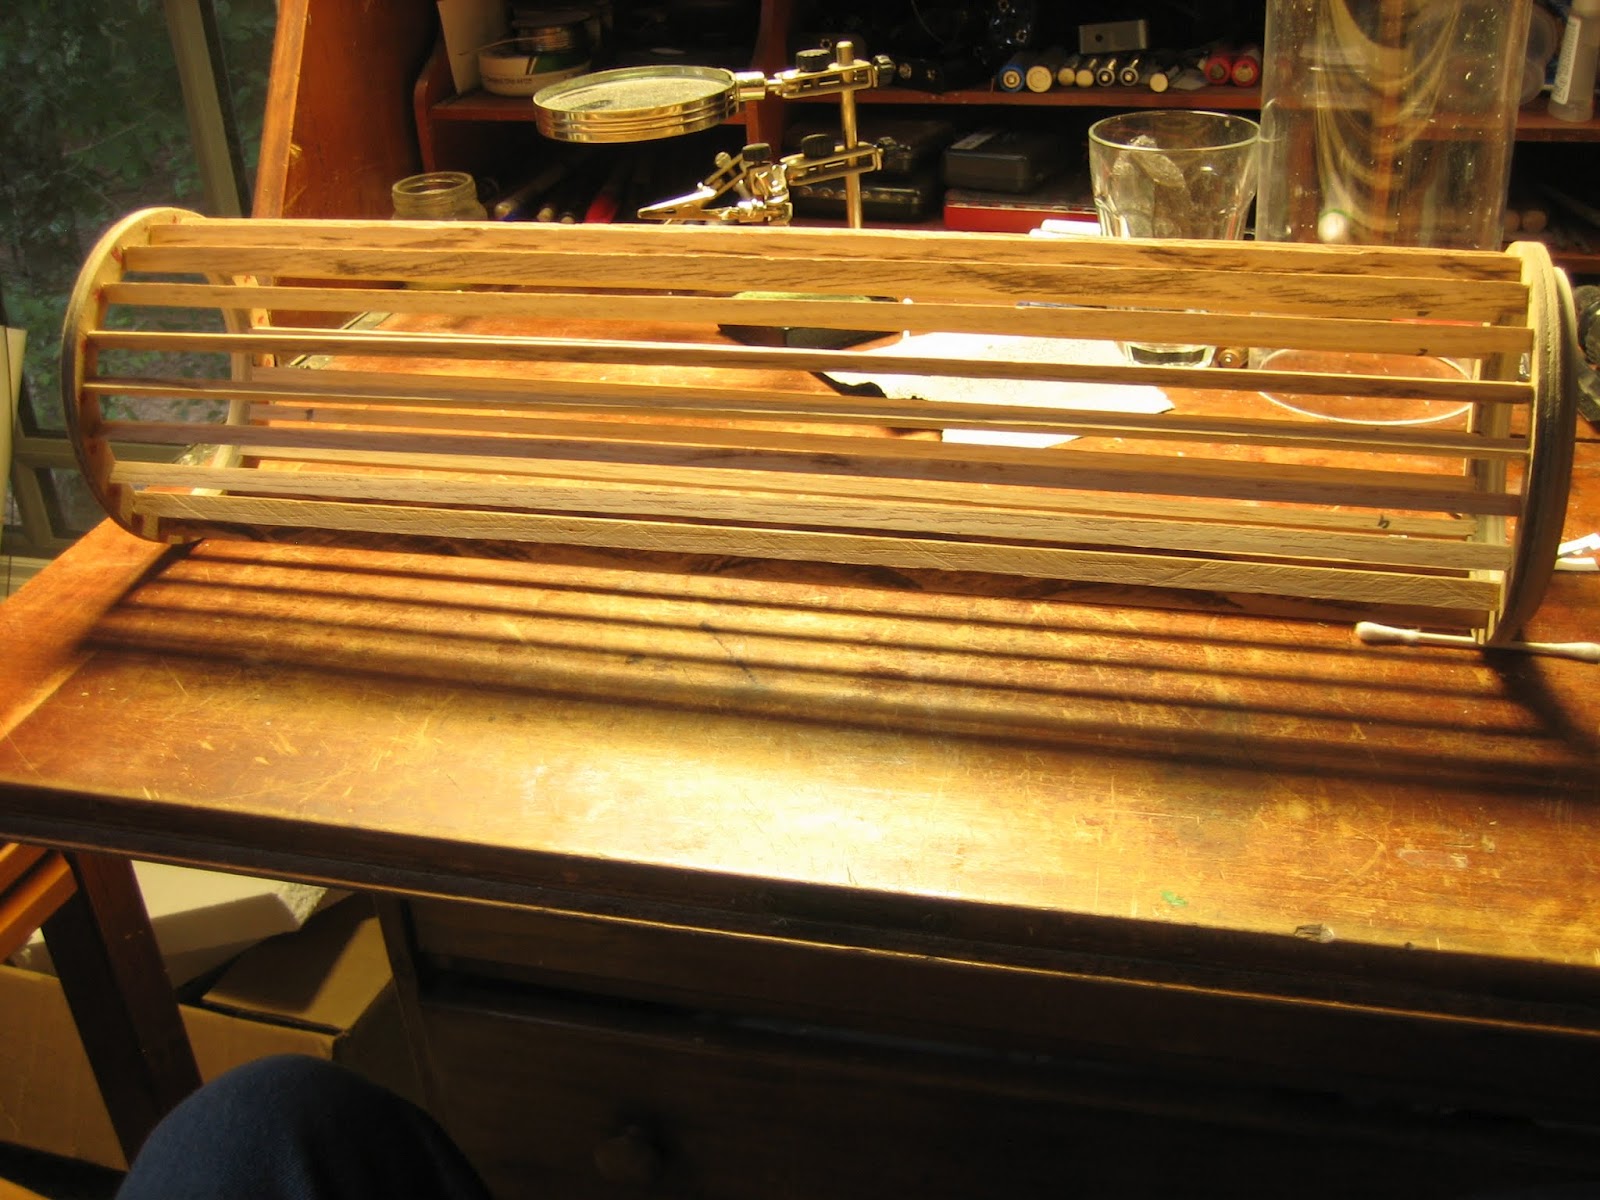
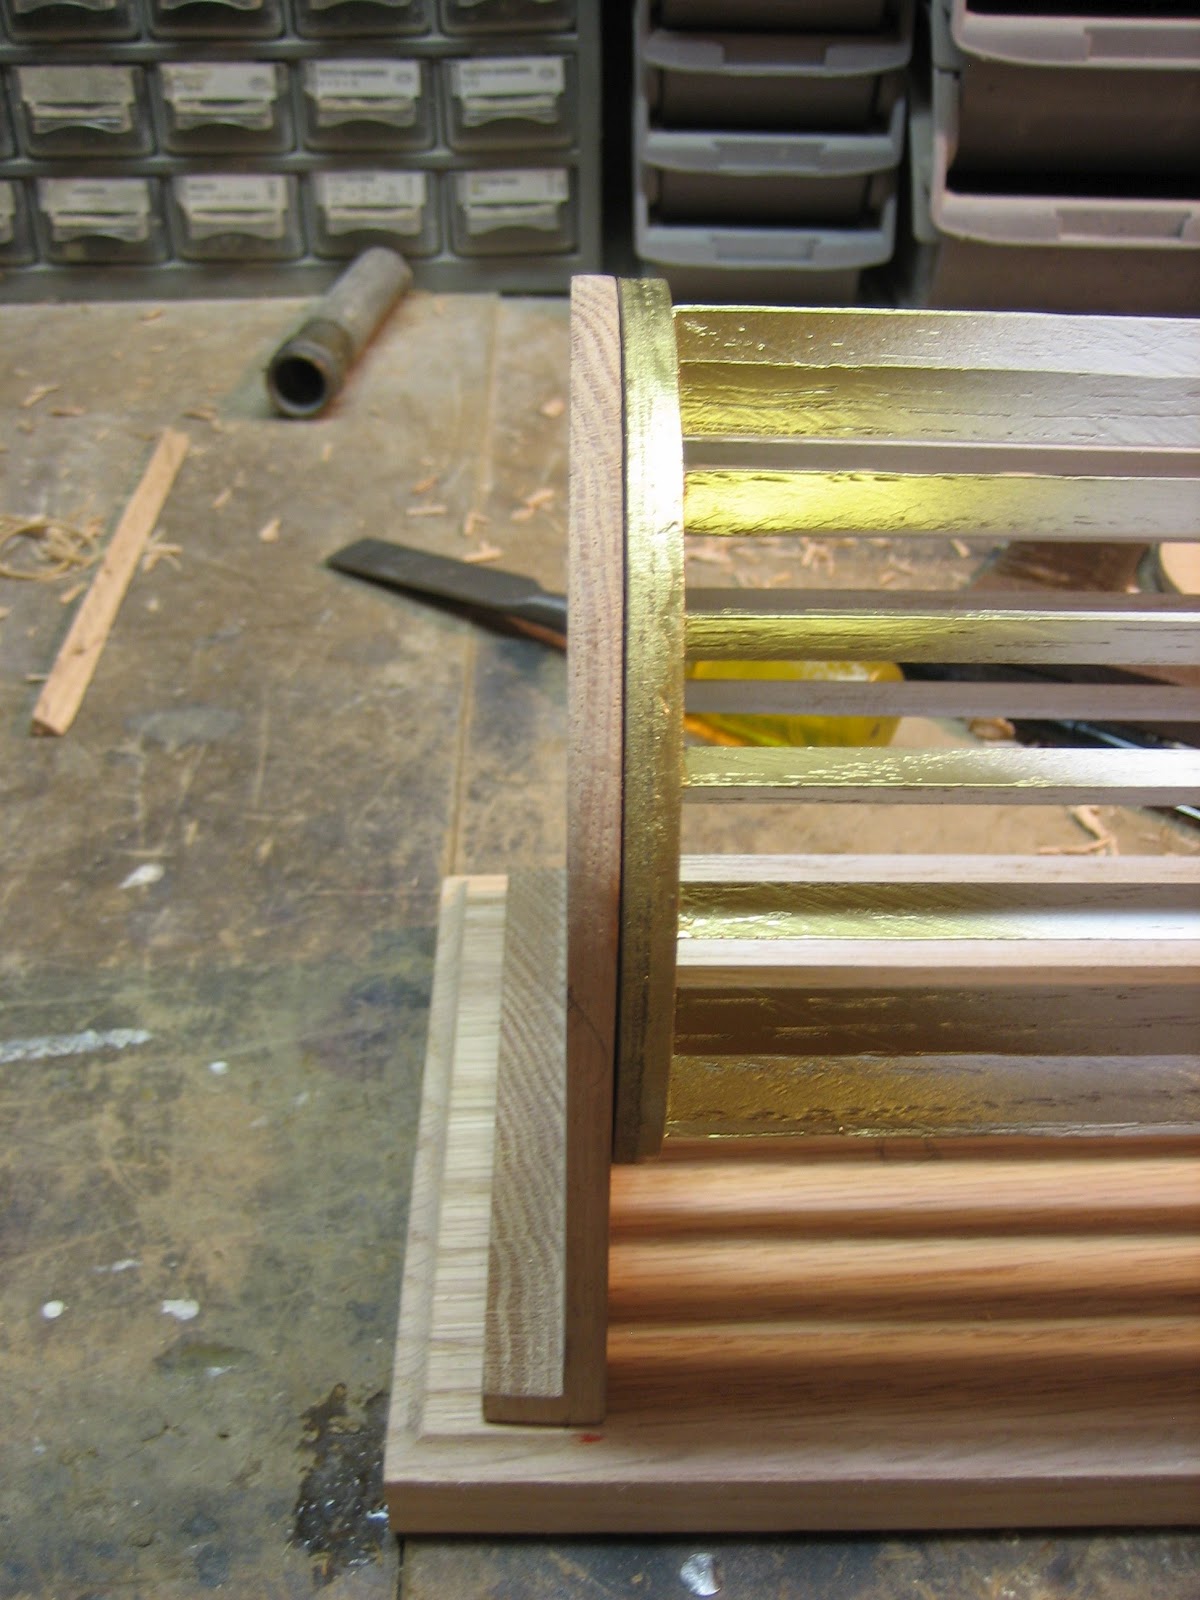
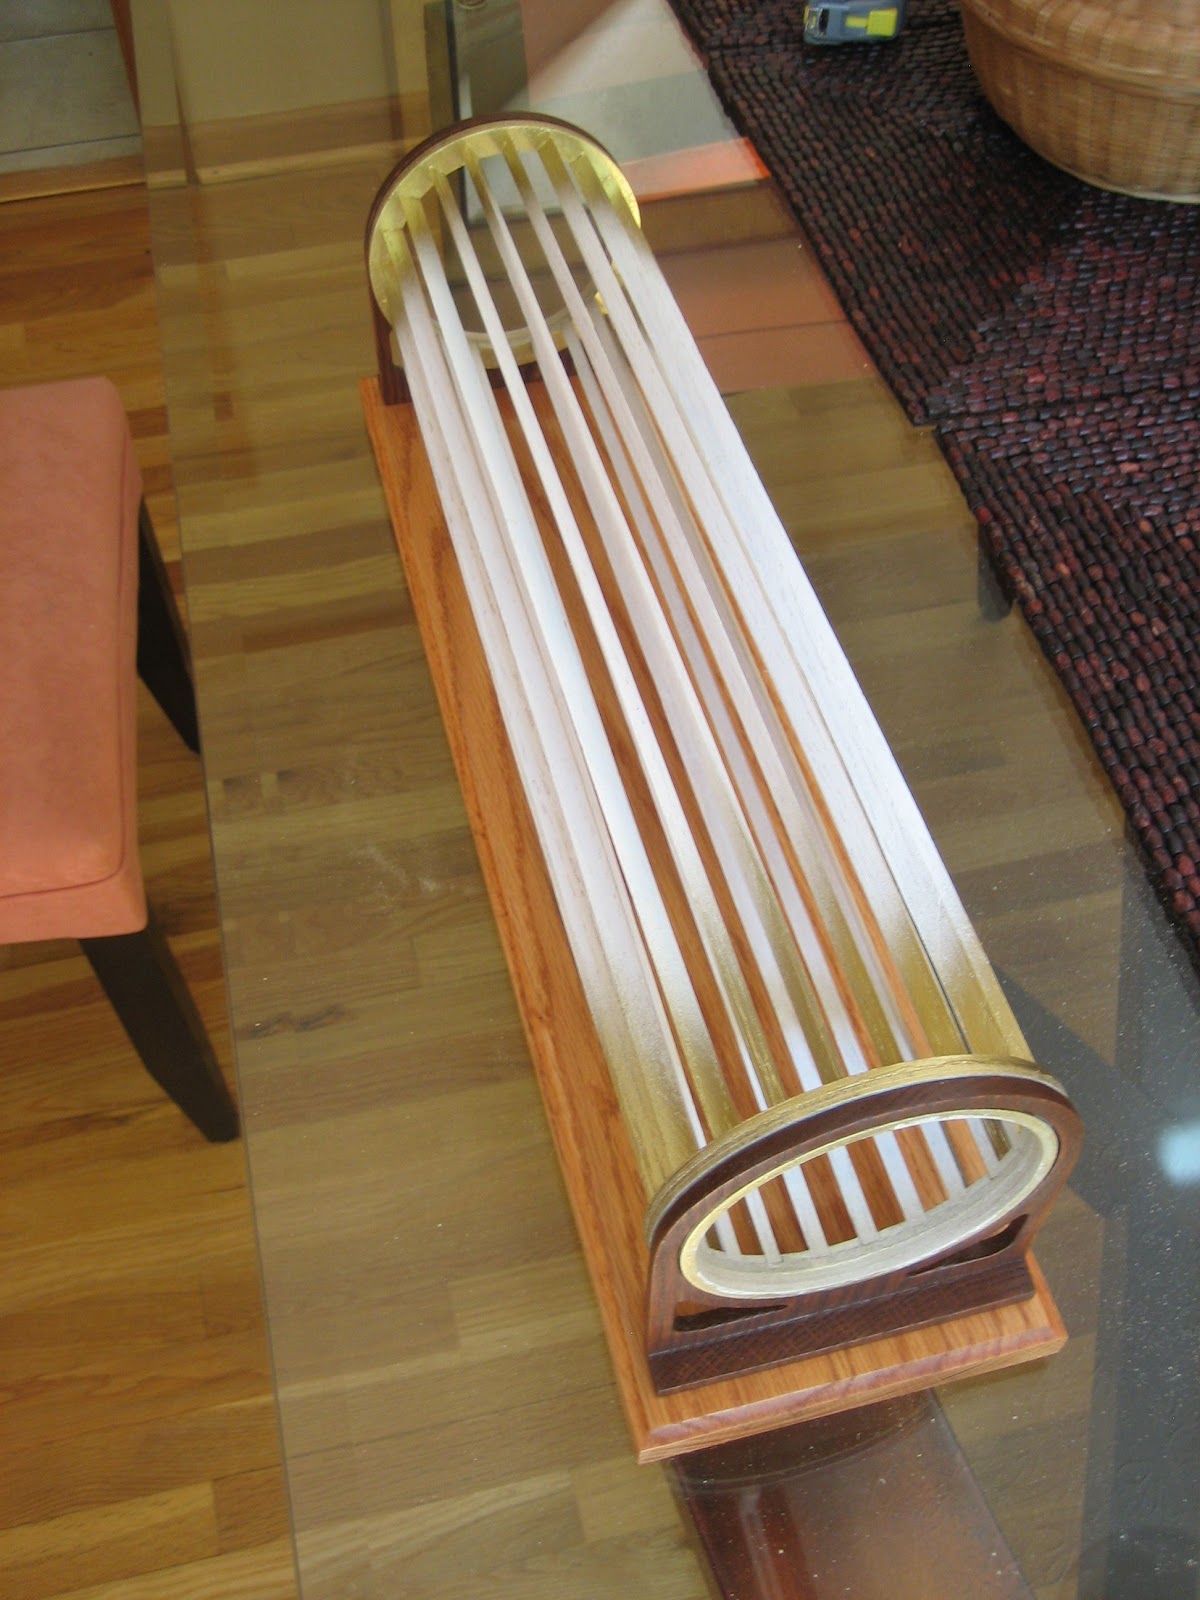
To finish the envelope, first paint the bars white. Then, paint the rings and last 1/2" of the ends of the bars gold. Note that the only parts of a ring that will show are the inner face (into which the bars are socketed) and the outer face of the part that rides inside the stanchions. The rest will either be hidden by the stanchion or will be covered by a brass strip that will get glued to the outer edge.
Also, spray the cylinder white, and make the ends gold.
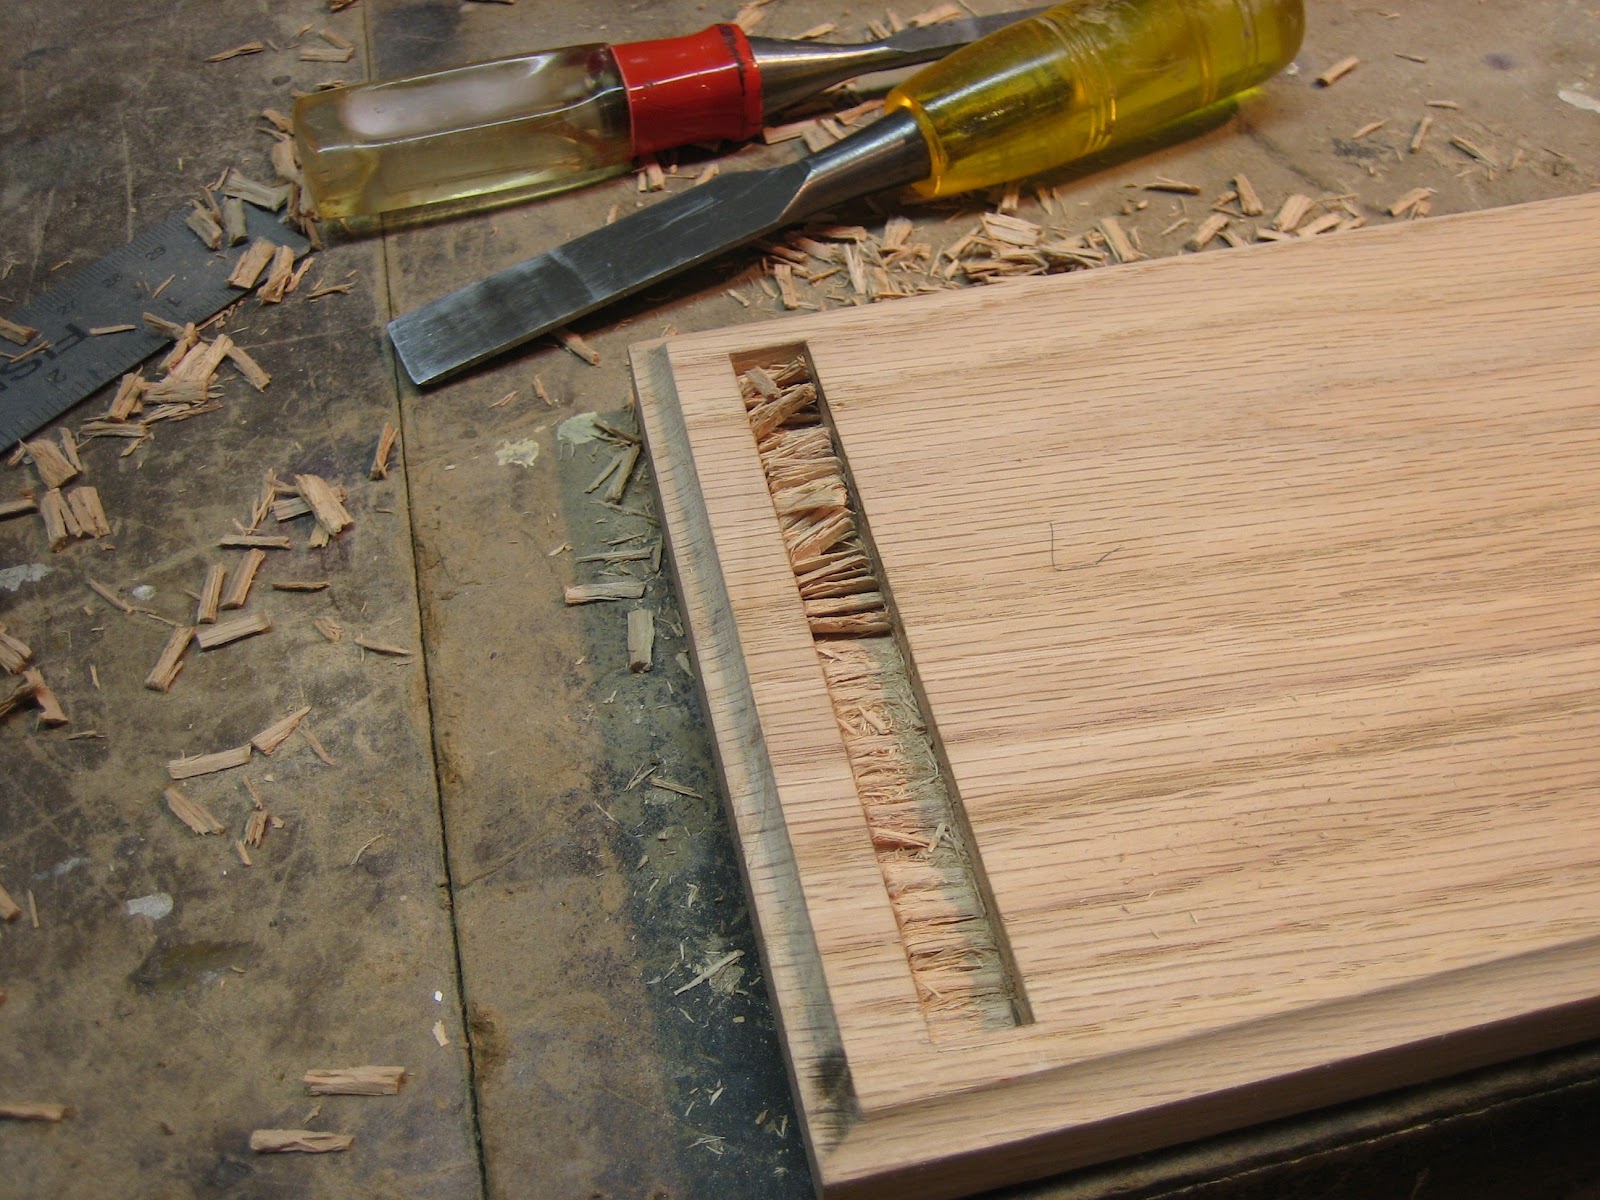
The last piece to build is the base. Make it 21 5/8" x 5 3/4" out of 3/4" thick stock. Face plane it and use a cove bit to rout the edges of one side.
Next cut the mortises. Start by placing your envelope between the stanchions and hold them together with a rubber band attached to a couple sticks stretched down the middle. Center it on top of the base so you can see exactly where to cut the mortises. Trace around the tenons with a pencil to mark the locations of the mortises and cut them.


Make sure that the stanchions fit perpendicular to the base, and that they hold the envelope securely but permit it to turn easily.


The final step is to remove (dado or rout) material from the underside of the base to leave two 1 1/4" wide and 1/4" high feet at either end. (On a real Thacher, the feet are separate pieces nailed to the underside of a main base board that is slightly less than 1/2" thick.)


At any time now you can do finishing work on the stanchions and base: sand them well, stain as you like, and apply a few coats of urethane.
Here are a few shots after staining the stanchions and base.


Next you have to print and prepare the scales and the instructions. You can get PDFs of them here:
Full credit for the scales goes to Wayne Harrison. Earlier versions of these pdf's can be found at the International Slide Rule Museum (see the links at the top, left of this page) but they have errors. Use these instead.
Have the scales printed on a wide inkjet, the best you can get access to. Don't print them on a laser printer. In my experience they won't be square or consistent.
To prepare the scales and instructions, tape them down to a piece of foam core board, scale side up. Apply a thin coat of urethane. If you can, add a bit of honey-brown tint to it so your scales are muted a bit. When it dries, sand it with 0000 steel wool, and then apply a second coat. When dry, turn the paper over and put a coat of urethane on the other side. When dry the paper will have turned a bit translucent, so spray paint the back side white.
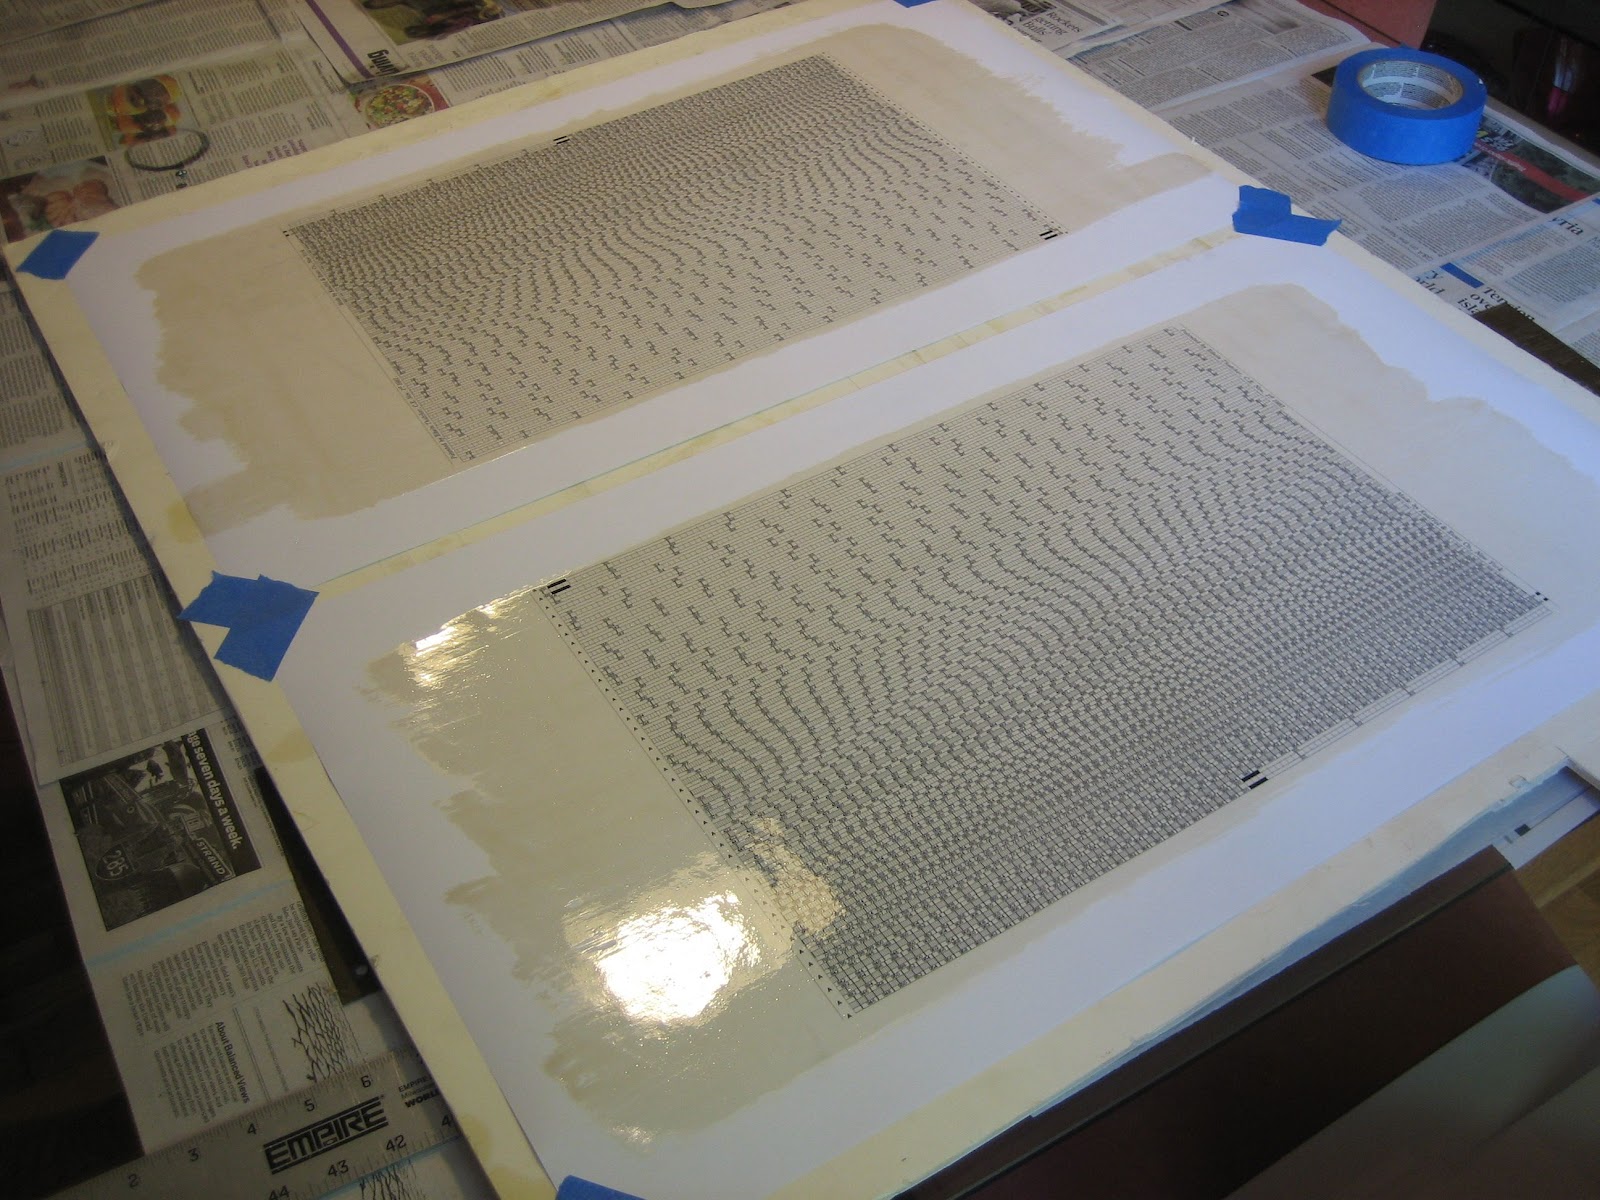
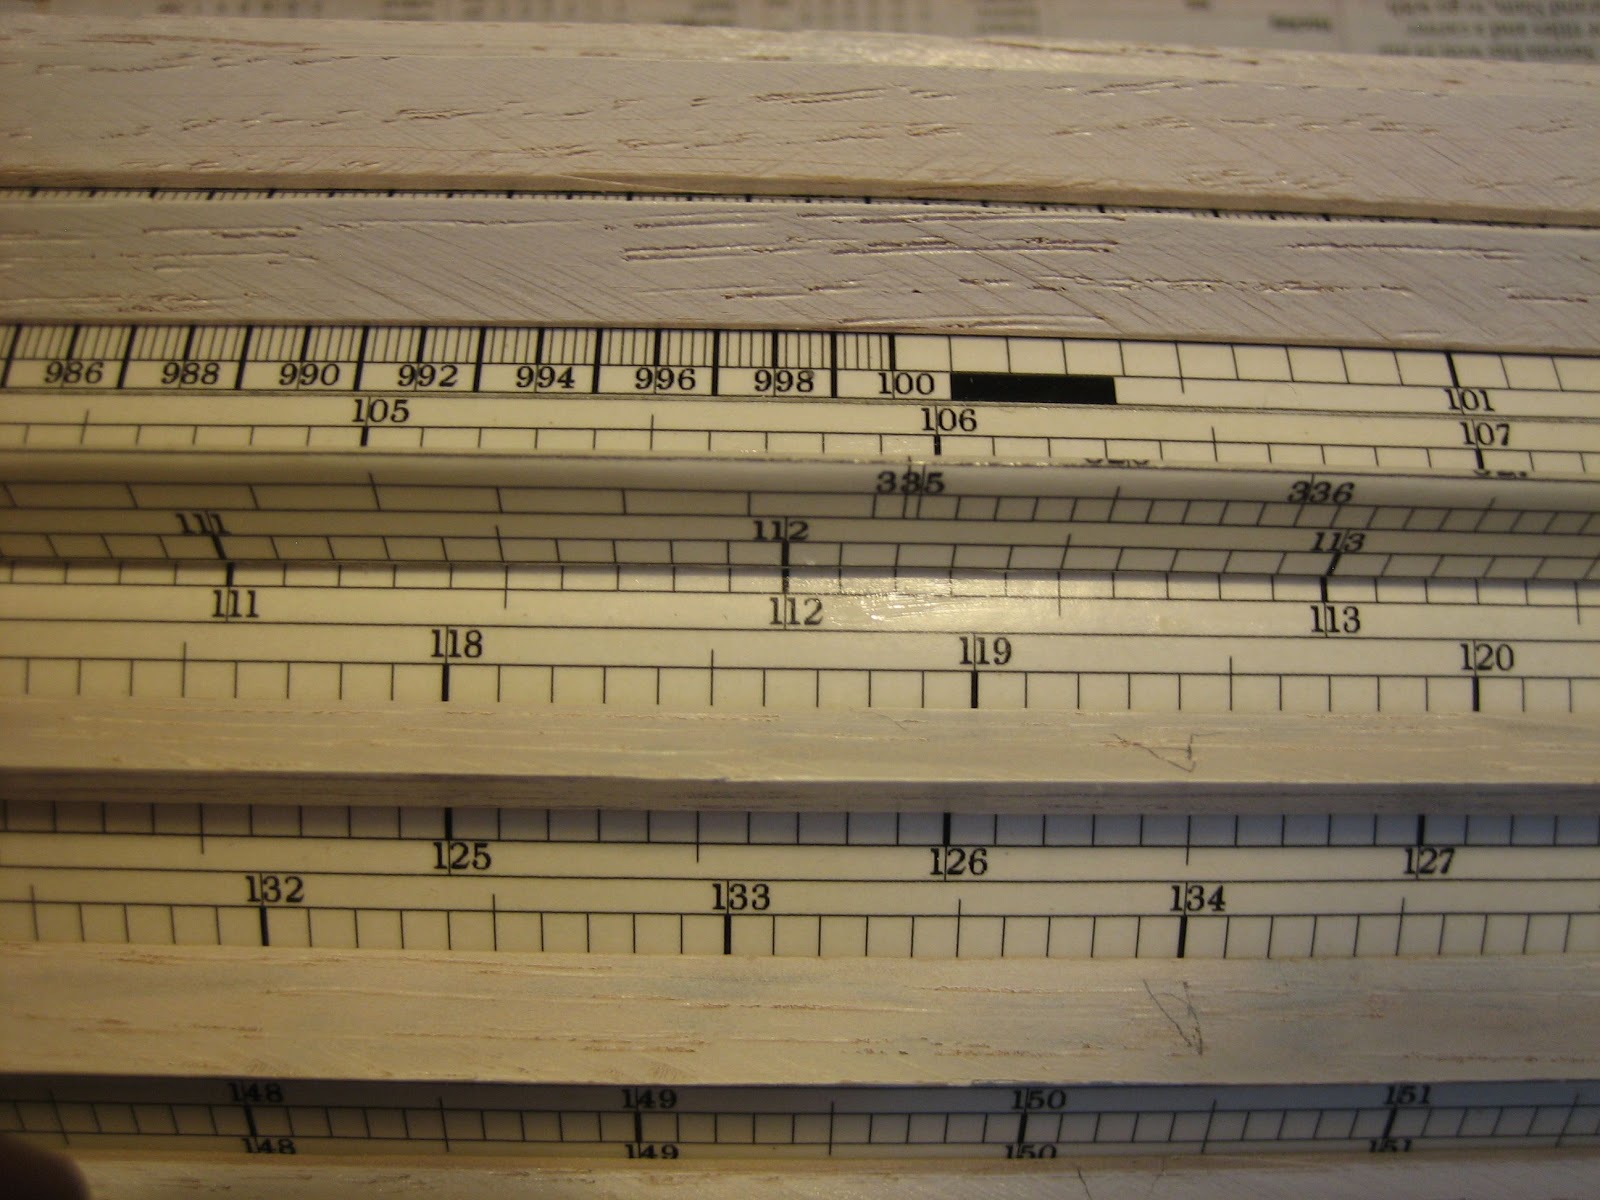
IMPORTANT: Paper stretches/contracts due to heat and humidity, as well as the application of liquids. It is quite likely that the scales will suffer a bit from this. Try to treat your A and B/C printouts as identically as possible in hopes that they won't stray too far from alignment with one another. But don't be surprised if, after preparation, they don't quite exactly match, everywhere, in width.
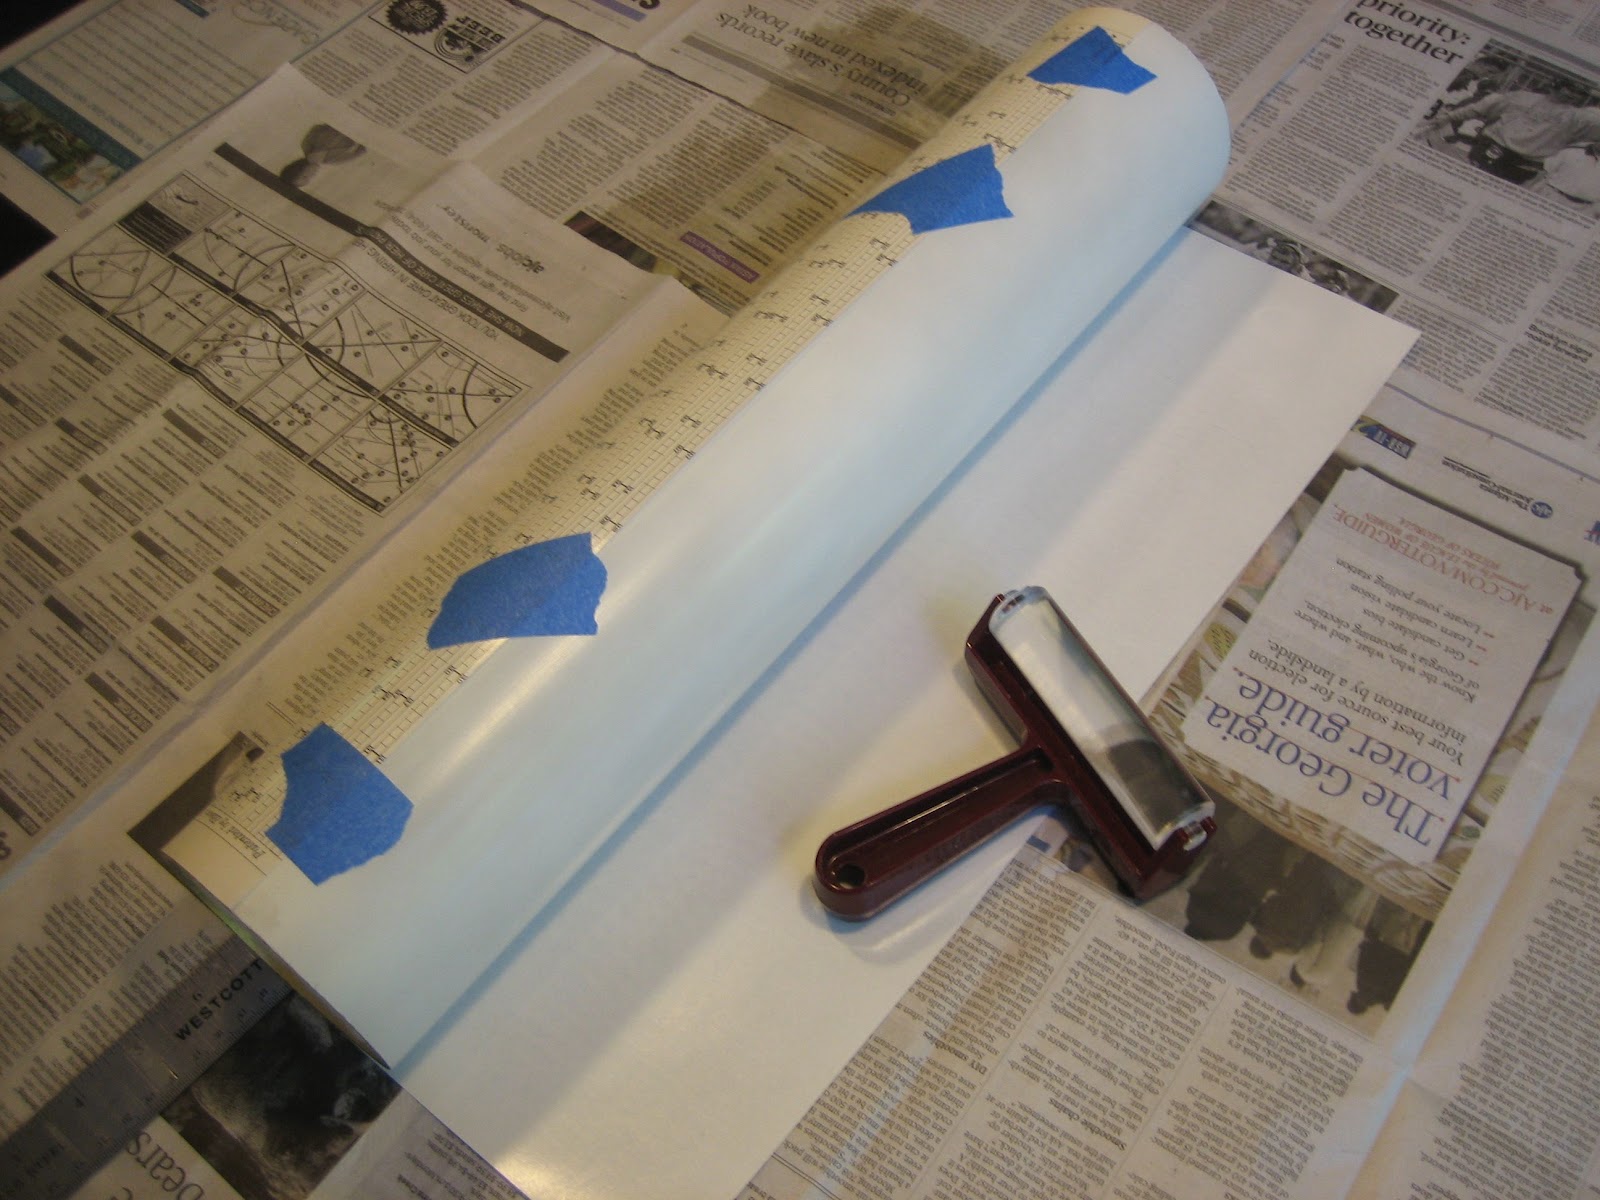
When the scales are ready, cut the A scales to the exact length of your cylinder, centering the scales between even amounts of white space at either end. Now, try to fit it around your cylinder so the top and bottom edges meet and the side lines register exactly. Not so easy, is it? If the cylinder isn't perfectly even or if the paper has stretched/shrunk just a wee bit, it won't be a perfect fit.
If the top and bottom edges won't meet (i.e. if the paper shrinks vertically or the cylinder is too wide) you're pretty well hosed. You can try another section of tubing, or reprint/refinish the A scales hoping for a better result, or live with the gap. If the top and bottom edges overwrap you can either prewrap the cylinder with a sheet of blank paper or try to use a thicker layer of glue to take up the slack. At any rate, be prepared to wrestle with the fitting of the A scales.
Once you get a decent fit and alignment, tape the top or bottom edge to the cylinder in several places, unwrap the loose edge, and apply glue to the back of the scale with a roller. I suggest using a thinned silicone glue, but I don't know that it's best. What I can say is that water-based glues will warp the paper (even though you've coated it). I can also say you don't want to use any glue that cures quickly (like paper cement) because you need some working time. I've tried a number of things and settled on silicon glue. One of it's best features is that it will rub off the coated surfaces of the scales if you get any on them.
Roll out an even layer of glue and then roll the glued surface onto the cylinder. This is going to be hard. In spite of being workable, the glue is still pretty sticky and if you get misaligned, or if you get air bubbles under the paper, you'll have to peel it back off and try again. It helps to work on a really flat surface, like a glass-topped table. But it's going to be hard and you will be cursing.
Once you've got the glued end wrapped and aligned to the taped edge, peel it back enough to remove the tape and free the other edge. Then unroll that edge, apply more glue to the back and roll it into place. Get the two edges to align with no air bubbles, place tape on the seam, wrap more tape around the cylinder and let it dry for a day or more.

Next you need to apply the B/C scales to the envelope and align them exactly with the A scale on the slide. Take the tape off your slide, clean off any glue, and put the slide inside the envelope. Secure it in place by wedging some cut-up and folded slides of a business card between the envelope end rings and the A scale - you don't want the slide shifting at all within the envelope. Also, be sure the bars are positioned so they straddle the scales.

Now cut out one of the B/C scale strips. Fold it gently lengthwise into a right angle - you don't want a sharp crease. Now dab glue along the length of the bar over which the strip should fit, and smooth it down evenly. Try not to get glue between the bar and the A scale. Also smooth a thin layer of glue on the back of the strip. Put the strip on the bar and align the B scale to the A scale at the middle of the bar. Firmly smooth the strip to the bar everywhere, maintaining alignment.
The strip may have a tendency to come unglued. So you want to press the paper to the bar while the glue cures. To do so, you'll need to pre-build a jig by taking two 18" bars and gluing them down next to one another, in parallel, to an 18" strip of wood. Glue that strip of wood to a longer one. You can now lay the bar being glued into the groove between the two 18" bars and apply some pressure (e.g. with rubber bands). This will press the paper to the bar firmly while the glue sets. Repeat 19 more times.


Clean up any excess silicon glue blobs. Most will rub off, some will need a bit of gentle scraping with a razor blade.
To finish up the envelope, cut two 1/4" wide strip of brass foil (available in 12" wide rolls at hobby stores) and glue them to the circumferences of the envelope's end rings.
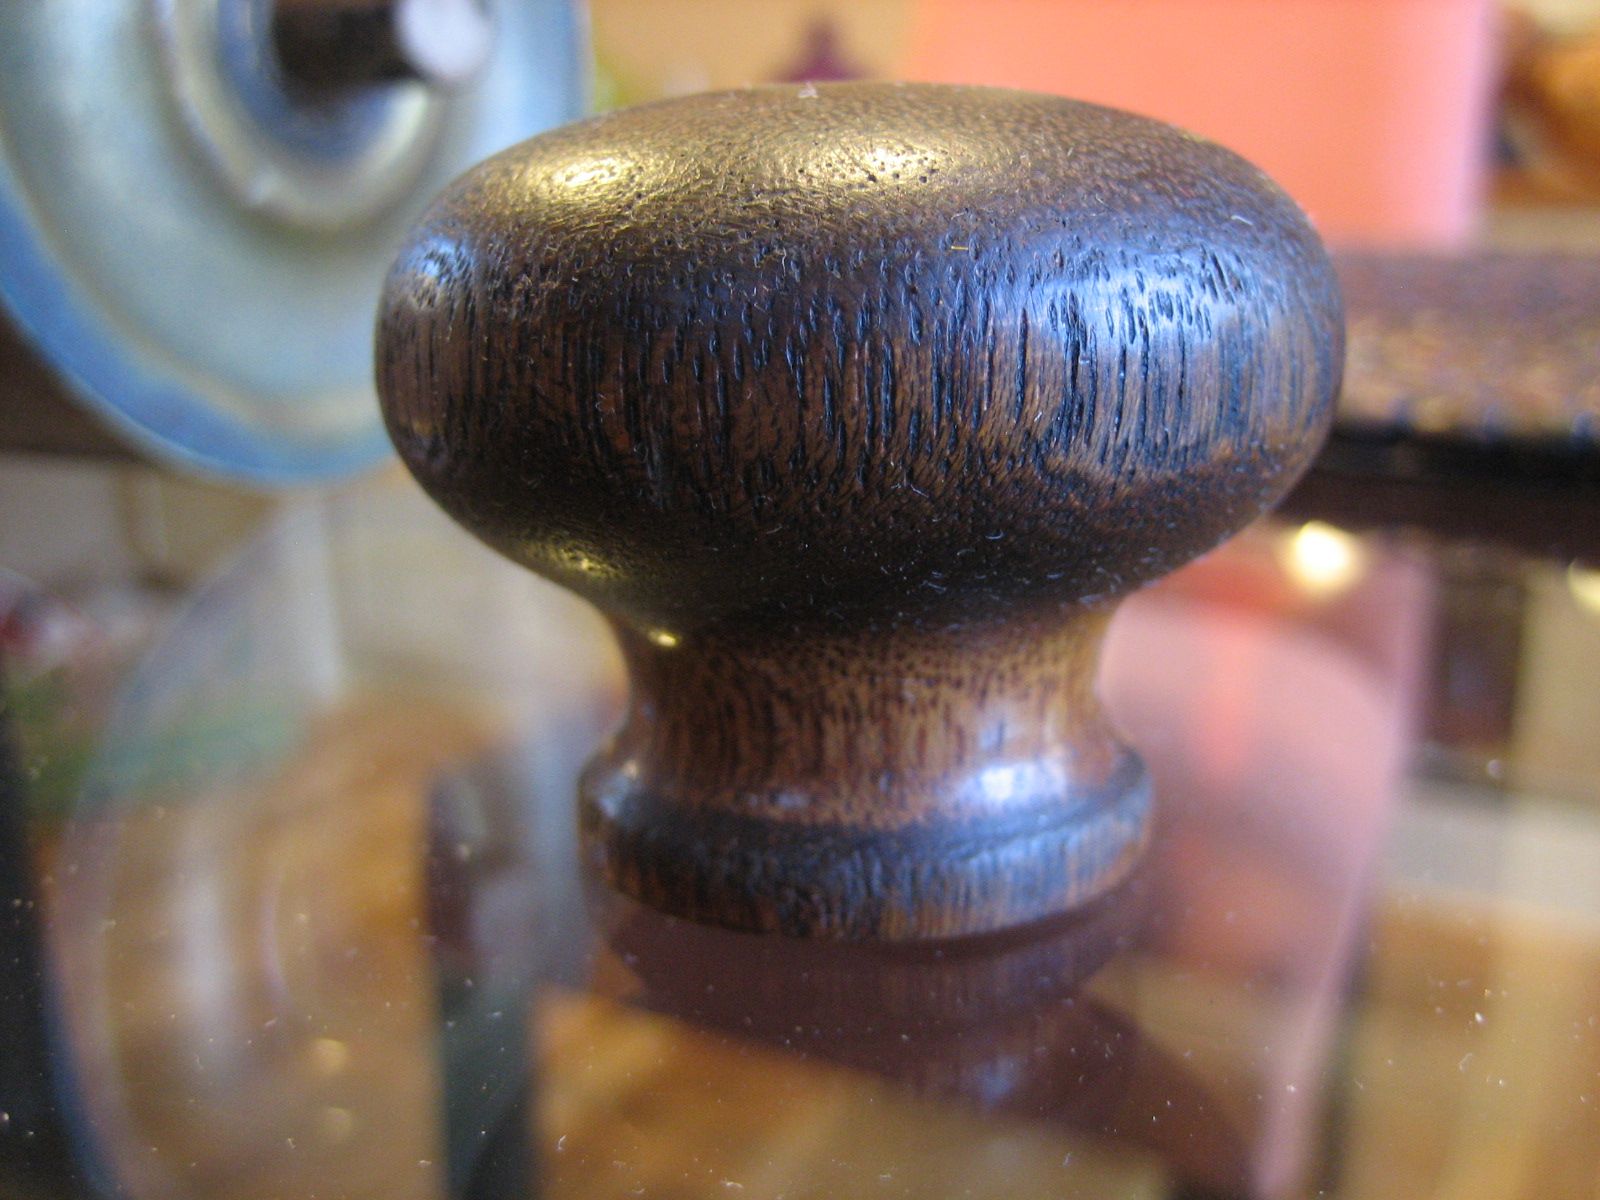
To finish up the slide, buy, stain and finish some wood knobs similar to the original, shown here. They're 1.5" tall, and are over 1.875" in diameter. I have not been able to find an exact match, but Rockler part 15257 is at least of similar size.
Attach the knobs to the end caps and glue the end caps into the ends of the slide.
Penultimately, prepare the instruction label for the base as you did the scales, cut them out, and glue them, centered between the mortises, to one side of the base. It will just barely fit. It's OK to let the stanchions overlap the left and right edges of the instructions a tiny bit as shown here:
For final assembly, you have two choices:
(1) glue the tenons of the stanchions into the base
(2) drive screws up from the bottom of the base into the tenons
The first is easier, but permanent.
The second permits disassembly should you ever break something. Just clamp the stanchions in their mortises perpendicular to the base while you drive countersunk screwholes through the base bottom and into the tenons.
Final results should look something like this:
If you make it this far, please take some pictures and send them to me! I'd be delighted to share this experience with someone.
Page updated
Google Sites
Report abuse