Embedded Files
Finished that bottle of fizzy drink? Don't bin the bottle: recycle it first as a space rocket, then when you've had enough of that, recycle it again at the plastic bottle bank!
This is an activity simple enough for even the youngest ones to enjoy
You will need:
- an empty fizzy drinks bottle
- coloured paper ('sugar paper' or similar)
- permanent marker (or something that will write on the plastic bottle, just to make a temporary mark)
- sticky tape
- (optional) : stickers or felt tips to decorate your space rocket at the end; windows (round paper circles and glue); paper or polystyrene cups and tissue paper for engines.
For very young kids skip steps 2-4 and make the rocket without the fins.
Step 1 - Lay the bottle down along one edge of a large piece of paper. Make a note of the straight height from the bottom of the bottle to the point where it begins to curve (see Figure 1):

Check the width needed by rolling the bottle up in the paper and mark it. Cut out the marked rectangle (allowing 1 or 2 cm extra on the width to form a small overlap).
[Step 2 - Now, draw four evenly spaced lines 2"/5cm in length from the bottom of the paper. Careful cut along these lines. These slits will be the openings for the fins at the bottom. (See figure 2)

Step 3 - Cut four fins. The easiest way is to cut four 'corner' shapes or right angles, 2 inches in width, and then fold them in half [see figure 3 below -"fin shape (a)"].


<<<<<<<Alternatively you can cut 2 long strips 2"/5cm in width and then cut each in half at an angle [as shown in figure 4 on the left - "fin shape (b)"]Step 4 - Using the cut lines in the paper for the rocket shell, mark on the bottle where the fins should attach. Using sticky tape, stick each one down.]
Step 5 - Now wrap the paper round the bottle [tucking the fins through the pre-cut slits]. Sticky tape down the loose edge.
Step 6 - Decide how tall you want the cone to be. This will be the radius of the circle (from the centre point to the edge). Draw a circle the appropriate size - either use a plate the right sort of size or use a compass. Cut out the circle and then cut in a straight line from the edge to the centre. Use this to roll the circle round itself to form a cone. When it's the right width for the top of the bottle, use sticky tape to hold it firm, then tape it to the top of the bottle. (See figure 5, below)

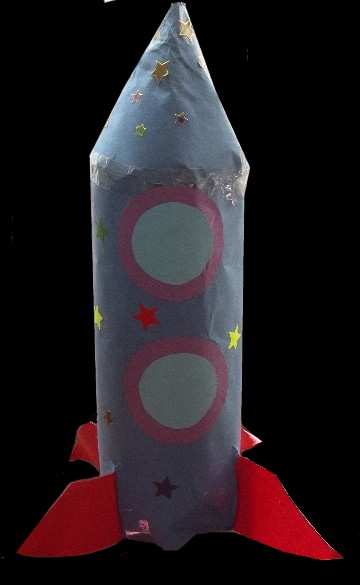
You've Finished! Now all you need to do is decorate it! You could cut some circles out of different coloured paper for windows. You could glue scrunched up red or orange tissue paper underneath for the rockets or even glue upside down paper or polystyrene cups to the underneath and then put red, yellow and orange tissue paper inside them! Stick stickers on the outside or draw patterns or whatever you like. Perhaps even stick glitter and pom-poms all over it - why not?!
Page updated
Google Sites
Report abuse