Clutch
Doubling Stock Clutch Springs
Forum thread: http://forums.delphiforums.com/yamaha1100/messages?msg=45847.1
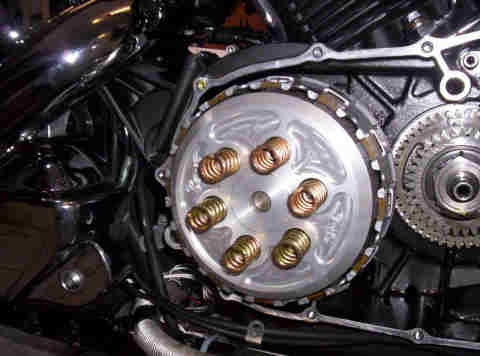
Upgrading to Barrett SR-6 - 64 Pound Clutch Spring/Plate
Instructions come with the kit. It's recommended to replace the friction plates along with this upgrade. Also be sure to soak the new friction plates in your engine oil before installing. Below is the kit installed and ready to have the side cover put back on. Stock Yamaha frictions are prefered
- Special items required (beyond your normal V*Star 1100 tool set):
-- Clymer's or other manual (Yamaha shop manual might do in a pinch but Clymer's much, much better!)
-- The clutch upgrade kit -- and steels and frictions if you need them (based on the 74,000 miles on my ride,
I decided, as long as I had the case open to do the clutch, I'd replace the wearable parts)
-- The right side case gasket
-- Whatever exhaust gaskets you need to replace when you drop the exhaust and put it back.
-- Permatex (or other brand) Gasket Remover - a must!
-- Plastic putty knife or similar plastic scraper
-- Hi-temp sealant to treat several of the bolts when they are put back - to prevent oil leak/seep
(I used copper Hi-Temp RTV, had it from when I did the AIS removal, and also use it to hold
the $%^#$ front exhaust gasket in place when replacing pipes.)
-- Oil to fill crankcase once done (and filter too, if needed)
-- Torque wrench as specified in the manual
- Doing the Job:
The major sequence of steps:
-- Drain the oil
-- Open the case
-- Start the process of cleaning off the stuck gasket (see note below)
- this will go on during the entire process, with you coming back
to gasket removal every 10 minutes until it is done
-- Remove all the old parts
-- Put in the new parts in the reverse order of removal
-- Be sure to oil the new frictions and plates as they go in
- and also lube the rest of the parts per the manual
-- Finish gasket removal - finally
-- Put the old "dowels" into the engine holes - they hold the gasket during install
-- Put on the gasket and then the cover
-- Replace the bolts, applying sealant per Clymer's Manual
-- Replace the oil filter/ORK interface
-- Replace the oil.
-- Adjust the left side lower clutch adjustment - per the shop manual - must do this
-- Adjust the clutch bar end free play - per the manual
Basically -- follow the instructions in the Clymer's manual, (which means you need to actually read the shop manual) with the following added notes:
The bolts in the case and the oil filter (and/or ORK interface) are of various lengths, so it is key to keep track which bolt goes where. I marked one bolt location as #1 on the case diagram in the manual, removed that bolt and placed it on a folded rag (body allowed indents for each bolt) in the leftmost position, then removed the next bolt going clockwise from #1 and put it to the right of #1, etc.
When you remove the oil filter/ORK interface - capture the small O-ring from the bottom right bolt and replace it on reinstall.
When you remove the cover, there are two "dowels" (small hollow cylinders) that most likely will stick in the cover - remove them carefully and set iwth the bolts - so they are out of the way of the gasket removal process.
The most common mistake when taking out the old pressure plate is that a flat washer sometimes sticks to the back of it. This must be put back behind the new pressure plate on the install. (Thanks, Shane of SS Custom Cycle)
Gasket removal - is a pain - the gasket is hard and will stick tenaciously - and you want to be careful NOT to use force to get it off - you need to protect the machined surfaces of the case and the cover. Use a plastic putty knife to remove all the loose parts of the gasket from the case and the cover. Carefully spray the remaining gasket/adhesive spots with the Gasket Remover. Let it sit for 10 minutes, then carefully scrape of what you can - and be sure to scrape of the softened top layer of the very hard gasket. Repeat until it all comes off - might take 5 or 6 passes, but it will come off. The secret is the multiple passes and scraping off the hard, stuck gasket a layer at a time as it gets softened. This is why, above, I say to start the process as soon as the cover is off - so you can work in parallel on the gasket and the rest of the stuff.
The shop manual will instruct you to put the sealant on two of the bolts (they obviously had sealer on when they came out) - but experience of other folks indicates potential for oil leak if you do not do the next one clockwise also, making it 3 sealed bolts. (worked for me!).
When it comes time to install the gasket, place the two "dowels" in their holes on the engine side, then place the new gasket over the dowels - which hold it in place with all the holes aligned - so you can put on the cover and install the bolts - don't forget 3 need to be sealed.
Note: No need to remove the metal clip that holds the last plates on....if you do, replace it with a new one.
"Jockey" Style Clutch
Thread on converting to a Jockey style clutch / shift
Another thread on the "Jockey" style shifter
See Also - Modifications - Suicide Shifter