Embedded Files


The MARC III Kawasaki Bi-Level commuter car was originally manufactured by Kawasaki for the Maryland Department of Transportation (MDOT) in an effort to expand it's Maryland Area Rail Commuter (MARC) train service and capacity. The bi-level design offered by Kawasaki met the clearance requirements along the Northeast Corridor between Perryville, MD and Washington, D.C. (most notably the tunnels in and out of Baltimore, Penn Station). They also offered more seating capacity compared to their predecessors; the single-level MARC II Sumitomo commuter coaches.
As part of a "Piggy-back" order, Virginia Railway Express (VRE) also ordered the same cars with slight variations to the MARC version. VRE's windows would consist of a single panel compared to the split panel configuration of the MARC cars. They would also use different seats which took up more room. MARC eventually purchased VRE's entire fleet of Bi-level cars when VRE decided to standardize its fleet with modern Nippon Shayro Gallery Coaches. MARC overhauled the VRE coaches applying the MARC livery and installing the split panel windows. MARC did however keep the internal seating configuration.
No mass-produced model of the MARC III Kawasaki Bi-level Commuter car exists. However, in response to the MLRR's request and others, Island Model Works has produced a resin kit of this commuter car in both Cab and Trailer configurations. The model became available in the Fall of 2008. The kit does not come with instructions but it is pretty straight forward in assembly. The modeler has the option of adding more detail or further working the shell to make it even more accurate but it is an excellent base model in which to start. The kits include the following:
One piece body/shell
Window glazing
Trucks (no wheels)
Floor
Decals are also available but sold separately.
I did not go the route of super-detailing my kits as I have enough projects to keep me busy when I'm not busy (I know what I said. Consider it Yogi Bera-esque :)). I only added the K5LA horn provided by "Details West" and windshield wipers offered by "A Line". I also installed working reverse and headlights in the cab. Hopefully this page will be a good basis in which to start and then take the project in whatever direction you wish.
Photo
No Picture Available
No Picture Available
No Picture Available
Notes
Receiving the Kit
The kit will likely come in a simple box with all parts included. It is important to make sure that all parts (as stated on the IMW website) are included as soon as you receive the kit. Mistakes can happen and the sooner you follow-up the better. IMW has been very good about following up and making good on any errors that may have cropped up in my dealings with them.
Inspecting the Shell and Fixing Imperfections
Island Model Works is a small company and does not have the resources for the level of QA/QC that a Rapido or Walthers would have with its passenger cars. As such, it is up to us as the modeler to inspect the shell for any errors or imperfections.
What I have noticed in working with the IMW kits is that in some cases, the shell could end up warped. This tends to happen when the model is cooling as the roof may "cave in" or the center of the car may rise, depending on how the shell was removed from the mold.
The good thing is that this phenomenon is easily fixable, especially with resin. Take the shell that is warped and place it on a baking tray. Place the tray and shell in the oven set to 120 degrees Fahrenheit (use good judgement, too hot and you'll melt the shell beyond repair). By heating the shell, it makes it flexible enough to bend and reshape. Adjust the shell as necessary and once straightened out, run the shell under cold water. It is important that while doing this, that you hold the car and maintain the correct shape (if necessary). What I found is that by not doing this the shell will go back to its original warped position.
Another thing that may be necessary is filling in holes, creases or lines. This can be accomplished with putty and high grit sand paper.
During this stage, you need to decide if and what detail or additional features you would like to add to the model. Do these details require drilling holes? If so, now is the time to determine where to drill them and do it. In my case, all the detail/features I wanted to add required holes.
Prepping the Shells for Painting
After the puttying and sanding (if required), we need to clean the shell. This is important even if no puttying and sanding was required as resin kits never come completely clean. This part is also especially important if you plan to "metalize" your model using "Alclad II" high shine finishes.
For this step, you will need soapy water (I like to use dish soap) and an old toothbrush. Dip the shell(s) in a dish of the soapy water and then remove. Brush over the model with the toothbrush until you start seeing suds. Next dip the model under cold running water and continue brushing the model until all traces of soap are gone.
When complete, wrap the model in paper towel and allow it to completely dry overnight. The paper towel does two things. 1)It helps to dry the model faster and 2)It prevents dust from settling on the model that you just cleaned. As mentioned before, Alclad II is unforgiving with surface imperfections and that includes dust.
From this point forward, latex gloves will be needed when working with the model as to prevent getting finger prints on the shell that could later, potentially show up through the finish.
As part of the strategy in the above paragraph, we construct a paint stand (see below pictures) for these models so that they can be handled without having to directly having to pick up the model with our hands.
Painting/Metalizing
If you are simply planning to paint the model using standard silver spray paint, you can skip ahead to the window installation section, otherwise if you are going the Alclad route, you're a brave soul!

The first step is to coat the model with "Future" floor polish found in most Wal-Marts. It is airbrush ready and works very well. Ever since I found out about it and used it, I now sear by it. The purpose of coating the shell with the clear coat is to fill in any micro-imperfections that we otherwise would not be able to pick up with our eyes. This also aides in providing a level surface. Be careful not to spray more than what is necessary. It is also important to make sure that you avoid overspray as it makes for a less smooth surface. For that reason it's best to have your airbrush set on a narrow dispersion and spray at approximately 6 inches from the surface. If you are not satisfied with the base clear coat, let dry, sand with high grit sand paper, wash and repeat the process until satisfied.
Store the models in an area "free" from dust. This may include storing them in a cabinet with a makeshift canopy. You will note in the pictures below that is exactly what I did.
Once you are satisfied with the base clear coat, it is now time to apply the actual base coat which is crucial to the application of alclad. The base coat also determines the reflective tone of the high shine coat. Alclad recommends a gloss black but I have (through the advice of another modeler who swears by alclad) started to use a dark gray gloss.
I use Krylon Dark Gray Gloss paint (also found in most Wal-Marts; a huge volume at a great price I might add). The paint is airbrush ready but you must decant the paint as it is meant to be sprayed from a spray can. We can decant the paint by taking a straw directed into an airbrush jar. At the other end of the straw, make sure that the straw covers the entire nozzel as to not make a mess and spray past the straw. The paint will run directly into the jar and will immediately be ready for airbrushing.
Much in the manner in which we applied the clear coat, make sure your dispersion is narrow and that you use nice, steady long strokes. If you are using a compressor (a must for this application), apply the paint at a range between 15 and 20 PSI.
If unsatisfied with the undercoat, you can repeat steps 1 through 2 or completely redo the model by soaking it in a tub of 91% Isopropyl alcohol or any paint stripper and start over.
When complete with this step, allow the base coat to drive for at least 24 hours. During this time (as in step 1) make sure the models are stored in an area that is "dust free".
The next step is to apply the Alclad. I used "Alclad II Chrome". It will appear "too shiny" at first but this is ok as we will need to clear coat over the Alclad which will tone down the sheen.
At 15 PSI, apply the Alclad (which is also airbrush ready) in long even strokes. Be careful not to put too much on at once or it will look more like silver paint. The first couple of passes may not yield any results and appear as if the model still sports the undercoat color. Allow the first coat to drive for 10 minutes and then come back to the model. Inspect it again to see if you are satisfied with the finish. If not, apply a second coat the way you applied the first. Each coat should reveal a more realistic metal finish but it is important between each coat to walk away and come back before deciding whether or not to continue.
After you are satisfied with the appearance of the Alclad, we are now ready to seal it with clear coat. Apply this coat the same way you applied the initial coat in step 1. This will allow us to start applying the decals as seen in the section below.
**WARNING: Do not apply any more clear coat than you need as each application tones down the sheen. Keep in mind that you will have to apply another coat to seal the decals later so the less clear coat you apply in this step, the better.

Applying Decals
Application of the decals is pretty straight forward. During this process, it is recommended that the shells still not be handled directly by hand. Keep them on the stands that were created for the metalizing process.
The IMW kits do not come with reference photos or instructions on where to place the decals. Please reference the photos on this site or elsewhere on the web to get a sense of where these decals should go. I will point out two key things when applying the decals:
Keep in mind the orientation of the cars.
The car numbers go on the "cab end" of the car or nearest the door with the display board above it (as seen in the photo).
After applying the decals, apply a final coat of clear coat to seal the decals.
Hand Brushing Detail That Make the Model Pop!
This can be one of the most tedious parts of the project (especially doing this for multiple cars at a time!). This is however what makes the model pop. This is an optional step if you're in a hurry to get these bad boys on the rails or just don't have the time, patience or confidence to do this (which is ok :)).
Below is a list of what needs to be painted black (or at least what I decided to paint):
Diaphragms
Display board above the vestibule
Side window sills
Casted window stripping
I used a hand brush to apply the black paint to these areas. I used a flat black acrylic paint from PolyScale. I started to see the benefit from doing this right away. Others may not but if you don't see the benefit by the time you put the windows, I don't know what else to tell you!
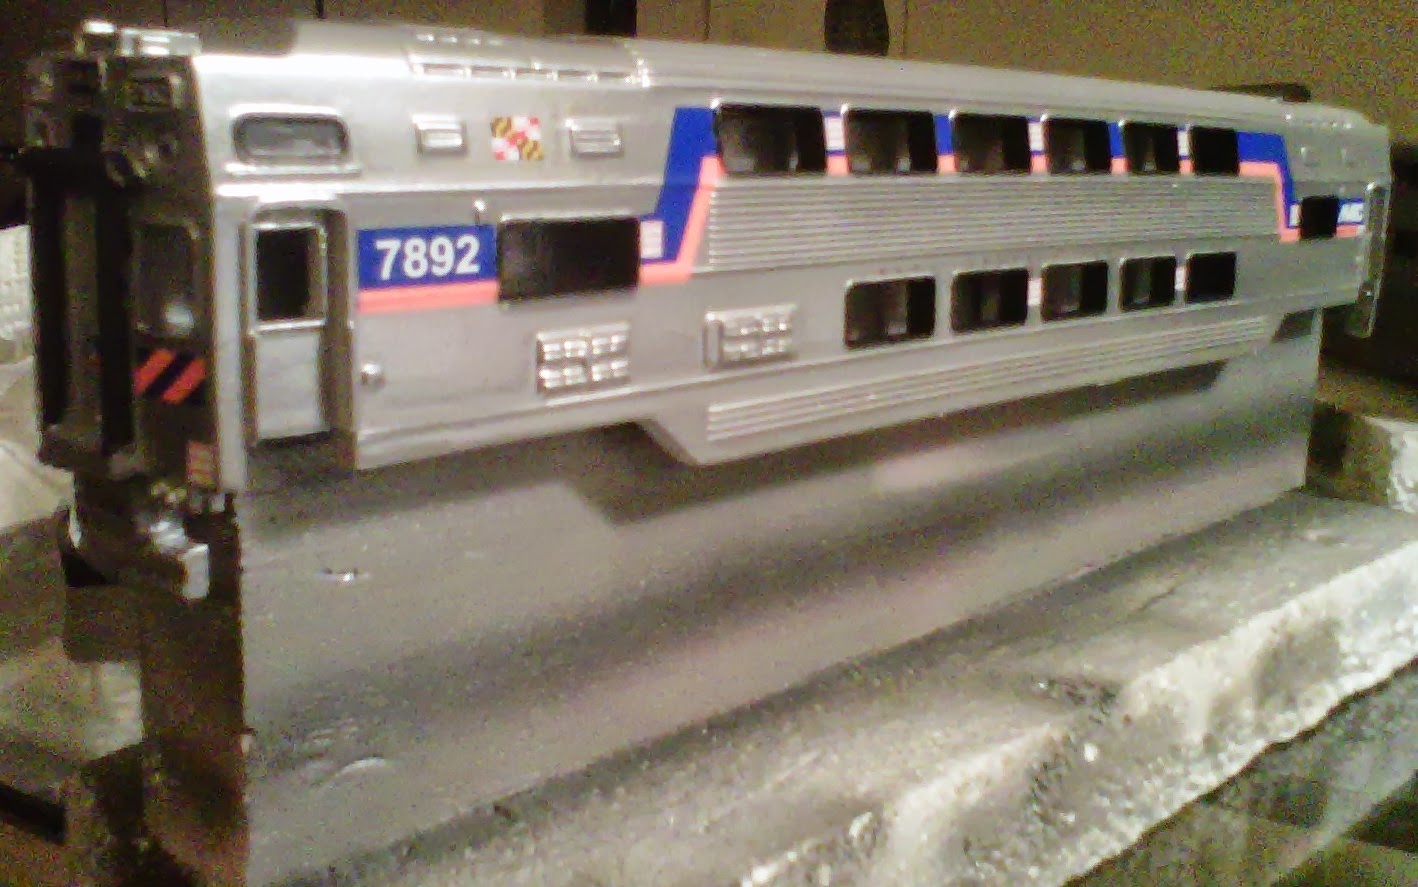
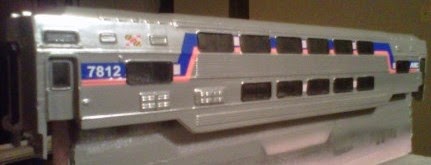
**NOTE: I later realized that the prototype 7892 is actually a trailer, not a cab. It just so happened that IMW printed the decal sheet with the assumption that 7892 was a cab and I didn't bother to verify that. I have since re-numbered this cab 7845

Installing the Window Glazing
This is the other tedious part of the project. Unfortunately, the windows do not easily snap into their openings and they each have to be individually cut out from the casting. It really helps to have a dremmel handy as it speeds up the process considerably. The first batch of cars saw me using a file.
It is important that one wear a mask and goggles when filing down the windows to fit the openings. It took me about an hour and a half to two hours to do one car so I would work on one car a night depending on whether it was a weekday or weekend.
As you can see in the photos to the right, I had already begun installing windows in all but one of the cars (this actually happens to be from the second batch of cars that I did which is actually an overhaul of the first batch of cars that I purchased from IMW)
Floor, Trucks and Couplers
We almost forgot that these cars need something to roll on!
Well fortunately IMW didn't as the floor and trucks should still be in their boxes.
Depending on the nature of your layout, you may want to optimize the lteral play of your trucks. To do this you must file down the center of the tapered sections at each end of the floor. You can always file the whole thing back evenly but at the end of this process you will give your trucks the ability to navigate tough curves and switch points. To put it mildly, it reduces the likelihood that your cars will derail for whatever reason.
To mount the trucks I purchased screw-nut packages from home depot. Be sure to purchase 36" wheelsets. I primarily used Reboxx wheelsets for these cars.
I mounted my couplers to the floor. Kadee has produced an extended swing coupler kit specifically for 85' or longer railroad cars. The kit number is #451. I assembled the coupler assembly and then placed the floor on the shell and positioned the coupler so that it lined up in the center of the car and that the inside back of the coupler lined up with the edge of the end vestibule door. Doing this for each car will assure adequate yet acceptable spacing of the coupled cars.
I used Poly Scale Paint to paint my floors "steam power black" and my trucks "roof brown".
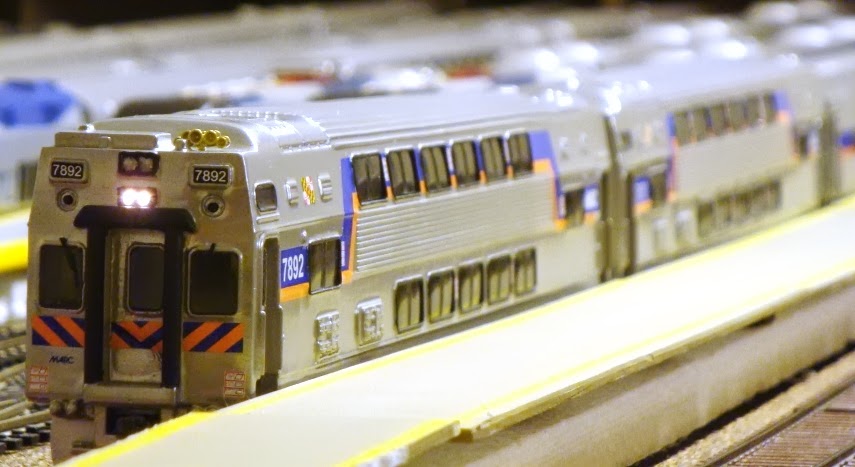
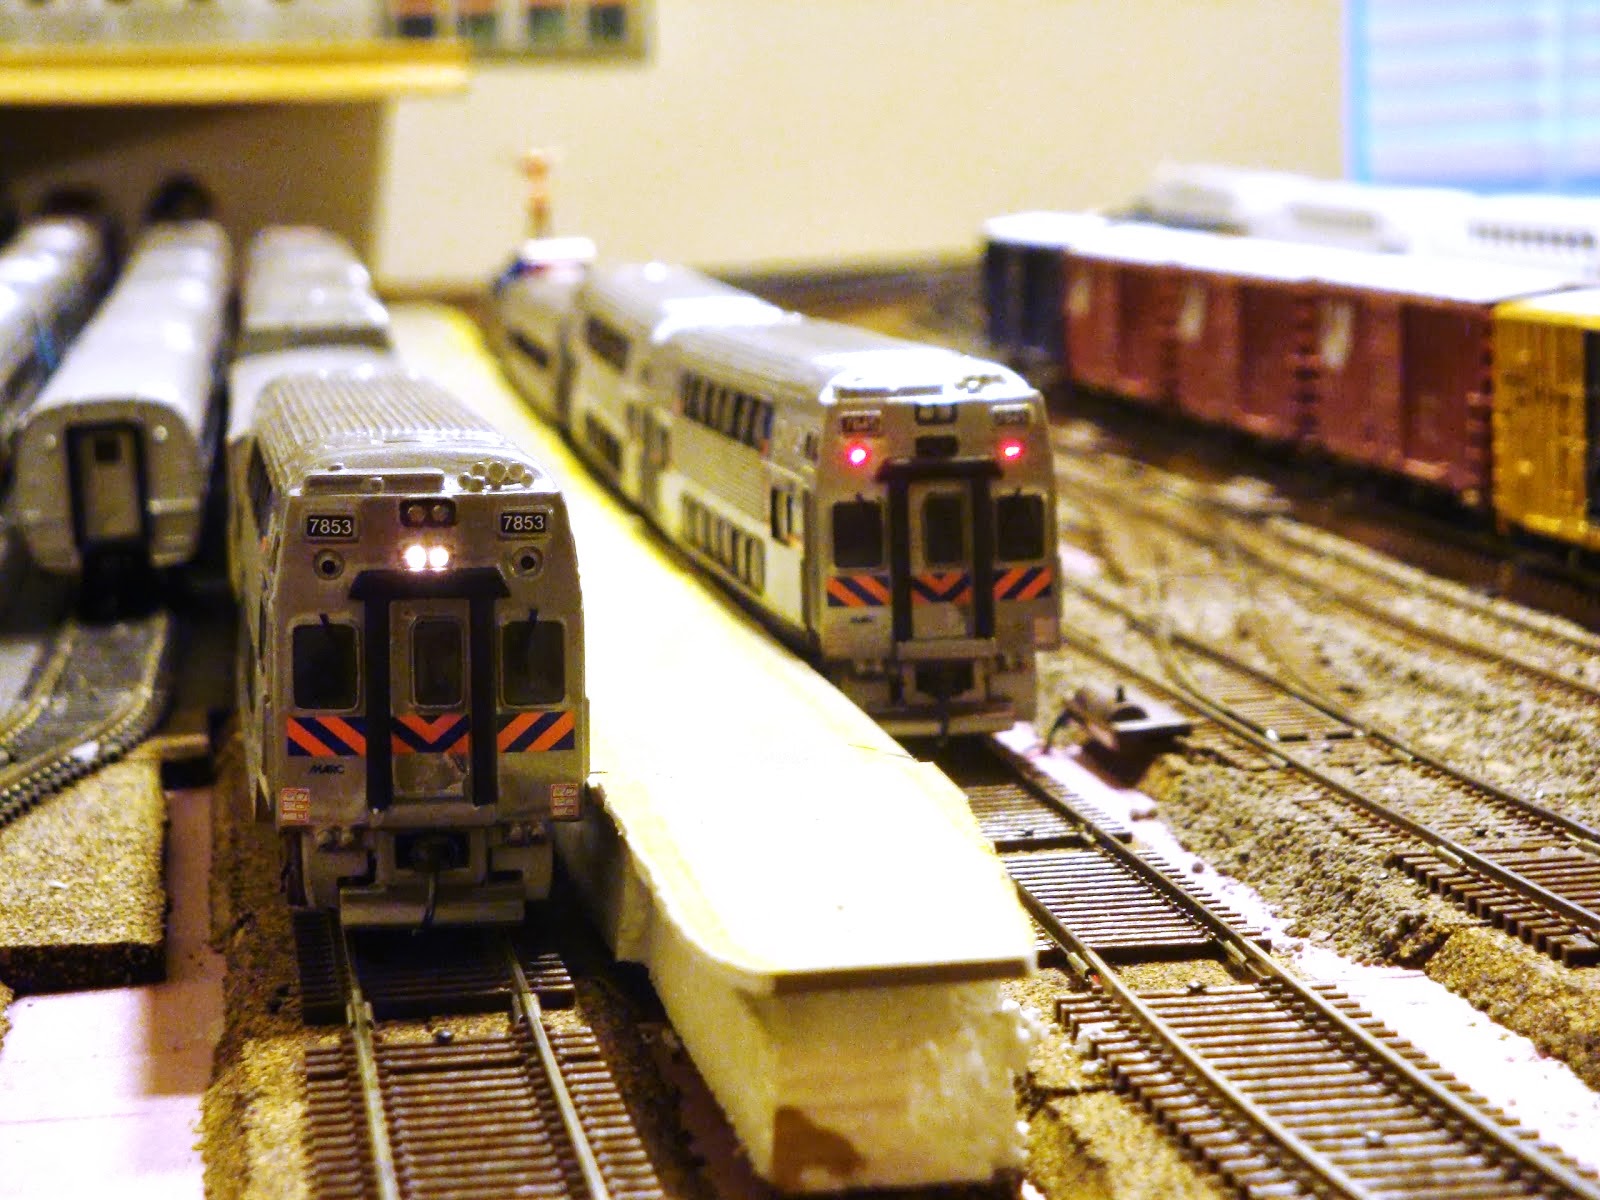
The Finished Product
If you followed the steps above, your models should closely resemble these. The top photo is a picture of the cab and trailer, fully completed. The photo below demonstrates the working headlight on one of the cab car 7892 (Currently re-numbered as 7845). The tail lights are also functional. I used a function-only decoder in combination with the TCS lighting device (TCS FL2) which eliminates the need for finding the right size resistor for the bulbs. The bulbs are incandescent bulbs from Miniatronics.
As I've always stressed, one of the best parts of assembling a kit or kitbashing is seeing the thing evolve and come together. I hope this page has captured the evolution of assembling the kit.
If you have any additional questions do not hesitate to contact me!
Good luck!
No Picture Available

Page updated
Google Sites
Report abuse