Embedded Files

1. Introduction and Terminology
1. Introduction and Terminology
The Cube has been invented by the Hungarian Ernö Rubik in the seventies and after the big craze of the early eighties it suddenly disappeared. Now, it is back again and many try to solve it, but find out that it is not so easy. This step by step tutorial will help you to solve any scrambled 3x3x3 Cube.
The Cube has been invented by the Hungarian Ernö Rubik in the seventies and after the big craze of the early eighties it suddenly disappeared. Now, it is back again and many try to solve it, but find out that it is not so easy. This step by step tutorial will help you to solve any scrambled 3x3x3 Cube.
I’m trying to make it simple, but this means that it will not be as fast as speedcubing methods.
I’m trying to make it simple, but this means that it will not be as fast as speedcubing methods.


The Cube partially open
6 centre pieces can rotate on a six armed spider
12 edge cubies (=edges) sit between two centres and have two stickers of the adjacent centres
8 corner cubies (=corners) sit in three faces, are surrounded by three edges and have three stickers of the adjacent centres on them
Terminology
cubie = piece
face
The little pieces building the Cube. The 6 centre cubies (or pieces) are fixed and can never leave their place. An edge cubie will always stay an edge and a corner cubie always a corner. The Rubik’s Cube is built out of 26 pieces and the six-armed spider instead of a 27th inner cubie.
Any Cube (Hexagon) has six faces. (Greek word hex = six). On one face of the 3x3x3 you will always see nine squares with nine stickers, the surface of 1 centre piece surrounded by 4 edges and 4 corners.
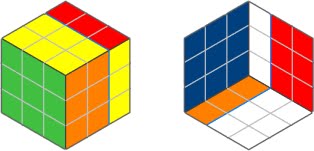
On the picture we see a white, green and red face of the solved Cube

naming of faces
Look at a Cube sitting on a table. The face to your right is named R (Right), to your left L (Left), the face on top U (Up), the face on the table D (Down), the face facing you F (Front), and the face at the back B (Back)
On a picture like to your right you can only see three faces. Layers L (opposite to R), B (opposite to F) and D (opposite to U) are invisible on the photo.

layer
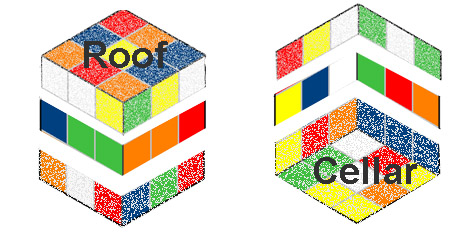
wall, roof and cellar
places, orientate, gap
All nine cubies related to a face are a layer. Layers can be turned (or rotated). We can make clockwise turns or anticlockwise turns of layers by 90 degrees. Layers are named by the corresponding face letter. Turning a layer means that the centre cubie just rotates and the 8 cubies around the centre go to different places.
There are inner layers as well, the layers between two opposite outer layers (they are called slices as well.) We will only turn outer layers, but I’ll refer to the layer between U and D as the second layer.
Sometimes things can be explained better if we view a cube like a house.
When we look at a cube placed on a table, we have four vertical layers that we call walls. The top layer U is the roof and the down layer D is the cellar
Any position a moving cubie can go to, we will call “place”. A cubie is at the right place only, if its stickers have the colours of the corresponding centres.
If a cubie is on the right place, but the colours to not match, we say it is wrongly orientated. A wrongly orientated edge at the right place needs to be flipped to become completely correct. A wrongly orientated corner needs to be turned. (A completely correct edge has to match the two centres it sits in between, a completely correct corner the three surrounding centres). A centre piece does not move, it is at the right place by definition. A place where a cubie is sitting, but not on its right place, we call gap.
naming of turns (or moves)
Clockwise turns by 90 degrees of the six layers are named: L, R, F, B, U, D
Anticlockwise turns of the six layers are: L’, R’, F’, B’, U’, D’
180 degree turns (no difference between clockwise and anticlockwise in this case) are: L2, R2, F2, B2, U2, D2
The 1st picture shows the turn R nearly completed, the second the move U


colour scheme
You could put the stickers in different order onto the six faces. Nowadays, the most popular scheme of colours is: white opposite yellow, green opposite blue, red opposite orange, where the white, red and green faces are in a clockwise order – as on the photos.
2. Use of Diagrams
2. Use of Diagrams
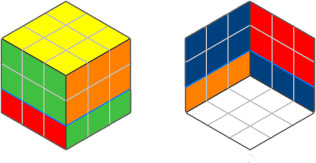
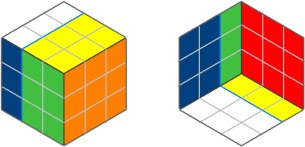
In the following I’ll use diagrams showing all six faces at once.
The diagrams will always be paired. The left part shows in 3D fashion the faces U,R.F and the right part a view of the other three faces B, L and D.
It may be a bit hard to imagine individual cubies on a scrambled cube, if some stickers are hidden.
After a while you will become used to these diagrams, though.

Very often, it is sufficient to look at the left part, but if we want to know whitch stickers can be viewed e.g. on the L wall, we have to look at the right part.
Each sticker is in one of the faces and carries the name of that face

Very often I’ll call the U layer the “roof” and the D layer the cellar
and the vertical layers are “walls”


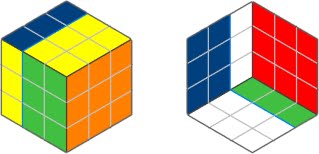
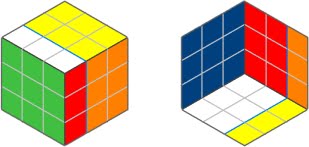
The 8 corners have 3 stickers each; only two of them are completely visible on one part of the diagram: UFR and LBD
Each corner is named by using 3 letters, the layer names.
When I use a corner position name like UFR , I mean the corner cubie currently at that place (the order of the 3 letters doesn’t really matter)

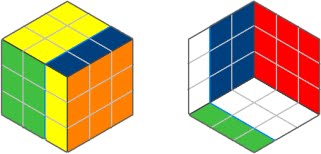
The 12 edges; only 6 of them are completely visible on one part of the diagram(UF, UR, FR; BL, BD, LD); the arrows indicate which stickers are on the edge cubies; Each edge is named by using 2 letters, the layer names.
When I use in the later text an edge position name like UF , I mean the edge cubie currently at that place (the order of the 2 letters doesn’t really matter)

I show all possible turns done on a solved Rubik’s Cube:
U

D
L
R

F
B
U’
D’


L’
R’
F’
B’


U2
D2
L2
R2


F2
B2

3. The white Cross
3. The white Cross
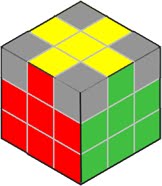
The first goal is the white cross and we make this in two steps, first the daisy on the yellow top face, second the White Cross
Our goal in this step

Part 1 of Step 1: We make a “daisy”, where four white petals surround the yellow centre.

first goal

We hold the cube with yellow on top.
(I’ll use for the following examples a cube with U =yellow, F =green that is scrambled by the sequence:R',U',F',R',B,L',D,R',U,B',U,F,
You could use the Gelatinbrain 3x3x3 to follow my sample solution)

This is an intermediate target pattern, because from there we can build the white cross easily. With “white cross” we mean a pattern where the four white edges sit correctly on the white (D) layer. Feel free to turn the whole cube around looking at the different walls, as long as yellow stays on the roof (U layer). In the example diagrams we leave the green face as the F face.
In this first step, the daisy, 4 white edge stickers need to be placed on the yellow U face.
We can locate the four edges with white stickers in the sample diagram: white/red at UF (the usual notation of an edge place is to use the two face names the edge is sitting in), white/green at BL, white/blue at UL and white/orange at FD.
On the yellow face there is no white petal so far.
We can recognize that the white/green edge sitting between the red and blue centre can be moved to the U face either by B’ anticlockwise turn of the blue face) or by L. Only L will place the white sticker on U. We do that and have:
We can recognize a first rule: If a white sticker is in the second layer, turn the non-white face so that the white sticker goes up.

L

We recognize a second white sticker in the second layer, the White/blue edge at FL.
The move F (the face where the blue sticker – the non-white - is in) brings a second white sticker to U:
F

We see two more white stickers in the second layers in the F face.
The next move is R to bring the white/red edge to the yellow U face
R

The last white sticker could be moved up by L’, but at UL there is white/green already. That can easily be changed by doing U’
U’

Now the move L’ can be done:
We have built the “daisy”
L’

Part 2 of Step 1: Finish the white cross
goal for Step 1

Now, we can send the white edges down by 180 degree turns. We have to match the “wall” sticker with the correct centre. The white/green edge is sent down by F2.
We turn U’ and match the white/blue edge with the blue centre on B.
We send it down with B2. Another U’ matches the white/orange edge with orange centre in R. We do R2.
The last is the white/red edge, currently at UF. We do U and match it with the red wall. Finally L2 completes the white cross.
While building the daisy, very often a case occurs that has not come up in this example: A white edge may be in the cellar (D) layer. Just make sure by turning U that a gap is above the edge cubie in the roof. If the white sticker is in the D face, just send it up by a 180 degree turn. If the white sticker is on a side wall, just do a 90 degree turn and the edge is now in the second layer. You can proceed as above.
Another case is that a white edge is in the roof, but the white sticker is on a side wall. Do a 90 degree turn and the edge is now in the second layer and proceed as usual. Please do some training, before you go on to the next chapter. After a while you will feel quite comfortable with these first two lessons. Many tutorials say: The white cross is trivial or even the white layer is trivial and we just go on to the next steps.
F2

U', B2, U', R2, U, L2

4. The White Corners – Finish the first layer
4. The White Corners – Finish the first layer
The white corners go into the cellar (D layer)
Our goal in this step
Step 2: Finish the white layer by pushing the white corners down to the cellar (D layer).
Obviously, a white sticker is on each white corner. In our example we see two white corners in the roof (U layer) and two in the cellar.
We choose white/green/orange corner at ULB (the notation for corner locations just uses the three faces that join at the corner)We place the first corner above the gap it has to go to, by U2


The target gap for this corner is at the cellar place FRD. We analyse the new situation and see that the white sticker is in the F wall and the orange sticker is in the orange wall. We turn the corner with a turn U out of the orange wall. (U’ would be wrong because the corner would remain in the orange wall.) Now we turn the target gap with R to the roof
U, R

U' sends the corner to the target gap
and R' sends it down to the correct place in the cellar.


The first corner is at the correct place and correctly orientated.
We note as a first rule for the white corners: Bring the target corner to the place in the roof that is above the gap in the cellar. If the white sticker is in a side wall – as in our first example case -, we turn the U face so that the corner travels away from the non-white wall, turn the gap up to the roof, put the corner into the gap and restore the wall.
By accident the corner white/red /green sits in the roof above the correct gap.
In this case the white sticker is on the roof face and not in a side wall as in the first case.
With L', U, L we keep it in the roof, but now the white sticker is on the R wall.
With U2 the corner goes back to the place above its target gap.


Now we can follow the first rule. With U it leaves the wall F (with the matching non-white sticker in.)
F brings the target gap to the roof.
U', F' place the second white corner correctly.


We have now a second rule for the white corners: If the white sticker of the target corner is on the roof, we turn a wall where the corner sits in and make a U turn to move the corner away from that wall. We restore the wall and move the target corner above the target gap again. Now we have the white sticker on a wall and apply the first rule above.
The next white corner white/blue/red in the roof has to go to the gap LBD. We turn the whole cube that the blue wall becomes F.
We turn the white/blue/red corner by U2 to the F wall.
R, U', R',


The white sticker is in the L side wall. U2,
We see that the white sticker is on the roof and follow the second rule.
U',
F', U, F


The third white corner is placed correctly. The forth is currently at LFD at the right place but orientated incorrectly. The white sticker is in the orange L wall, the orange sticker is on the blue (F) wall.
L', U', L, U sends the corner to the roof above the gap.
We follow rule number 1 and do:

U, F, U', F'
turn the corner away from the blue wall, turn the blue wall so that the target gap is on the roof, put the corner into the gap and restore the blue (F) wall.

5. Put Edges into the second layer
5. Put Edges into the second layer
Step 3: Move the correct four edges to the second layer.
In the second layer we have 4 centres and 4 edges – no corners.
Obviously none of the edges belonging to the second layer has a yellow sticker. Yellow edges belong to the roof. Now we will use the first time something called an algorithm. Do not be afraid, an algorithm is just a sequence of moves changing the cube in an intended way. We learn and memorize it and then we use it to solve the edges in the second layer.
We look for an edge that has its correct place in the second layer, but is currently on the roof.
In our example, we recognize the blue/orange in position UL. We see further that its wall sticker matches with the L wall (orange). That is exactly the situation we are looking for:
The gap is in the front wall F, either left or right. The target edge we will put into the gap matches with the side wall of the gap (in this case L).
We do the following manoeuvre: L, U, L, U, L, U', L', U', L' (algorithm I)
Our goal in this step


algo I
Before we look at the result, actually, we analyze this sequence of moves:
We count 9 moves.
The last 4 do exactly reverse the first four moves. If we do not the fifth move at all, the whole cube would remain unchanged.
We memorize it by saying: down, to, down, to, down, away, up, away, up.
Only the wall L and the roof U are turned. The up /down refers to the wall. The “to” means: turn the roof towards the gap, the “away” means: turn the roof away from the gap.
We need a mirrored version, too, where L becomes R' and U becomes U':


Before we go on with the other three edges of the second layer, we will look at our first algorithm executed on a solved cube:
down (L)


down (L)
to (U)
to (U)
down (L)


away (U‘)

away (U‘)
up (L‘)
up (L‘)


You see that the L wall and the roof U become very much scrambled temporarily, but at the end the whole cube is quite ordered again. If we add another U’ move (not necessary for the purpose here), you see that all together just three edges have moved: . The yellow/red, originally at position UL (the one in the L wall next to the gap FL) is now in the gap FL. That was the purpose of this manoeuvre.

Now back to the example. We see the green/red edge matching with the red wall,
but the gap it should go to is in the back wall. We turn the whole cube around and F becomes green again.
We recognize exactly the same situation as before and repeat the manoeuvre:
L, U, L, U, L, U', L', U', L'


The green/orange edge is our next target. We move it by U2 to the matching orange wall
This time we need the mirrored version of the algorithm. The sentence “down, to, down, to, down, away, up, away, up” remains the same. It translates to R', U', R', U', R', U, R, U, R


algo I (right)
The remaining red/blue edge has a blue sticker looking currently to the red wall. We turn the whole cube that blue becomes wall L
By U we move the blue/red edge to the matching blue wall
and do L, U, L, U, L, U', L', U', L' again.


algo I (left)
Second layer completed! (end of this long first example, we use a fresh example for the next step, because by accident we get here a yellow cross and would not need any orientation)
We can encounter the following case: We have yellow edges on the roof only, but the second layer is not yet completed. This means one or more edges are misplaced in the second layer. In our example, the red/green edge is at the correct place but orientated incorrectly. This is easy: With our algorithm L, U, L, U, L, U', L', U', L' we put a yellow edge into that place and the red/green edge is pushed to the roof.
Now we have a situation that we have covered, already. With U we match the green wall sticker with the green wall, turn the whole cube that green is our right wall and execute our algorithm at the right side.


6. Orientate the yellow edges
6. Orientate the yellow edges
(first part of the yellow cross)
(first part of the yellow cross)
Step 4: Yellow cross, first part. Flip edges (if necessary!)
Our goal in this step

When we have finished the second layers, the yellow edges can be in three different states (do not look at the corners in this stage at all!):
· All four yellow stickers are in the roof. Go to the next step
· no yellow stickers are in the roof; four edges need to be flipped
· two yellow stickers are in the roof; two need to be flipped
The nature of the cube does not allow that one or three stickers are on the roof. (If you ever see a cube with correct 2 layers and one or three yellow stickers on the roof, somebody has disassembled his cube and assembled it incorrectly.)

We learn our second algorithm: L, F, U, F', U', L' (algorithm II)

We analyze this sequence of moves
· We count six moves.
· Three layers are involved that meet at one corner (LFU).
· The first three moves are clockwise and involve the three different layers.
· The last three moves are anticlockwise and involve the same three layers in a different sequence
If all yellow edge stickers are on the roof, we do nothing and go the next lesson!
The two yellow stickers can come in two patterns: They build a line with the yellow centre, as in the example, or they build an L pattern.
Here are the six moves executed on a solved cube:


L
F
U


F’
U’
L’
Let’s cover the line case first:
We turn the U layer until the line goes from the F wall to the B wall.
We do our algorithm
How do we memorize this sequence best?
We do the first move along the yellow line, the second crosses the yellow line.
A memorizing sentence can be: the wall along, the wall across, the roof above, restore the wall, restore the roof, the first is restored at last.
If we ever forget it, it is still easy to remember that we have to do six moves, three clockwise, followed by three anticlockwise. The first two are wall moves, and the roof above them follows. If we reverse them in the wrong order it could be: L, F, U, U', F', L'. This would do nothing to the cube. As long as we remember the last move will restore the first, we should be able to recollect the algorithm.
If the two yellow edges build the L pattern, we turn the U layer until one yellow edge sticker is back and the other is right as in the picture to the right.
If we have no yellow edge stickers on the roof (like in this example),.

algo II
They build now the line. and we repeat our algorithm L, F, U, F', U', L'
We do our algorithm once and get this:
we do our algorithm once

Do not look at the corner stickers, just the edge stickers matter.
Again, we do not care about the yellow corner stickers at all. We recognize the L pattern, position it by U2


and solve it doing the algorithm twice: Done

7. Place the yellow edges correctly
7. Place the yellow edges correctly
Step 5: Yellow cross will be finished.
Our goal in this step
We can turn the roof and the whole cube freely and are looking for a situation where exactly one edge matches the F wall centre and the other three edges needs to be rotated clockwise. In the example no edge is matching.

We do a U turn, turn the whole cube clockwise and have the intended situation: The yellow/red edge matches with the red F wall, the other three edges need to move clockwise: yellow/green from UL to UB, yellow/green from UB to UR and yellow/blue from UR to UL.

The arrows in the picture show, why I’m talking about a clockwise rotation. We need a third algorithm for this:
R, U2, R', U', R, U', R’ (algorithm III)

We analyze this algorithm:
· We count 7 moves.
· Only the R wall and the roof U are involved. We start with a clockwise R and connect this with intended clockwise rotation. We alternate between U and R and the R turns alternate between clockwise and anticlockwise.
Here are the 7 moves executed on a solved Rubik’s Cube:

U2


R
R’
U’


R
U’
R’
A good way for memorizing the sequence is the following:, We concentrate on the corner in the cellar at our right (FDR) and the adjacent edge (in the example the red/green edge at FR). They always stay together.By the first two moves, this corner edge pair emigrates to the left wall (L= blue wall). The third move restores the R wall, except of the slot that our pair has left. Now the pair returns by four more moves and in a different way.
(If the pair would return by exactly the same three moves reversed, nothing is gained at all. The sequence R, U2, R', R, U2, R', would be a no-operation.)
Therefore the pair returns by a first anticlockwise turn of the roof, The following R move brings the slot for the pair to the roof again, the second anticlockwise roof turn pushes the pair back to its slot and the last R’ turn restores the R wall completely.
When we look at the result on our example above, we recognize that we have achieved our goal, the yellow cross is completed:

We have still to look at some special cases: all edges can be turned to their correct place by turning the roof. That’s easy, just turn U until you recognize that the cross is finished.

In this case (picture right), we have two matching edges at UF and UL.

We turn the roof by U and turn the whole cube clockwise

We recognize that we have one matching edge in the F wall, but the other three edges need an anticlockwise rotation.
We do a second U turn and see that no edges match at all. We do a third U turn, see one matching yellow/orange edge
and turn the whole cube that orange becomes our F wall.

We have reached the wanted situation, where exactly one edge matches the F wall centre and the other three edges needs to be rotated clockwise.
We use our algorithm
R, U2, R', U', R, U', R'U;

We see that this was a simple case, where two matching edges could be changed by simple U turns to the situation we want. Furthermore, we have seen that a situation with one matching edge and the three others needing an anticlockwise rotation can be handled by simple U turns as well.
There is another case of two matching edges that needs to be covered: Two matching edges in a line. In the example the red and orange (yellow) edges build such a line. Simple U turns do not change the situation: Either two edges match or none at all. We just do randomly our algorithm; in this case with F = red


Now, we have two matching edges, but in an L shape. We handle this as in the case above, by U turns until we get the situation we want, where exactly one edge matches the F wall centre and the other three edges needs to be rotated clockwise.
8. Orientate the yellow Corners
8. Orientate the yellow Corners
Step 6: We make the roof completely yellow. The corners will be correctly orientated but not yet at their correct place.
Our goal in this step

In this example we have no yellow corner stickers on the roof.

We can have the following cases:
Four yellow corner stickers are on the roof, the roof is completely yellow. We go to the next lesson.
No yellow corner stickers are on the roof. All yellow corners need to be orientated (as in the example).
One yellow corner sticker is on the roof. The other three corners need orientation.
Two yellow stickers are on the roof. The other two corners need orientation
The nature of the Rubik’s Cube does not allow a situation where three corners are correct and only one needs orientation!
What do we mean by “orientation”?
If we imagine, we could twist a corner around its tip, we want to twist a incorrectly orientated corners either clockwise or anticlockwise to get its yellow sticker to the roof.
Please, have a look at the green/yellow/orange corner at UFR. If we could twist it anticlockwise on its place, the yellow sticker would go to the roof, the green sticker to the F wall and the orange sticker to the R wall. Another case is the yellow/green/red corner at FRB (in the R wall back). This one needs a clockwise twist. Because we cannot twist them really on place, we need an algorithm!
Here it is R, F', R', F, R, F', R', F, (algorithm IV-clockwise)

We analyze it and see
We count eight moves.
The first four moves are exactly repeated by the second four moves. The usual notation for this would be
(R, F', R', F)*2. The four moves inside the brackets are repeated.
Only the R and F walls are turned.
Here are the 8 moves executed on a solved Rubik’s Cube:
R
F’
R’
F


R
F’
R’
F


Please, note that a single execution of this algorithm produces an intermediate result, only. The lower two layers are very much scrambled. The roof is almost unchanged, only the yellow/green/red corner got twisted clockwise. The interesting thing is: If we just repeat the algorithm twice more, the cube will be solved again, completely.
This can be used to turn three corner cubies clockwise, if we turn U in between the three executions of the algorithm!
How do we memorize this best?
The sequence will twist one corner at a time located in the F wall to our right (the corner cubie at UFR). We hold the cube completely stable. The yellow face remains U and the chosen F face (green wall in the example right) remains F until we have orientated all yellow corners. I call the place UFR the “twisting place” and my memorizing sentence is related to this “twisting place”. away, away, to, to, away, away, to, to.
The “away, away” means in this case an R move followed by F’. The walls turn away from the twisting place at UFR.

Be warned that this is a dangerous part of the solution. We may not turn the whole cube and we may not do a single wrong move.
We have to repeat this algorithm of 8 moves several times. Before we go on we need the brother sequence (which is the sequence above reversed): F', R, F, R', F', R, F, R', or (F', R, F, R')*2 (algorithm IV-anticlockwise)

(Please, rest assured that we will not need further algorithms to learn. The next lesson describes a method without anymore new algorithm.)
Here are the 8 moves executed on a solved Rubik’s Cube:
F’
R
F
R’


F’


R’

R
F

As in the clockwise variant of this algorithm, the lower two layers of the cube are pretty much scrambled. On the roof, a single anticlockwise twist of the yellow/green/red corner has happened.
The memorizing sequence remains the same: away, away, to, to, away, away, to, to
In the “anticlockwise” case, we just start with the F wall by F’.
Now, when do we do what and how do we apply the two algorithms?
We turn the whole cube that the first corner cubie that needs to be twisted in the F wall at our right (at UFR).
As I have said this is the twisting place. If the yellow sticker is in the F wall, we start by a R turn and do the 8 moves using our memorizing sentence away, away, to, to, away, away, to, to.
If the yellow sticker is in the R wall, the first move is F’.
We recognize a rule: The first turn moves the yellow sticker to the roof!
Let’s go back to our example
We see a cubie that needs orientation at the twisting place. The yellow sticker is on the R wall.
We start with F’ (the yellow sticker goes to the roof by this first move) and our first 8 moves are: F', R, F, R', F', R, F, R'


The first corner is twisted correctly; the roof is completely unchanged except of this single twist, the cellar (the white layer) and the second layer are pretty much scrambled. Do not worry; the first two layers will be OK at the end. We just go on and turn by U the second corner (the yellow/red/green) to the twisting place
We see a yellow sticker in the F wall (the green face)
We do R, F', R', F, R, F', R', F. As by a miracle the first two layers are OK again.


and start by R (the yellow sticker goes to the roof).

But this is no miracle: The second algorithm is the inverse of the first. After the first algorithm a tiny change has happened to the roof (the single twist at URF), the U turn in between has moved the next corner cubie to the twisting place. We do the second algorithm that twists the second corner and restores the scrambled first two layers.
The complete sequence has been: F', R, F, R', F', R, F, R' U R, F', R', F, R, F', R', F
If we leave out the U in the middle, nothing happens. By the U we move the first corner (twisted anticlockwise) away and the second arrives at the twisting place and gets a clockwise twist as necessary.
We continue with another U:

result is:

We see the yellow sticker in the F wall and start with R, the complete sequence is
A final U turn restores the edges at their correct place
R, F', R', F, R, F', R'


We do another U and see that the yellow sticker is in the side wall R: We start with F’ and F', R, F, R', F', R, F, R' finishes the yellow roof
Before we go on to the last step, we look at another example, where three cubies need to be twisted
We turn the next cubie to the twisting place by U
By U2 we turn the last corner to be twisted to the twisting place. The same situation the third time - yellow sticker on the R wall:


The corner at the twisting place has a yellow sticker on the R wall. We start by F’ and do:
We have the same case as before – yellow sticker on the R wall:

We have just to fix the edges by U.
away, away, to, to, away, away, to, to. = F', R, F, R', F', R, F, R',

away, away, to, to, away, away, to, to. = F', R, F, R', F', R, F, R',

and are done with this step

away, away, to, to, away, away, to, to. = F', R, F, R', F', R, F, R',
Actually, by the nature of the Cube, there are strict rules about the direction of the necessary twists:
If there are three, all need to be twisted in the same direction – either all clockwise or all anticlockwise.
If there are two, one needs a clockwise twist, the other an anticlockwise twist.
If there are four, two need a clockwise twist, two an anticlockwise twist.
9. Place last layer corners
9. Place last layer corners
Step 7: - We finish the cube!
Our goal in this final step

As promised, we do not need another algorithm for this last step.
We learn a method!
The method has three steps:
We turn the whole cube until in the front wall at your right (at UFR) we see a corner that is placed incorrectly. We push this corner cubie down to the cellar by R’ D’ R (This is not really an algorithm, right? We park the target corner in the font wall, down in the cellar, at our left = FLD)
We turn U until the target gap is at the exchange place – at UFR.
The target corner at FLD has two non-yellow stickers. The target gap is surrounded by two edges having these two colours.
We “park back” the target corner from FLD to the exchange place by reversing the first 3 moves:
R’ D R
We continue the last example above

We park the incorrectly place yellow/blue/orange corner from the exchange place to the cellar.(R’ D’ R) The yellow/blue/orange corner is now at FLD.

By U2 we turn the gap to the exchange place

We “park back” the yellow/blue/orange corner to the gap, by reversing the first three moves and do: R’ D R
We park the yellow/green/red corner at FLD by R’ D’ R


The gap we are looking for is between the blue and the orange edge on the roof.
By U we turn the next corner that needs replacement to the exchange place
We turn the red/green gap to the exchange place by U

R’ D’ R
and reverse the parking sequence by R’ D R

Hooray, Yippee! The cube is done!
Which cases can occur for the corner placement on the last (yellow) layer?
One is correct and three have to be placed correctly (as in the example above).
All four are incorrect.
All four are correct. We are done!
Obviously, three correct and one incorrect is not possible. All are orientated correctly at the beginning of this final step and if three are correct, the fourth has no other choice than to be on its correct place, too.
The nature of the Rubik’s Cube does not allow the case “two correct, the other two are exchanged (swapped)”. This cannot happen on a real Cube!
Here is an example with four incorrectly placed corners

We park the blue/orange corner by R’ D’ R
We park the blue/orange corner back to the roof by R’ D R
We park it by R’ D’ R
We park the blue/red corner back
and park it by R’ D’ R
and park it back by R’ D R

We place the blue/orange gap at the exchange place by U:


We turn the blue/red corner to the exchange place by U2


We turn the blue/red gap to the exchange place


We turn the last remaining untwisted yellow corner in the roof, the green/orange, to the exchange place by by U
We turn the green/orange gap to the exchange place by U


Nothing really bad can happen during this last phase of the solution. Just consequently follow the park / park back procedure and the cube will be solved at the end. The order in which you push the yellow corners to their right place does not matter.
10. Summary
10. Summary
I repeat the rules and algorithms without any further diagrams as a brief summary:
· The white Cross (becomes intuitively and easy with some practice)
o The Daisy on the roof
§ If a white sticker is in the second layer, turn the non-white face so that the white sticker goes up to a gap. (Make a gap by U turns)
§ If the white sticker is in the roof or in the cellar, move it to the second layer. Be sure you have a gap on the U layer.
o Send the white edges down to the cellar by 180 degree turns
· The white corners
o Bring the target corner to the place in the roof that is above the gap in the cellar. If the white sticker is in a side wall , we turn the U face so that the corner travels away from the non-white wall, turn the gap up to the roof, put the corner into the gap and restore the wall.
o If the white sticker of the target corner is on the roof, we turn a wall where the corner sits in and make a U turn to move the corner away from that wall. We restore the wall and move the target corner above the target gap again. Now we have the white sticker on a wall and apply the first rule above.
· Put the four edges into the second layer
o Turn the whole cube until the target gap is in the F wall, either right (FR) or left (FL).
o Match the target edge wall sticker with the L or the R wall.
o If target gap and target cubie are left do algorithm I (left): L, U, L, U, L, U', L', U', L'
o If target gap and target cubie are right do algorithm I (right): R', U', R', U', R', U, R, U, R
· The yellow Cross
o orientate the yellow edges by L, F, U, F', U', L' (algorithm II)
§ If you see a line, position it between UF and UB
§ If you see an L position it at UR and UB
o Position the yellow edges at their correct places
§ Look for one correct edge at UF and three other needing a clockwise rotation
§ do R, U2, R', U', R, U', R’ (algorithm III)
§ If you cannot make the start position by simple U turns, do algo III randomly and try again
· Orientate the yellow Corners – the roof will become completely yellow
(This may look dangerously at the beginning, because you mix up the lower two layers by the algorithm used. Hold the cube stable and move the U layer only between the algorithms, never turn the whole cube!)
o The twisting place is at UFR
o Turn the whole cube until a corner that needs a twist is at UFR
o If the yellow sticker is at R do
F', R, F, R', F', R, F, R', or (F', R, F, R')*2 (algorithm IV-anticlockwise)
o If the yellow sticker is at F do
R, F', R', F, R, F', R', F, (algorithm IV-clockwise)
o turn U until the next corner that needs a twist is at UFR
o repeat the procedure one, two ore three times, until all yellow corners are correct –
· Place the yellow corners at their correct place
o Exchange place is at UFR
o Park a corner that needs to be positioned correctly by R’ D’ R at LFD
o do an U turn until the target gap is at UFR
o unpark the corner
o repeat this procedure until the cube is solved, completely
Page updated
Google Sites
Report abuse