
Tanning Hides
Embedded Files
Indigenous Peoples have been tanning deer hides for centuries, but the process is more of an art than a science. Although all tribes used materials from the natural world to produce velvety-smooth leather, there were variations in techniques.
Tanning is the process of treating animal skin to create and maintain leather.
In Our Story
Determined to make use of every part of the deer, Sam sets to getting the deer hide tanned. His first product is a beautiful deerskin door to cover the cave opening in his tree.
Some Terms
Hide: We get the term “hide” from a Germanic word (haut), which essentially translates to “animal skin.” The word “hide” is usually reserved for the skins of a larger animal, like a moose, cow, or deer.
Skin: The term “skin” is usually applied to smaller animals (think sheep skin or snake skin). If the creature had hair, it may be preserved or removed in the tanning process, depending on a lot of variables. Skin can also be a catch-all term that includes furs and pelts.
Fur: The word “fur” is usually applied to a processed skin that retains its hair, often from bears, feline species, and mustelids (minks, weasels, badgers, otters, and wolverines).
Pelt: The origins of this word are a little murky. It may come from the Middle English word pelett (meaning animal skin), or it may not. Either way, this word can be synonymous with fur, or it can be applied to an undressed skin that will become a fur (leaving the hair, wool, or fur intact).
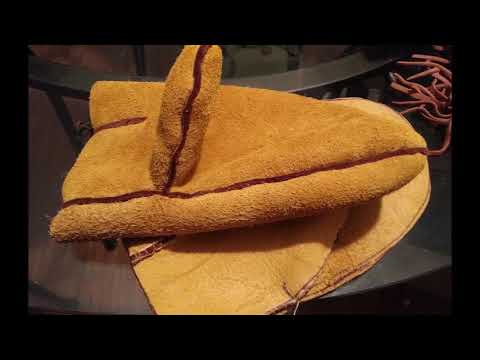
Buckskin: This is typically deer or sheep skin, tanned through a conditioning process and stripped of all hairs. Brains, egg yolks, fish oils, and other substances have been used to transform a stiff hide into a soft suede-like leather, though today, sheepskins that have been treated with chromate tanning chemicals are sold as “buckskin” (after dying them to resemble a smoked buckskin color).
Leather: Used for shoes, bags, belts, upholstery, and many other applications, “leather” is a hairless animal skin product that’s tanned with various vegetable tannins or chemicals.


Hair vs. Fur vs. Wool
Hair, fur, and wool are all made from the same substance (keratin) and are chemically indistinguishable from each other. These skin coverings are one of the features that differentiate mammals from other creatures (like birds or reptiles). Generally, the word “hair” is applied to humans and “fur” is used for animals, though some tanners will say that fur is a solid-shafted hair, like you’d have on a furbearer. Hair is also a hollow-shafted skin covering, like you find on a deer. Wool is another covering on the skin of an animal. It’s essentially a form of undercoat hair that is soft, curly, and never stops growing. Sheep, goats and a few other creatures grow the hair type that’s considered wool. The hair that most people would recognize as fur can have three layers, each one consisting of a different hair type.


Down hair: This is the undercoat or innermost layer of the fur, consisting of wavy or curly hairs. There are typically more down hairs in an animal’s coat than any other hair type, and these are primarily used for thermoregulation (creating an insulating layer next to the skin).
Awn hair: Filling the gap between down and guard hairs, the awn hair start off growing like guard hairs, but they become wavy and thinner about halfway through their growth. The tips of these hairs help shed water, while the bases of the hairs keep the animal warm.
Guard hair: Sometimes called the topcoat, guard hairs are longer, straighter, and typically coarser than the other hairs. These stick out through the other hairs, and are the most visible part of the coat. These hairs usually have the most color and gloss, giving the animal it’s markings and color. These longer hairs are protective, and many mammals can raise their guard hairs as a threat display when alarmed.
Cleaning the Hide
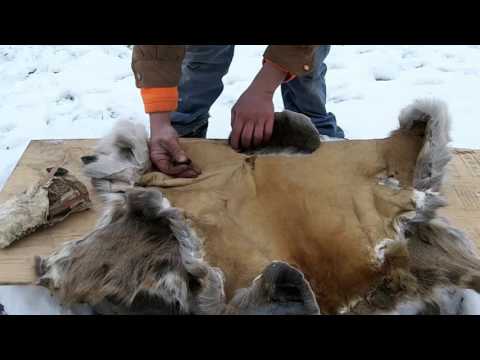
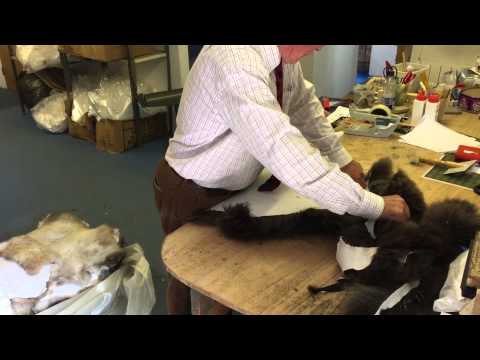
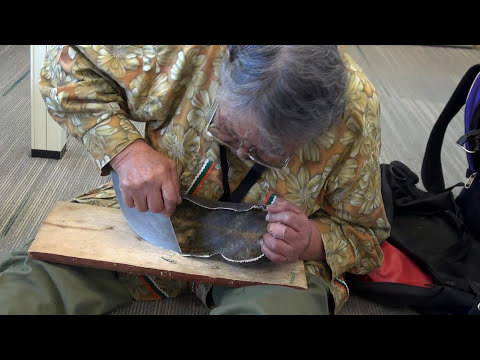
However you intend to transform your animal skins, there’s one universal step that you’ll need to take to prepare them for tanning, rawhide, or storage. The most essential part of your prep work is called “fleshing,” which is the removal of meat and fat from the hide. Meat will rot and lead to the decay of the skin. Fat will become rancid, and also contribute to decomposition. You’ll need to scrape all of the meat and fat off the hide as thoroughly as possible. If the hide has just been peeled from a fresh kill, the meat and fat can be scraped off the skin and thrown into a soup or stew. If the hide has been lying around for a few days (or for too many hours, in warm weather), the meat and fat pulled from it may no longer be safe for human consumption. In that case, use your scrapings for trap or fish bait. Fleshing can be done in different ways, but I prefer to scrape with the square edge on the back of a drawknife handle, while pressing the hide against a smooth log for support.
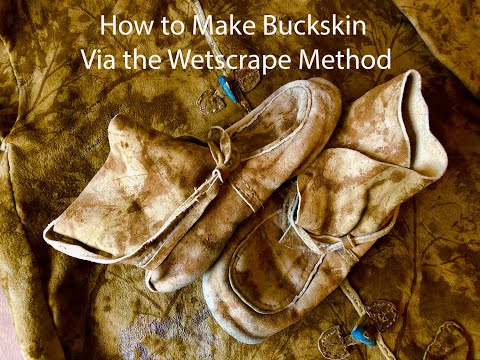
Brain Tan
Skinning and Fleshing: After the animal is skinned, the hide must be carefully fleshed to remove any leftover fat and tissue.


2. Initial Soaking: The hide must be soaked in water for up to three days. This allows the hair to slip, or loosen, and raises and softens the grain layer of the hide.
3. Graining: After the hair begins to slip, the hide must be thoroughly scraped to remove all the hair, the follicles, and a portion of the grain, or the outer layer of hide. “This can be the most intensive step of the process—pretty labor intensive and meticulous,” “Any patches or streaks of grain left on will become dry and stiff, and will impede the brain penetration.” Good scraping tools are the hump ribs from bison, but elk and deer ulna or radius bones also work well.


4. Membraning: This critical step involves removing the the first layer of mucous membrane from the fleshy side of the skin. If this membrane is not removed, the brain mixture won’t be able to penetrate the skin and your hide will never get soft.
5. Wringing: Wringing helps further break down the mucous membrane and, done properly, leaves the hide with the proper water content for maximum flexibility. This is usually accomplished by attaching the hide to an anchor point and then twisting it around a large stick to remove as much water as possible.
6. Braining: Animal brains are heated in water (approximately 1 pound of brain per hide) so that the braining solution has the consistency of “a brain milkshake.” (A note to the squeamish: Eggs, oil, and soap will also work, though not as well as brains.) The water should be very warm but not so hot that you can’t put your hands into the brain solution. Put the skin in a tub containing the solution and massage the hide by hand to help the emulsifiers in the brain tissue penetrate the hide. Most hides take two brainings, but some may take up to five.


7. Hand-Softening: This is critical to producing the soft, supple feel of traditional buckskin. After the final braining, the hide should be worked across a firm object (the backs of chairs work well). Properly softened, the hide should be supple even after it gets wet. After washing buckskins, the hide may take a bit of manual manipulation to soften completely, but that it should take only a few minutes to make the clothing supple after a wash.
8. Smoking: You can stitch two hides together into a modified bag and suspends them over a smoker. The key is to use punky wood, which creates smoke without flame. The bag design traps the smoke in the hides and gives the finished buckskin a distinctive color and smell based on the wood used; sage gives the hide a yellow hue, and Douglas fir gives the skin a brown finish. The smoke acts as a preservative.

Or.. Stretch it out (And then smoke)
Build a rack: Your drying frame, or rack, can be made out of wooden poles or lumber. Most of my deer-hide racks are usually 6- by 4-foot rectangles. Two-by-four lumber is the sturdiest material for a rack that is still light enough to carry around with a hide tied up in it. Nails, screws, bolts, cords, or even strips of deer hide can be used to fasten the corners of any rack, although several screws in each corner are the most durable and sturdy fasteners.
Cut the cord: Any cord or rope will be fine for stretching the hide. Nylon Marine rope, cotton clothesline, hay bale twine, or strips of deer hide will work. You’ll find your own favorite. Keep the cord after tanning, as all the different-length pieces will allow you to get the next hide stretched on the rack faster.
Racking out the hide: This step involves slicing holes around the edge of the hide, so that cord may be threaded through these holes to tie the hide up in the rack. Set the hide and rack on the ground, with the hide in the center of the rack. Spread out the hide, flesh-side up, and with your knife, slice holes parallel to the edge of the hide. These should be 1-inch in from the edge, about 2 inches long, about 4 to 6 inches apart, and on every available “corner” of the hide. Next, use 3- to 6-foot lengths of cord to tie the legs of the hide to the corners of the rack. You want the hide centered and symmetrical in the rack. Don’t tie it too tightly, yet.
Now tie up the neck area more tightly than the legs. After the four legs and neck are tied up, you can tie up the rest of the hide. Tie the cords tightly to make the hide perfectly flat, taking care with the tender skin around the rump and “armpits.” This tender skin will rip if it’s pulled too tight. If a hole rips out, just cut another hole to use and don’t tie it as tightly next time.


Making Clothes
Indigenous Americans and other cultures around the world have utilized the hides of animals for their clothing for thousands of years. But taking the hide off a dead animal and making it into soft, supple clothing that has the ability to last for hundreds of years is a true art, and is no simple task. Clothing made of buckskin is luxurious and outrageously expensive--rightfully so, as the steps to make this wearable art are complex and take a lot of work.


Measure your body for the materials. Depending on what type of garment and what style of clothing you are making, the amount of material you use will vary greatly, but the measurements of how they fit to your body will remain the same regardless. Always allow some space over your measurements for the room to move about and be comfortable in your buckskin clothes. It is also critical that you make sure your hides have been treated so they will not shrink when wet. In the old days, they did this with smoking.
A standard shirt will need a minimum of three deer hides, or one large elk hide. Leggings or trousers will need at least one, possibly two deer hides per leg, or one large elk hide.
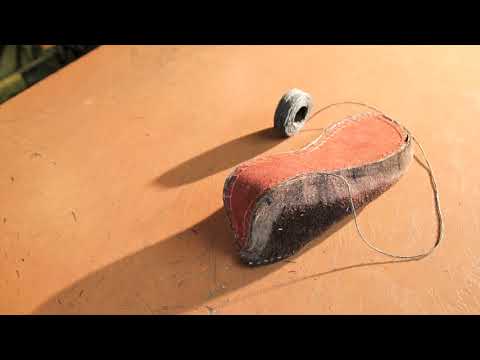
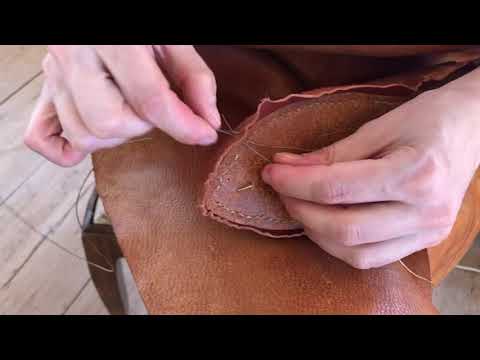
Using the awl, and applying pressure against the pointed end, mark your pattern on the hides. Check and double check your measurements! You cannot afford to mess up and ruin the buckskin you have worked so hard to attain. Cut out the pattern and align your garments. Remember to allow plenty of extra room on the edges for beautiful fringe work if desired.


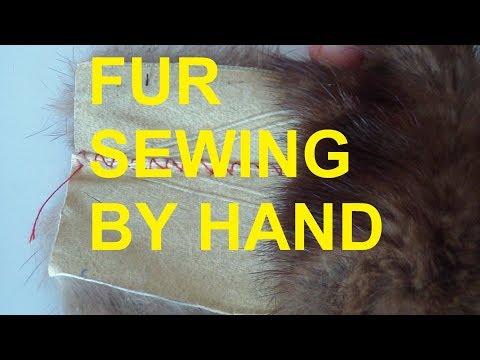
Sew your clothes according to the pattern. Authentic looks use sinew or simulated sinew thread. But you can use heavy duty sewing thread. Make sure you do a good job, and that you make clean punctures with your awl. Do not tear your buckskin; if you do, you will need to surround the hole with stitches to prevent further tearing. Buckskin is SKIN, and once a tear starts, it is likely to continue unless you use preventative measures.


Again In Our Story..
Realizing he has grown several inches and will need new clothes, he plans to trap another deer. Using some of his homemade salt as lure to the animals, he sets a trap, but is thwarted by The Baron, the weasel who lives near his home. Eventually the deer trap works, giving Sam a second deer, and he begins making himself a deerskin suit. CH 11


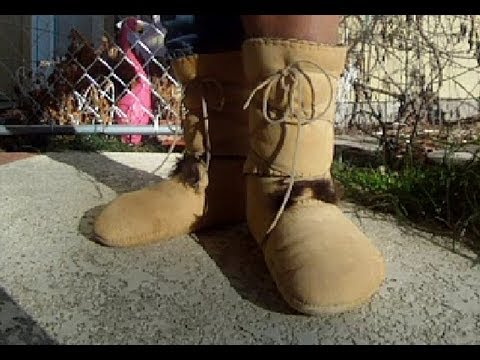
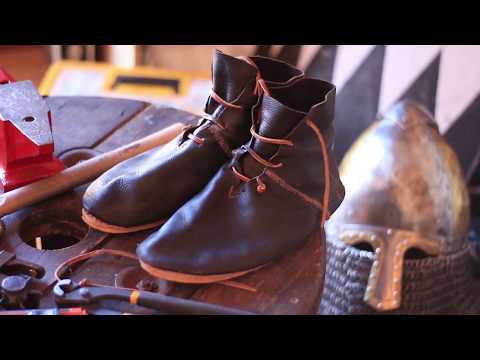
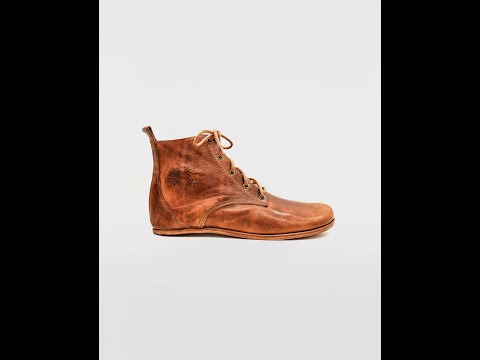
Making Shoes
A shoe is an item of footwear intended to protect and comfort the human foot. Shoes are also used as an item of decoration and fashion.
Ha. What? We all know what shoes are.


Shoes coincide with the Neolithic Age (or New Stone Age) and although speculative footprints indicate a presence before this, absence of archeological evidence makes it impossible to date when shoes started to be worn. The wide geographical locations (including America, China, Egypt and Mesopotamia) support footwear was a spontaneous innovation made from available resources and contemporary with the development of basketry. In the spirit of zeitgeist, sandals reflect the latest technology and influence historical events.


Historically, the design of shoes has varied enormously through time and from culture to culture, with form originally being tied to function. Though the human foot can adapt to varied terrains and climate conditions, it is still vulnerable to environmental hazards such as sharp rocks and temperature extremes, which shoes protect against. Some shoes are worn as safety equipment, such as steel-toe boots which are required footwear at industrial worksites.
The earliest known shoes are sagebrush bark sandals dating from approximately 7000 or 8000 BC, found in the Fort Rock Cave in the US state of Oregon in 1938. The world's oldest leather shoe, made from a single piece of cowhide laced with a leather cord along seams at the front and back, was found in the Areni-1 cave complex in Armenia in 2008 and is believed to date to 3500 BC. Ötzi the Iceman's shoes, dating to 3300 BC, featured brown bearskin bases, deerskin side panels, and a bark-string net, which pulled tight around the foot. The Jotunheimen shoe was discovered in August 2006: archaeologists estimate that this leather shoe was made between 1800 and 1100 BC, making it the oldest article of clothing discovered in Scandinavia.

The oldest known shoes were discovered in Fort Rock Cave, Oregon (1938). Made from woven sagebrush bark. Radiocarbon dating indicates these are at least 10,000 years old. A simple platform (made from woven fabric) with toe and heel attachments (thongs) woven from rope. The Oregon sandals had a base made of five pieces of rope (longer than the foot) and woven together with loops left on either side. The front part was folded to protect the toes and the sandal was strapped with a thong which linked the side loops. Rabbit fur and pine needles were sometimes added for comfort. These early sandals are consistent with a high calibre of basketry.

The world's oldest leather shoe, made from a single piece of cowhide laced with a leather cord along seams at the front and back, was found in the Areni-1 cave complex in Armenia in 2008 and is believed to date to 3500 BC.
The world's oldest leather shoe, made from a single piece of cowhide laced with a leather cord along seams at the front and back, was found in the Areni-1 cave complex in Armenia in 2008 and is believed to date to 3500 BC.

Many early peoples in North America wore a similar type of footwear, known as the moccasin. These are tight-fitting, soft-soled shoes typically made out of leather or bison hides. Many moccasins were also decorated with various beads and other adornments. Moccasins were not designed to be waterproof, and in wet weather and warm summer months, most Native Americans went barefoot.
Many early peoples in North America wore a similar type of footwear, known as the moccasin. These are tight-fitting, soft-soled shoes typically made out of leather or bison hides. Many moccasins were also decorated with various beads and other adornments. Moccasins were not designed to be waterproof, and in wet weather and warm summer months, most Native Americans went barefoot.

The simplest Roman shoes are carbatinae; a sort of moccasin-like sandal made from a single piece of cattle hide with a seam up the back, cut into loops and laced over the foot. Despite their simplicity, carbatinae were often decorated with openwork heels and elaborate arrangements of loops. Roman clothing was seen as a sign of power, and footwear was seen as a necessity of living in a civilized world
The simplest Roman shoes are carbatinae; a sort of moccasin-like sandal made from a single piece of cattle hide with a seam up the back, cut into loops and laced over the foot. Despite their simplicity, carbatinae were often decorated with openwork heels and elaborate arrangements of loops. Roman clothing was seen as a sign of power, and footwear was seen as a necessity of living in a civilized world

Roman soldiers were issued with chiral (left and right shoe different) footwear. Shoes for soldiers had riveted insoles to extend the life of the leather, increase comfortability, and provide better traction. The design of these shoes also designated the rank of the officers. The more intricate the insignia and the higher up the boot went on the leg, the higher the rank of the soldier.

Egyptians had developed advanced shoemaking skills for their time, and they created sandals woven of reeds or leather that were quite similar in design to many modern sandals. Though the design of Egyptian sandals was simple, the wealthy still found ways to adorn them.
Egyptians had developed advanced shoemaking skills for their time, and they created sandals woven of reeds or leather that were quite similar in design to many modern sandals. Though the design of Egyptian sandals was simple, the wealthy still found ways to adorn them.

Viking shoes were made from goatskin or calfskin, and according to shoes surviving from a Viking settlement in York, they could vary greatly in style. Viking boots were rarely higher than ankle length, and were often closed with stitching on the inside, which probably made the shoes more durable. Shoes were secured with either laces that wrapped around the ankles or buttons. Men and women’s shoes appear to have been very similar.
Viking shoes were made from goatskin or calfskin, and according to shoes surviving from a Viking settlement in York, they could vary greatly in style. Viking boots were rarely higher than ankle length, and were often closed with stitching on the inside, which probably made the shoes more durable. Shoes were secured with either laces that wrapped around the ankles or buttons. Men and women’s shoes appear to have been very similar.

Wooden footwear often ended up as firewood and, because of its nature, wood will rot away in the long run. The oldest surviving wooden footwear in Europe is found in Amsterdam and Rotterdam, the Netherlands, and dates from 1230 and 1280.These finds look very similar to the wooden shoes that are still worn in the Netherlands.
Wooden footwear often ended up as firewood and, because of its nature, wood will rot away in the long run. The oldest surviving wooden footwear in Europe is found in Amsterdam and Rotterdam, the Netherlands, and dates from 1230 and 1280.These finds look very similar to the wooden shoes that are still worn in the Netherlands.

Paduka is an ancient form of footwear in India, consisting of little more than a sole with a post and knob which is engaged between the big and second toe. It has been historically worn in South Asia and Southeast Asia. Paduka exist in a variety of forms and materials. They might be made in the shape of actual feet, or of fish, for example, and have been made of wood, ivory and silver.

Archaeological finds show that as early as 7,000 years ago, ancient Chinese had learned to make articles of daily use from plant fibers. Certain researchers believe that bamboo needles and flax thread date back even further than bone needles and hide threads. Different types of leaves and leaves would be woven together to create these types of shoes
Archaeological finds show that as early as 7,000 years ago, ancient Chinese had learned to make articles of daily use from plant fibers. Certain researchers believe that bamboo needles and flax thread date back even further than bone needles and hide threads. Different types of leaves and leaves would be woven together to create these types of shoes

While China’s people in the east were making straw shoes using bamboo needles and flax thread, China's northern and northwestern people were sewing hide boots and shoes with bone needles and thread.
While China’s people in the east were making straw shoes using bamboo needles and flax thread, China's northern and northwestern people were sewing hide boots and shoes with bone needles and thread.

The earliest pair of leather shoes in existence in China is a 4,000-year-old pair of boots made from sheep hide, worn by a mummified female corpse discovered in the ruins of the ancient kingdom of Loulan, in the deserts of Xinjiang Uygur Autonomous Region.
The earliest pair of leather shoes in existence in China is a 4,000-year-old pair of boots made from sheep hide, worn by a mummified female corpse discovered in the ruins of the ancient kingdom of Loulan, in the deserts of Xinjiang Uygur Autonomous Region.
Making Dye
Natural, earthen pigments have been used since prehistoric times, with the earliest written record of their application dating back to 5000 BC. Civilizations from all over the world have utilized organic material from plants, animals, and minerals to create color they could apply to surfaces to create representational forms. Each civilization has had a unique method for creating and using natural dyes, and we’ve seen these methods transcend generations from antiquity, to the Renaissance, to contemporary practices today.


Natural pigments continued to be the base for oil paints until the 19th century when synthetic and petroleum-based pigments were introduced. Many artists working today use natural materials as they’re environmentally-friendly and surprisingly easier to manipulate. Natural pigments are also used in printmaking, spun into paper threads for weaving and stitching, used to produce oil and wax crayons, and are even used in silk painting in Asian art.


A natural pigment is one that is found in nature that is ground, sifted, washed, and in rarer cases, heated to create a desired hue. Since their inception, natural pigments served many artistic purposes for ancient cultures around the world. The first paintings, from prehistoric times, were cave paintings applied by brushing, smearing, dabbing, and even spraying techniques. Artists used whatever pigment was available to them through natural resources. This included earth pigments such as red and yellow ochre, charcoal, white from ground calcite, and green from various minerals .
Mineral

Earthtones from cream to brown to red and yellow. Ochre is a natural mineral consisting of silica and clay owing its color to an iron oxyhydroxide mineral, goethite. It is found throughout the world, in many shades, in hues from yellow to brown. The best brown ochre comes from Cyprus. Used throughout history, this permanent pigment can be safely mixed with other pigments.

Well ground charcoal has often been used as black pigment. In India, charcoal prepared from twigs and woods of tamarind tree after burning in a closed pot, is powdered to make black pigment. Some other substances which after charring were used for preparing black pigment are the shells of almonds and coconuts. The charcoal so produced is soft and gives homogeneous and fine black pigment.

Chalk is found with limestone deposits and has been used as pigment from very early times. In India, conch shell white was favoured by artists and is believed to have special properties. Archaeological evidence dates back to the use of zinc white as pigments in India before it was introduced in Europe. Other white pigments are Talc, Barium White and Titanium White.

Terre-Verte (Green Earth), Malachite and Vedgiris are examples of green pigments. Among them, terre-verte has been the most widely used since earlier times. Green earth is a mixture of hydrosilicates of Fe, Mg, Al, and K (gluconite and celadenite) but other minerals are likely to be present. The color of green earth, depending on the source, varies from place to place. The hues are from yellow green to greenish grey and are not affected by light or chemicals. Malachite is a copper carbonate hydroxide mineral. This opaque, green banded mineral crystallizes in the monoclinic crystal system. Vedgiris was a common pigment used in paintings. It is the normal acetate of copper and is prepared by the action of vinegar on copper foils. The pigment obtained is very bright and deep green.

Bio-colorants
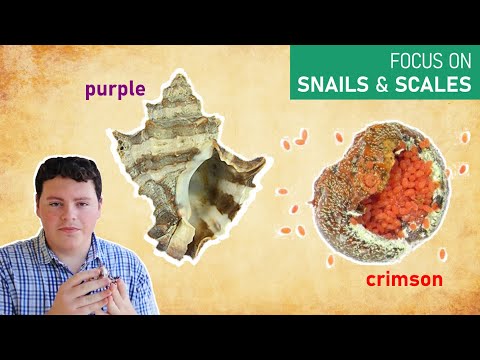
Natural dyes come from animal or plant sources while synthetic dyes are manmade. Until 1856, if you were trying to dye clothing, you would have had to use natural dyes. Some of the most common natural dyes include tyrian purple, cochineal red, madder red and indigo blue.

Madder came from the roots of 35 species of plants found in Europe and Asia. Madder roots have been used as a dye for over 5,000 years. Archaeologists have found traces of madder in linen in Tutankhamen’s tomb (1350 BC), and in wool discovered in Norse burial grounds.

Indigo was mainly used as a dye and pigment. It was derived from a shrub-like plant that was soaked in water and then beaten with bamboo to quicken oxidation. During this process, the liquid changes from green to dark blue. It is then heated, filtered, and formed into a paste.

Cochineal is a crimson dye made from cactus insects. It was introduced to Europe from Mexico by the Spanish. It was used as a cloth dye, artists’ pigment, and much later as a food dye. This also required a huge seasonal harvest seeing as 17,000 dried insects produced a single ounce of dye.

The Phoenicians' “Tyrian purple” came from a species of sea snail now known as Bolinus brandaris, and it was so exceedingly rare that it became worth its weight in gold. ... It took as many as 250,000 mollusks to yield just one ounce of usable dye, but the result was a vibrant and long-lasting shade of purple.
Vegetable/Tannins
There are other dyes, they can be extracted from roots, wood, bark, berries, lichens, leaves, flowers, nuts, and seeds. Others come from insects, shellfish, and mineral compounds. Their range of colors is narrow and produce shades that have little color value. You have to use some kind of mordent when dying with most to ensure colorfastness. Many dyes require a mordant, an element that combines with a dye and the fiber so that the dye is absorbed. These dyes are referred to as “adjective dyes.” Those that don’t require mordants are called “substantive dyes.” Common mordants include iron and tin.
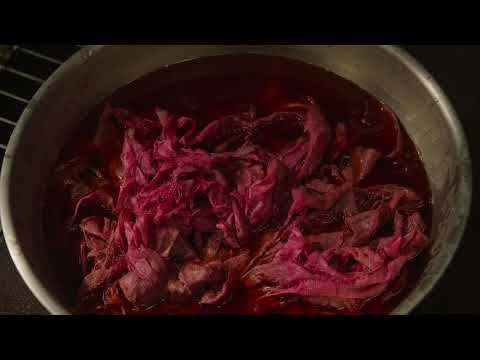
Avocado pits make pink. Blueberries create violet. Dried marigolds yield yellow. Start a dye garden with the family, and/or use things around and about and you can make these natural dyes—beets, spinach, onion skins, turmeric, and red cabbage create a brilliant range of colors perfect for any project.


Here is a cool website with much information about many natural pigments. It's pretty cool. http://www.webexhibits.org/pigments/indiv/overview/zincwhite.html

Mordent
Instructions for using a mordant or fixative:
Let’s use salt for this example, because it’s something everyone has in their pantry.
For every gallon of water, use 1 cup of salt. This is a 16 to 1 ratio.
Bring to a boil.
Soak your fabric in the water and bring down to a simmer.
Stir occasionally, for an hour.
Allow the fabric to cool in the water.
To dye the fabric, follow the instructions below, placing the still wet fabric into the dye bath.

Setting a Dyebath
Dye Bath: (Turmeric for example here)
Fill a stockpot ¾ of the way full and bring to a boil.
Add 2 tablespoons of powdered turmeric – you can always add more for a deeper yellow, but you can’t take it back.
Place your fabric in water and stir occasionally.
Leave it in the simmering water for at least 10 minutes.
After 10 minutes, pull your fabric out of the dye bath and hang to dry.


When your fabric is dyed, be careful not to wash it with other items. Wash it on its own at least 10 times, or until the water it is in washed in runs clear. You can test this by soaking it overnight and checking to see that no color transfers to the water. If you have not used a fixative, your fabric may never stop transferring its color.
For best results, your fabric should be 100% natural fiber, like cotton or wool. Modern linens may work, but many have been treated with wrinkle resistant products that impede dying. Begin with a relatively pale color, like white.
Ink


History is full of ink. From Paleolithic cave paintings to parchment scrolls to printed books, ink has recorded human history for over 100 millennia. Even the Kindle makes use of e-ink (a reusable ink that sits just below the surface of the screen), reminding its readers that ink is hardly a thing of the past. All inks are a means and method of communication – the first and longest-running form of information technology.

Around 1200 B.C., an inventor from China named Tien-Lcheu created a black ink for writing by experimenting with pine tree soot and lamp oil. He then added gelatin to the mixture that was made from the skin of a donkey with some addition of musk. All these ingredients created the first black writing ink that became very popular in China and the surrounding area. So much so that some tried to improve on the formula by substituting natural dyes and colors from plants and minerals. This included salt, gum, and nutgalls. This became the standard ink formula of that time.
Egyptians had also created their own form of ink around 2500 B.C. by blending a mixture of carbon and gum to create it. Once formulated, it was dried in the shape of sticks. Once thoroughly dry, the sticks were dipped into water and readied for use on papyrus paper.
Around the 4th century, an ink known as “masi” emerged in India. The Indians created this ink from charred bones and tar. This is commonly known today as “India ink.” It is a popular ink still today in India, China, and Japan as well as with artists who find that the bright colors and permanence of the ink makes it enjoyable and practical to use.


On a basic material level, inks consist of two components: colour and a way for that colour to attach itself to its intended surface, be it papyrus, parchment or paper. But the way that those elements combine, and the ingredients used to make them, offer a variety of permutations, proving ink to be one of the most curious and complex objects in human history.


Page updated
Google Sites
Report abuse